
In my previous posts of this series, I explained the core components and authentication flows of Microsoft Entra Agent ID and steps to create Agent identity blueprints and Agent Identities. If you haven’t read it yet, I recommend doing so before continuing with Part 03.
Part 01 – Step-by-Step guide to Microsoft Entra Agent ID – Part 01 – Authentication Flows https://www.rebeladmin.com/microsoft-entra-agent-id-part1/
Part 02 – Step-by-Step guide to Microsoft Entra Agent ID – Part 02 – Create Agent identity blueprints and Agent Identities https://www.rebeladmin.com/microsoft-entra-agent-identity-part2/
In this blog post, we will explore how to control access to agent identities using Conditional Access policies. One of the primary goals of Entra Agent ID is to enable organisations to manage and govern agent identities using the same familiar tools and security controls already available within the Microsoft Entra ecosystem. Conditional Access is a foundational component of modern access control, and now those same capabilities can be extended to agent identities.
There are several scenarios where Conditional Access policies can be applied to agent identities. However, it is important to understand that agent identities do not follow the same authentication patterns as interactive user sign-ins. Controls such as MFA enforcement or session management are typically not applicable to agent identity sign-in flows. As a result, Conditional Access for agent identities is primarily focused on making grant or block access decisions based on defined conditions and policies.
In this particular blog, I will focus on Attribute-driven Conditional Access and how it can be used to securely manage and govern access for agent identities.
In an enterprise today, it is not uncommon to have dozens — or eventually hundreds — of AI agents running across different business units. Each agent needs its own identity, and each identity needs access controls. Manually adding every agent identity to every Conditional Access (CA) policy is operationally unsustainable and error-prone.
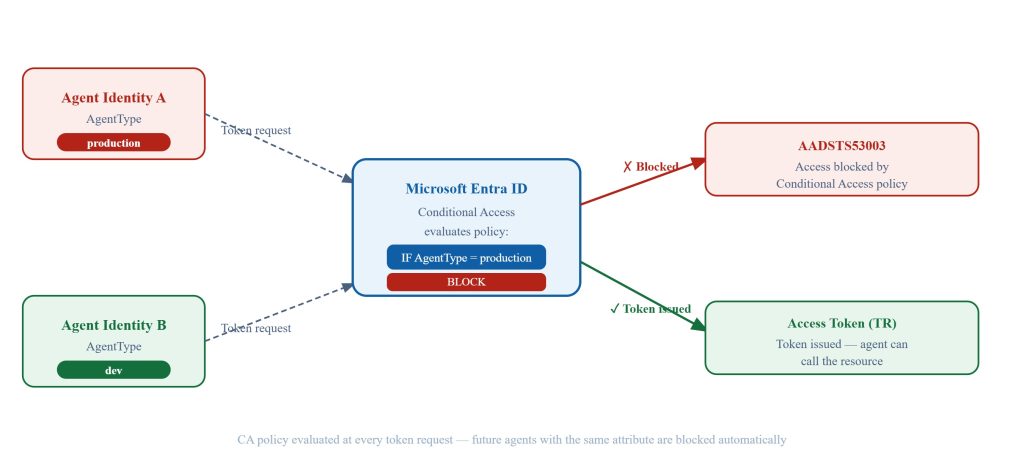
Microsoft Entra Agent ID solves this with Custom Security Attributes — business-defined key-value labels you attach to agent identities in Entra ID. Conditional Access policies then use these attribute values as targeting filters, so a policy like “block any agent where AgentType = Production“ automatically applies to every matching agent — including ones created in the future — without ever touching the policy again.
Scenario
In this demo I am covering the following scenario.
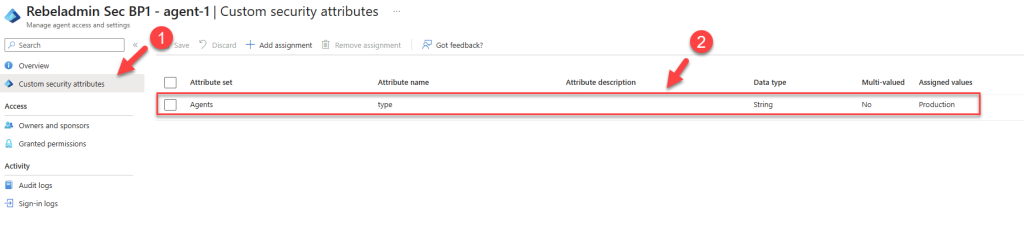
- I have a “custom security attribute set” setup in Entra ID for Agents. In there I have attribute called “type” with predefined values of “Dev”, “Test” and “Production”

Note : If you are new to security attributes you can learn more about it from https://learn.microsoft.com/en-us/entra/fundamentals/custom-security-attributes-overview
- Then this value will be recorded in each Entra Agent identities to recognize the operation boundary of the agent. In this demo I am using agent identity called “Rebeladmin Sec BP1 – agent-1” and I already defined value for attribute “type” as “Production”
- I also have an app called “rebeladmin-protected-resource” which have access to some synthetic data which used for dev, test purposes.
- I want to restrict access to this application for all agents where the security attribute is set to type=Production.
Prerequisites
Before proceeding with the Conditional Access policy configuration, ensure that the following prerequisites are met.
- Custom Security Attribute set defined in Entra ID and relevant values also added under each agent. You can find more info about security attribute values in here https://learn.microsoft.com/en-us/entra/fundamentals/custom-security-attributes-overview
- Relevant licences in place to use Conditional Access policies
Create the Conditional Access Policy
Let’s go ahead and create the conditional access policy to cover above scenario.
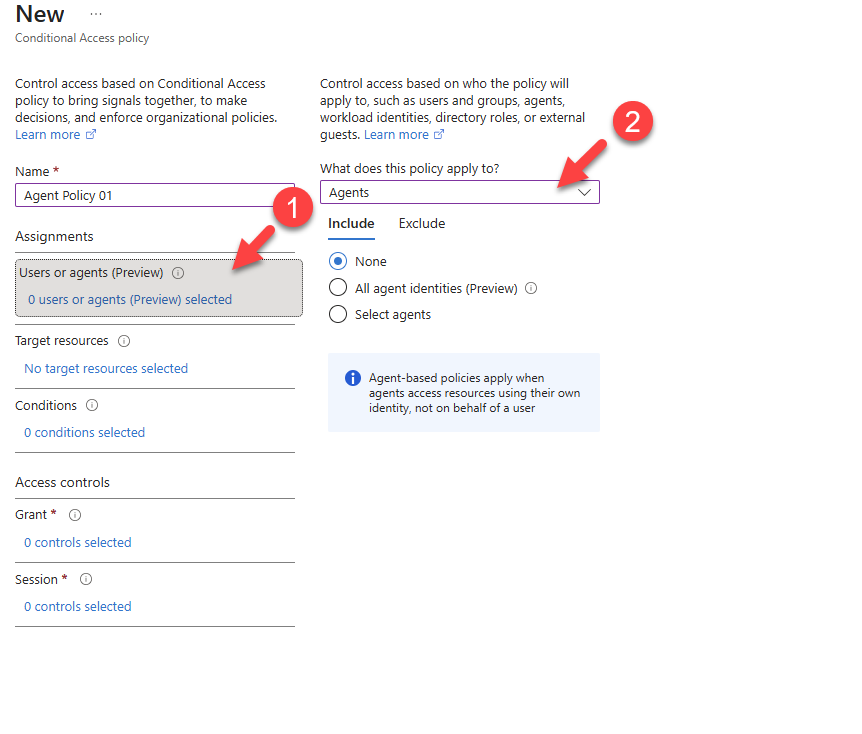
- Go to Entra admin Center > Conditional Access > + Create new policy
- Click on Assignment and then What does this policy apply to? —change from Users to Agents
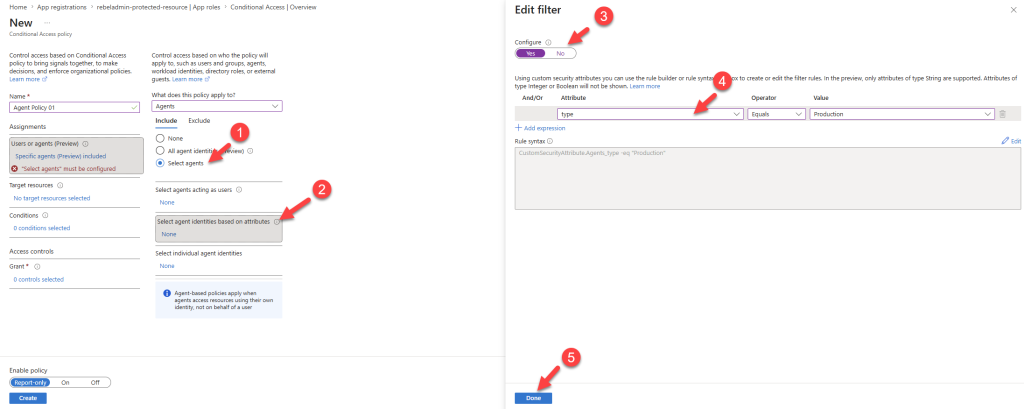
- Next, click on Select agents > Select agent identities based on attributes. In Edit filter, enable it by selecting “Configure”. Then set the attribute to match following condition “type = Production”. Once condition is define click on Done.
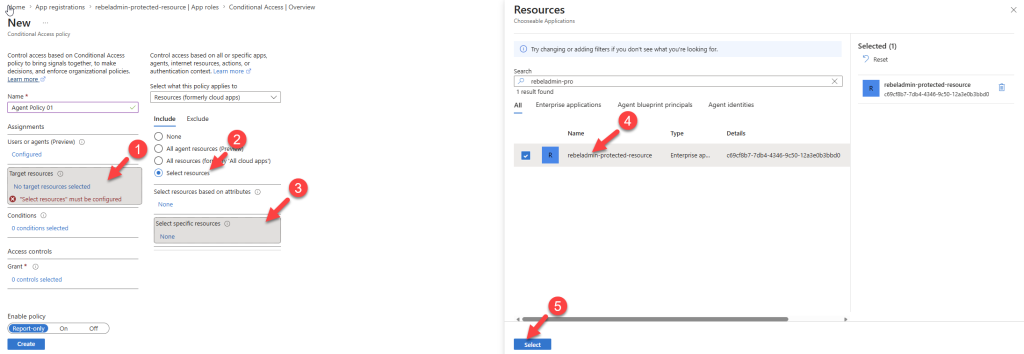
- Click Target resources > Select resources > Select specific resources. Then search and select the relevant app from the list.
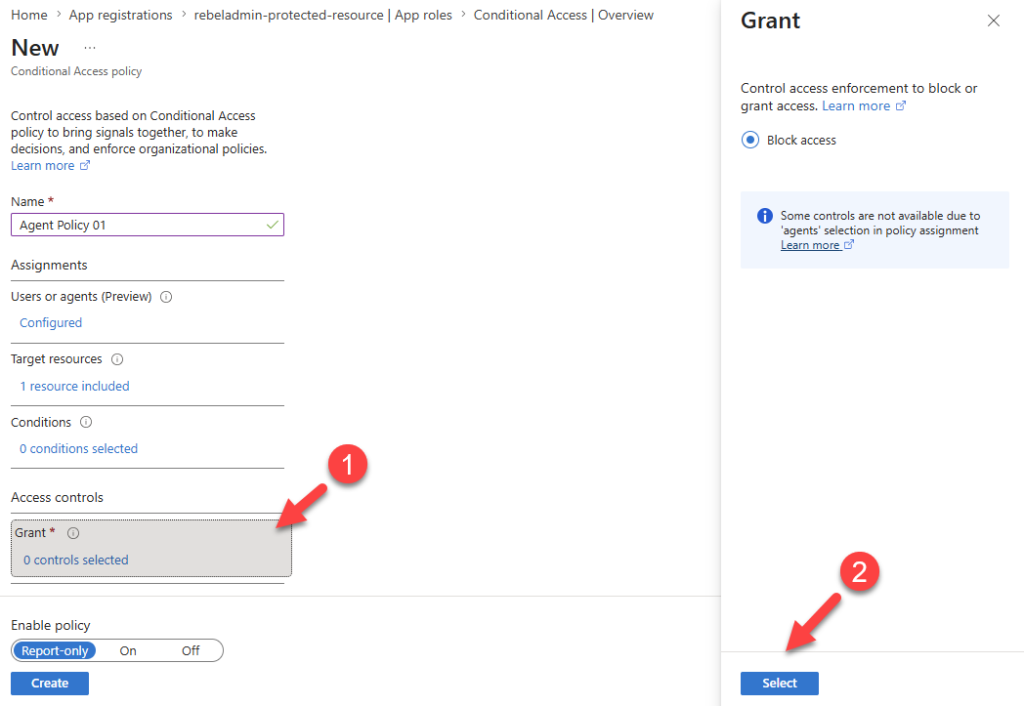
- Under Access Controls click on Grant* and make sure Block access is selected. Then to confirm click “Select”
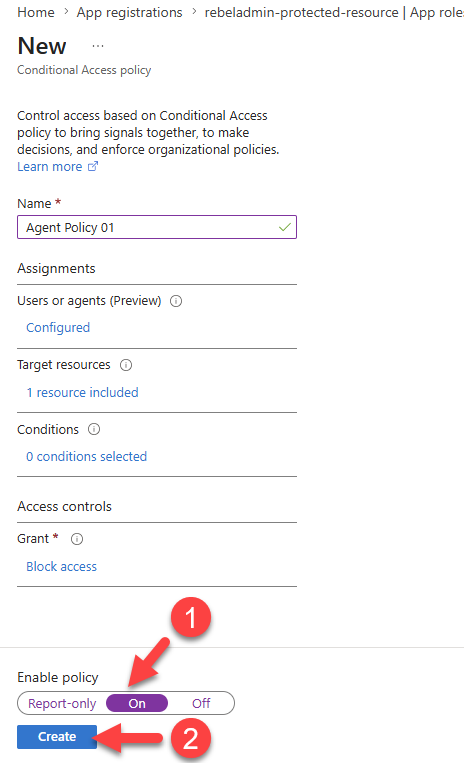
- Finally, under Enable Policy select On andclick on Create to complete the process.
Testing
Now we have a conditional access policy is running and next step is to confirm this is working. For this I am trying to demonstrate following,
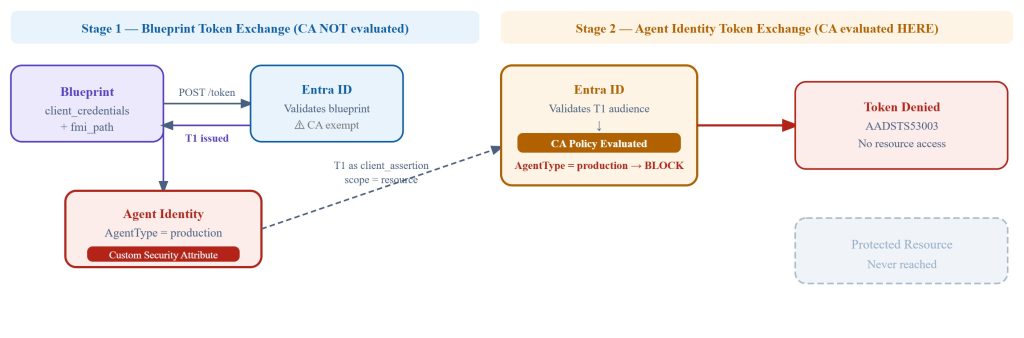
In my testing, I am using the generic two-stage authentication flow for Entra Agent identities.
In Stage 1, I use the relevant blueprint to obtain the T1 access token. As we know, agents cannot directly authenticate to resources because they do not hold secrets or certificates. Therefore, the blueprint is required to facilitate the T1 authentication process.
Stage 2 is where the Conditional Access policy is evaluated.
For this testing I am using following PowerShell Script.
# Test-AgentCAPolicy.ps1
# Two-stage Entra Agent ID autonomous flow demo
# Phase 1: run BEFORE assigning 'production' attribute → token issued
# Phase 2: run AFTER assigning attribute + CA policy On → token blocked
$tenantId = ""
$blueprintAppId = ""
$blueprintSecret = ""
$agentIdentityAppId = ""
$resourceAppId = ""
$tokenUrl = "https://login.microsoftonline.com/$tenantId/oauth2/v2.0/token"
# ── Stage 1: Blueprint → T1 ──────────────────────────────────────
Write-Host "`n[Stage 1] Blueprint authenticating to get T1..." -ForegroundColor Cyan
try {
$stage1Body = @{
grant_type = "client_credentials"
client_id = $blueprintAppId
client_secret = $blueprintSecret
scope = "api://AzureADTokenExchange/.default"
fmi_path = $agentIdentityAppId
}
$stage1 = Invoke-RestMethod -Method POST -Uri $tokenUrl -Body $stage1Body -ErrorAction Stop
$T1 = $stage1.access_token
Write-Host "[Stage 1] T1 issued." -ForegroundColor Green
}
catch {
$err = $_.ErrorDetails.Message | ConvertFrom-Json -ErrorAction SilentlyContinue
Write-Host "[Stage 1] FAILED: $($err.error_description)" -ForegroundColor Red
exit
}
# ── Stage 2: Agent Identity → TR (CA evaluated here) ────────────
Write-Host "`n[Stage 2] Agent Identity requesting resource token (TR)..." -ForegroundColor Cyan
try {
$stage2Body = @{
grant_type = "client_credentials"
client_id = $agentIdentityAppId
client_assertion_type = "urn:ietf:params:oauth:client-assertion-type:jwt-bearer"
client_assertion = $T1
scope = "api://$resourceAppId/.default"
}
$stage2 = Invoke-RestMethod -Method POST -Uri $tokenUrl -Body $stage2Body -ErrorAction Stop
Write-Host "SUCCESS - Access token (TR) issued" -ForegroundColor Green
Write-Host $stage2.access_token
Write-Host "`nExpires in: $($stage2.expires_in)s" -ForegroundColor Gray
}
catch {
$e = $_.ErrorDetails.Message | ConvertFrom-Json -ErrorAction SilentlyContinue
Write-Host "BLOCKED - Conditional Access rejected the token request" -ForegroundColor Red
Write-Host "Error : $($e.error)" -ForegroundColor Yellow
Write-Host "Error code : $($e.error_codes)" -ForegroundColor Yellow
Write-Host "Description : $($e.error_description)" -ForegroundColor Yellow
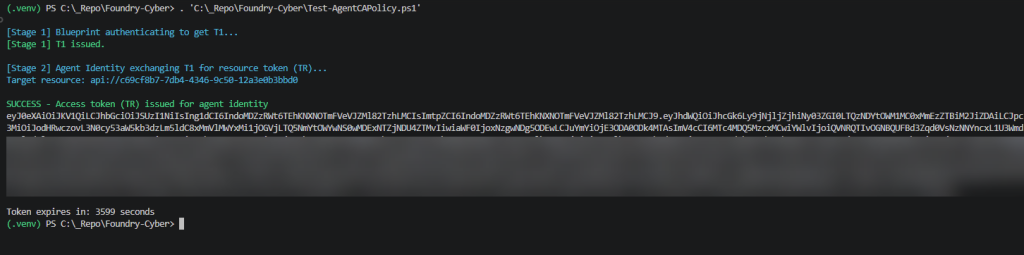
} For the testing purpose, I removed the security attribute assignment from one of the agent identities and ran the script.
As I expected I have successfully received an access token.
Then I went ahead and added the attribute again and run the script.
This time as CA match the condition, my access request is denied.

Then under the agent sign-in logs also I can see the relevant logs.
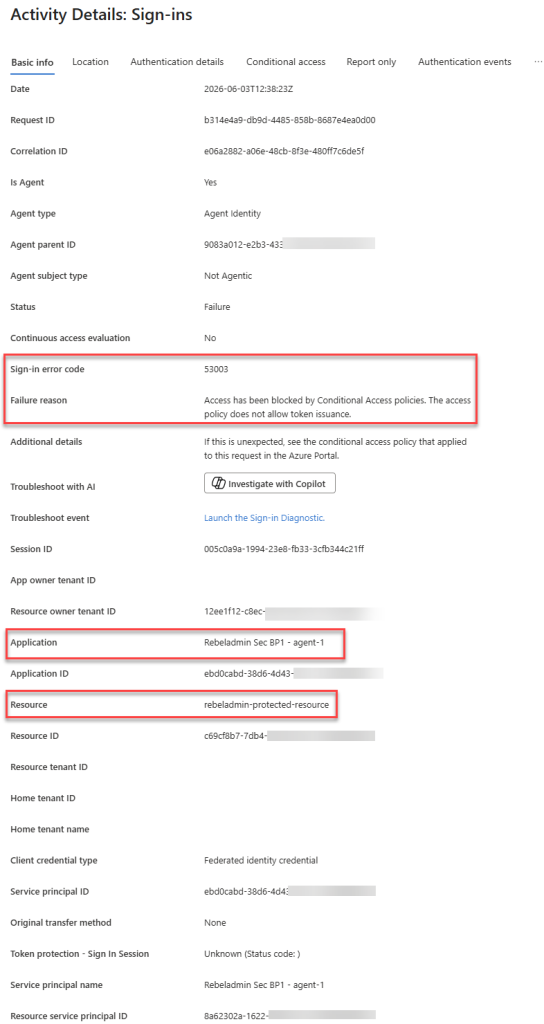
As we can see, the policy is working as expected. This brings us to the end of the blog post, and I hope you now have a better understanding of how to create Conditional Access policies for agent identities using custom security attributes.

