
Azure Private Link provides secure access to certain Azure PaaS services such as Azure SQL Database, Azure Storage, Azure Vault Services, MySQL Databases, Azure Cosmo DB via Microsoft backbone network. This will prevent sensitive data been transfer over the public internet. There are mainly two components in Azure Private Link.
Azure Private Endpoint – Azure private endpoint is a network interface that has a private ip address from a VNET. This allows us to connect to Azure services such as Azure vault, Azure Cosmo Database, Azure SQL database, Azure Storage etc. via Azure Private Link.
Azure Private Link Service – Azure Private Link service allows us to enable private access to our services which are placed behind Azure standard load balancer. Customers/Consumers can connect to these services via private endpoints placed in their own VNETs.
In this demo, I am going to demonstrate how to create Azure private endpoints and how we can access the Azure SQL database using it.
For the configuration process, I will be using PowerShell. Therefore, please make sure you have Azure PowerShell module installed. More info about it can find under https://docs.microsoft.com/en-us/powershell/azure/install-az-ps?view=azps-2.6.0
Let’s go ahead and start the configuration process by creating a new resource group.
1. Launch PowerShell console and connect to Azure using Connect-AzAccount
2. Then create a new resource group using,
New-AzResourceGroup -Name REBELRG -Location “East US”

In the above, REBELRG is the resource group name and East US is the resource group location.
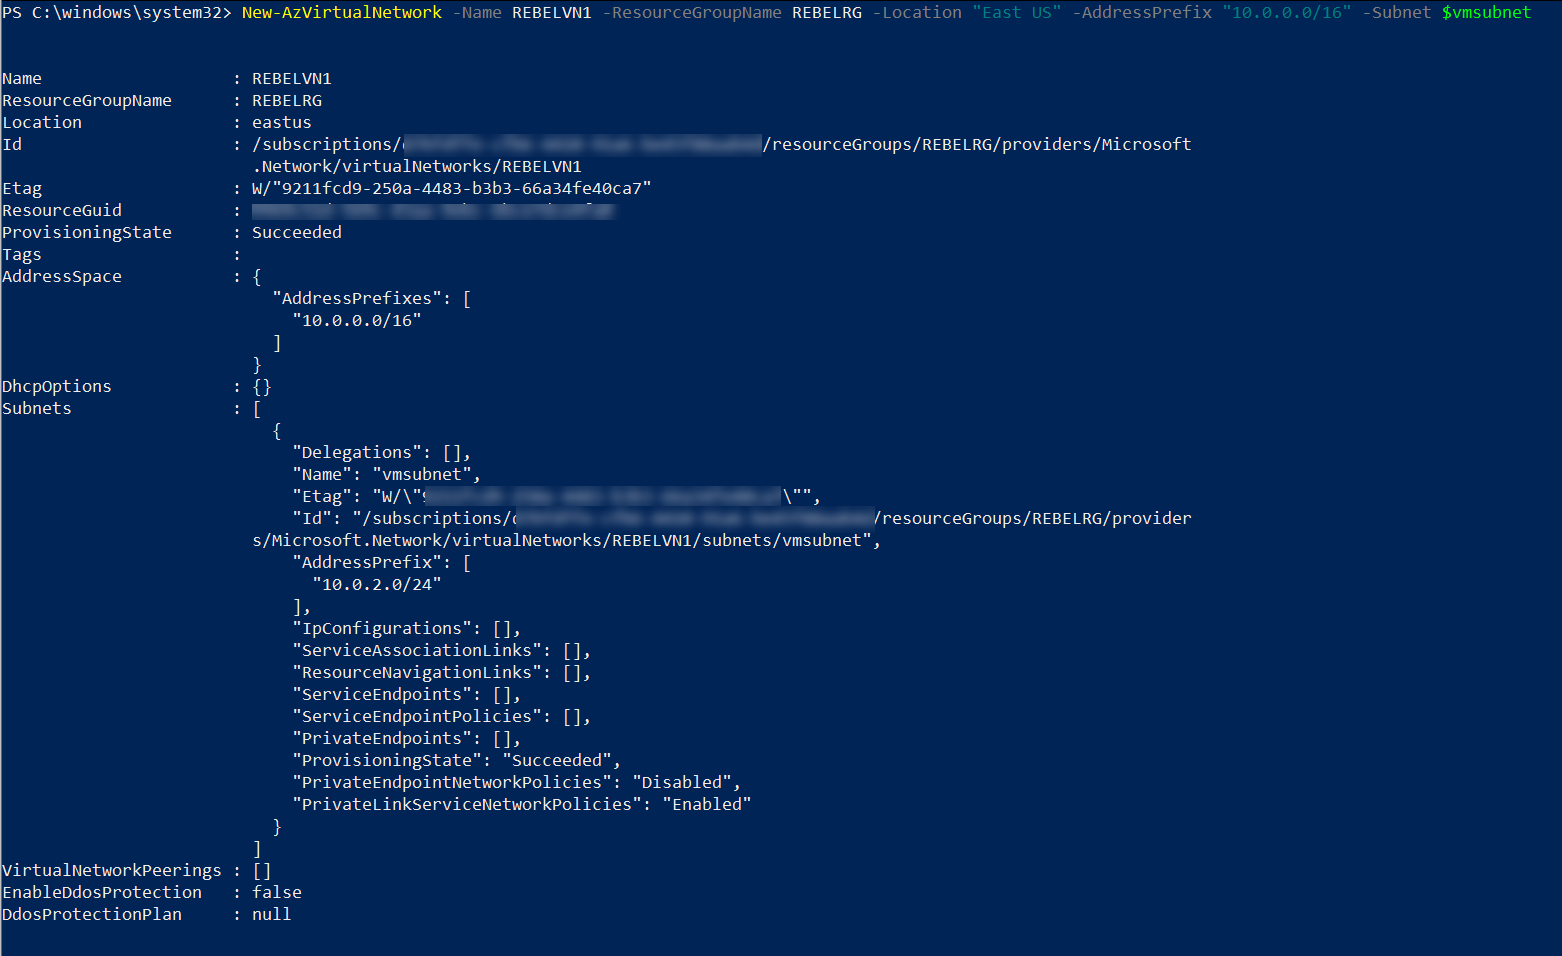
3. The next step is to create a new virtual network.
$vmsubnet = New-AzVirtualNetworkSubnetConfig -Name vmsubnet -AddressPrefix “10.0.2.0/24” -PrivateEndpointNetworkPoliciesFlag “Disabled”
New-AzVirtualNetwork -Name REBELVN1 -ResourceGroupName REBELRG -Location “East US” -AddressPrefix “10.0.0.0/16” -Subnet $vmsubnet
In the above, REBELVN1 is the new virtual network name. It has 10.0.0.0/16 address space. It also has a new subnet 10.0.2.0/24 (vmsubnet) for virtual machine and private endpoint. In the above -PrivateEndpointNetworkPoliciesFlag is set to disable. This will disable applying network policies on private endpoint in the subnet.
4. We now have the virtual network ready. The next step is to create a new virtual machine for testing.
$mylogin = Get-Credential
New-AzVm -ResourceGroupName REBELRG -Name “REBELTVM01” -Location “East US” -VirtualNetworkName “REBELVN1” -SubnetName “vmsubnet” -addressprefix 10.0.2.0/24 -PublicIpAddressName “REBELVM01IP1” -OpenPorts 3389 -Image win2019datacenter -Size Standard_D2s_v3 -Credential $mylogin
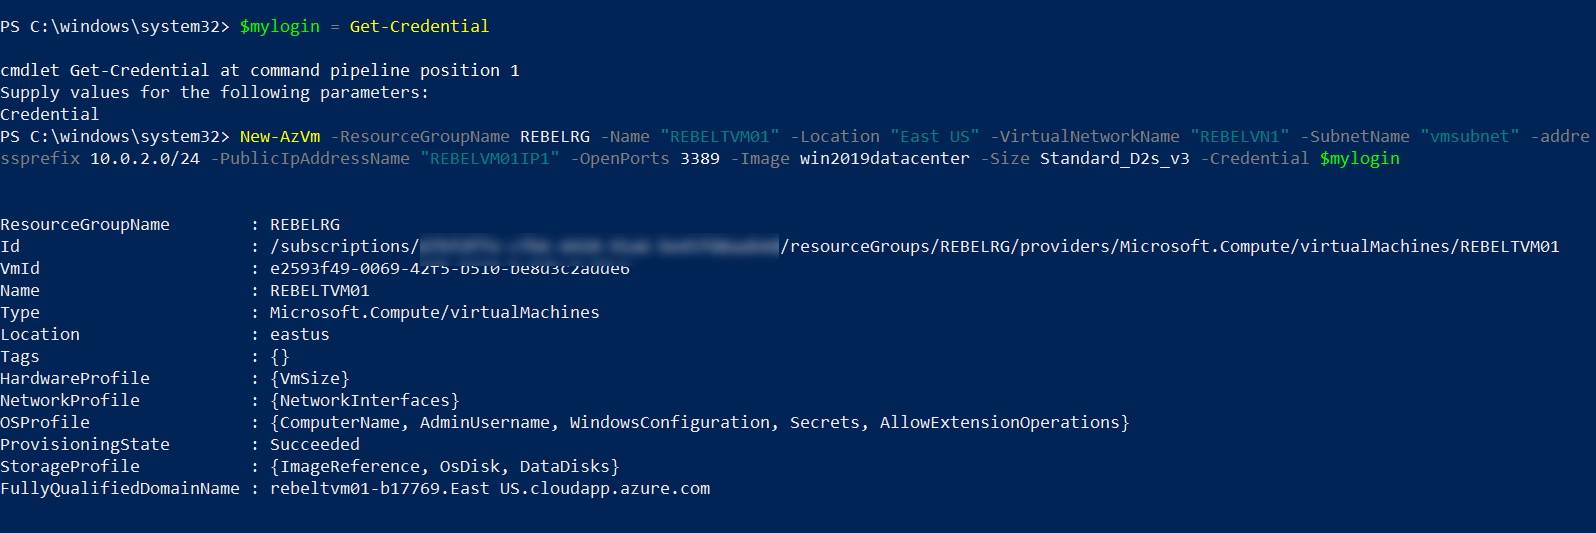
In the above, I am creating a virtual machine called REBELTVM01. It is running windows server 2019 data centre edition. I have specified it using -Image parameter. It also using Standard_D2s_v3 vm size.
5. In this demo, we are going to connect to SQL database using the private endpoint. So, let’s go ahead and create new Azure SQL server.
New-AzSqlServer -ResourceGroupName “REBELRG” -Location “East US” -ServerName “REBELSQL01” -SqlAdministratorCredentials (Get-Credential)
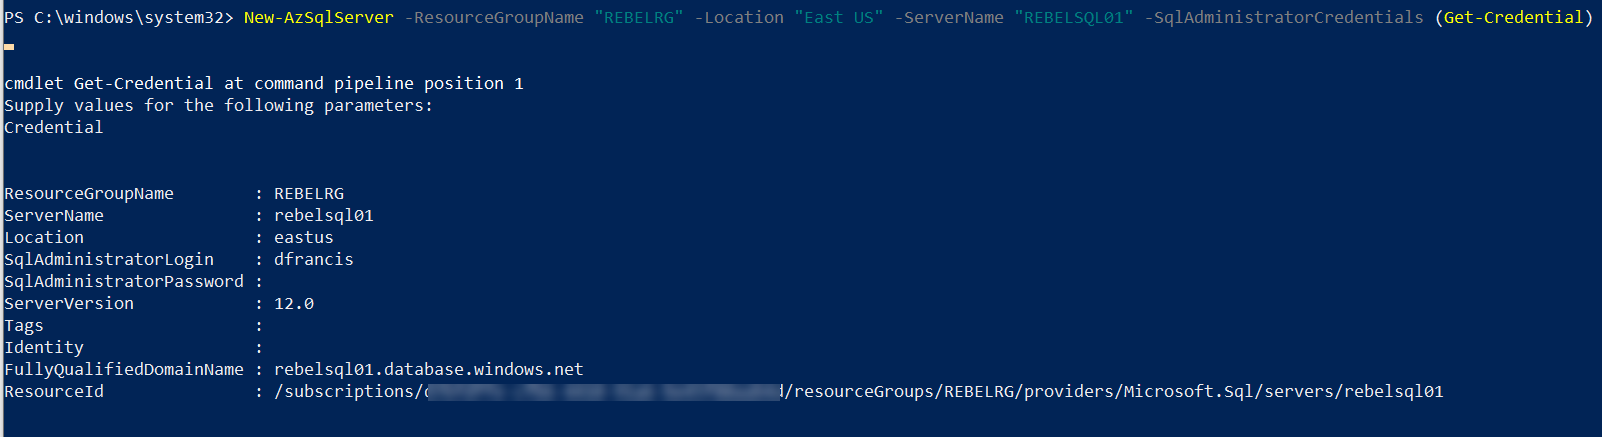
In the above, I am creating an Azure SQL server called REBELSQL01.
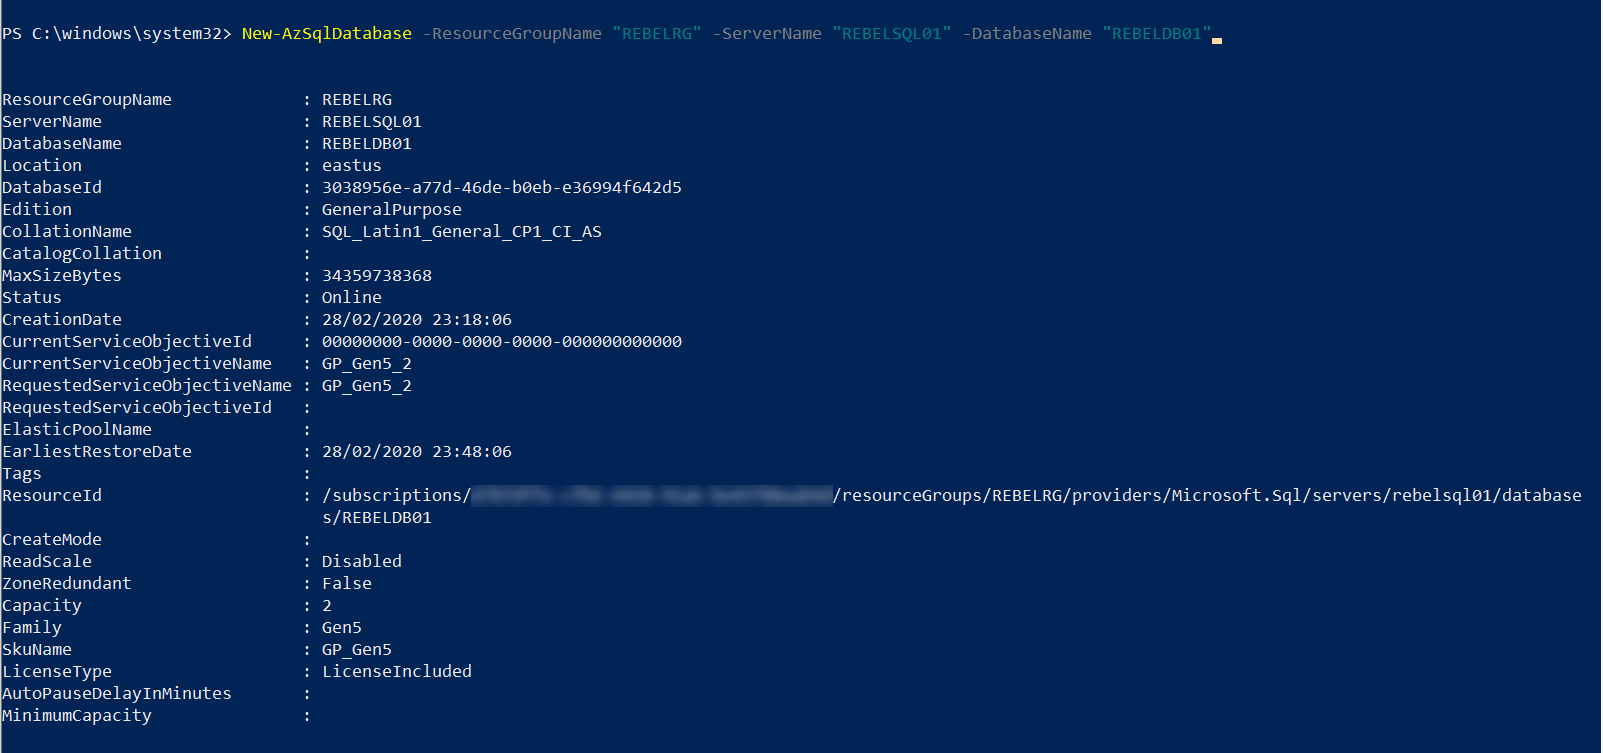
6. Then we need a database to connect to. We can create new database under the REBELSQL01 server using,
New-AzSqlDatabase -ResourceGroupName “REBELRG” -ServerName “REBELSQL01” -DatabaseName “REBELDB01”
7. The next step of the configuration is to create Azure Private Endpoint. I am going to start it with some parameters.
$azsqlserver = Get-AzSqlServer -ServerName rebelsql01
$vnetwork = Get-AzVirtualNetwork -ResourceGroupName “REBELRG” -Name “REBELVN1”
$vsubnet = $vnetwork | Select -ExpandProperty subnets | Where-Object {$_.Name -eq ‘vmsubnet’}
In the above I pass info about SQL server, virtual network and subnet we created in previous steps.
Then we create Azure private link service connection using,
$privateEndpointConn = New-AzPrivateLinkServiceConnection -Name “REBELcon01” -PrivateLinkServiceId $azsqlserver.ResourceId -GroupId “sqlServer”
Then endpoint using,
$privateEndpoint = New-AzPrivateEndpoint -ResourceGroupName “REBELRG” -Name “REBELPEP01” -Location “East US” -Subnet $vsubnet -PrivateLinkServiceConnection $privateEndpointConn
This completes the configuration of the Azure Private Endpoints.
8. As the next step of the configuration, we need to create a private DNS zone for SQL Database Server domain and link it with the virtual network. Before we do it first need to import Az.PrivateDns PowerShell module.
Import-Module Az.PrivateDns
Then create DNS zone using
$dnszone = New-AzPrivateDnsZone -ResourceGroupName “REBELRG” -Name “privatelink.database.windows.net”
$vlink = New-AzPrivateDnsVirtualNetworkLink -ResourceGroupName “REBELRG” -ZoneName “privatelink.database.windows.net” -Name “rebellink” -VirtualNetworkId $vnetwork.Id
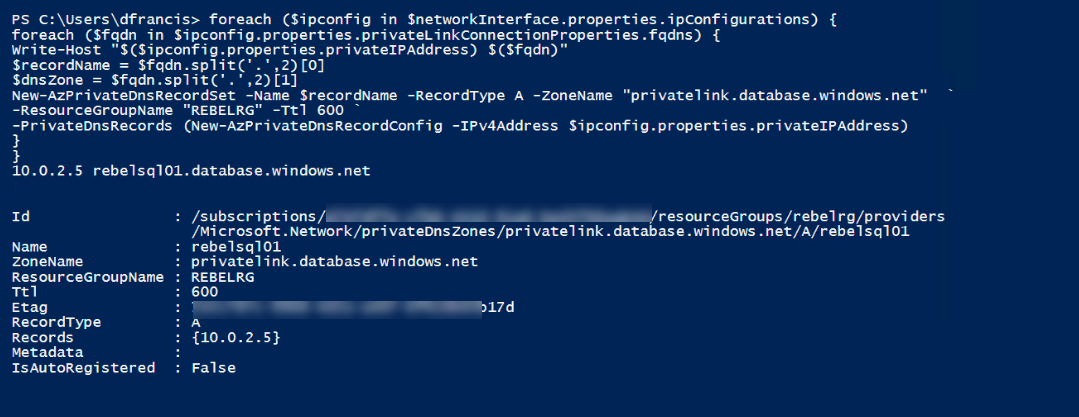
$networkInterface = Get-AzResource -ResourceId $privateEndpoint.NetworkInterfaces[0].Id -ApiVersion “2019-04-01”
foreach ($ipconfig in $networkInterface.properties.ipConfigurations) {
foreach ($fqdn in $ipconfig.properties.privateLinkConnectionProperties.fqdns) {
Write-Host “$($ipconfig.properties.privateIPAddress) $($fqdn)”
$recordName = $fqdn.split(‘.’,2)[0]
$dnsZone = $fqdn.split(‘.’,2)[1]
New-AzPrivateDnsRecordSet -Name $recordName -RecordType A -ZoneName “privatelink.database.windows.net” `
-ResourceGroupName “REBELRG” -Ttl 600 `
-PrivateDnsRecords (New-AzPrivateDnsRecordConfig -IPv4Address $ipconfig.properties.privateIPAddress)
}
}
Testing
To test the connectivity, let log in to REBELTVM01 server and install SQL Server Management Studio https://aka.ms/ssmsfullsetup
Then log in to VM and open PowerShell window. Then type nslookup sqlserverfqdnsname and enter.
In my example, it should be nslookup rebelsql01.database.windows.net
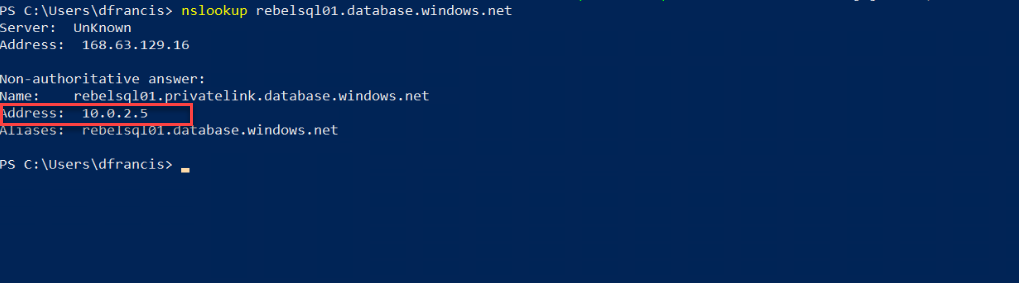
As we can see it should resolve to ip address from 10.0.2.0/24 network.
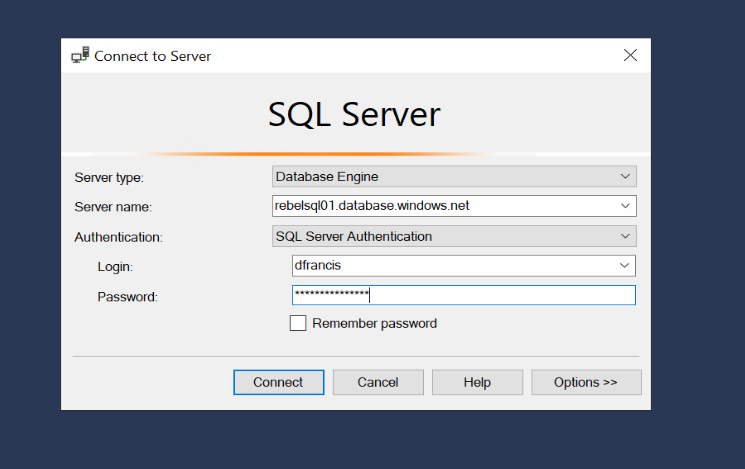
Then we can test connect to SQL database server using its fully qualified domain name.
Once login, we can see the newly created SQL database REBELDB01
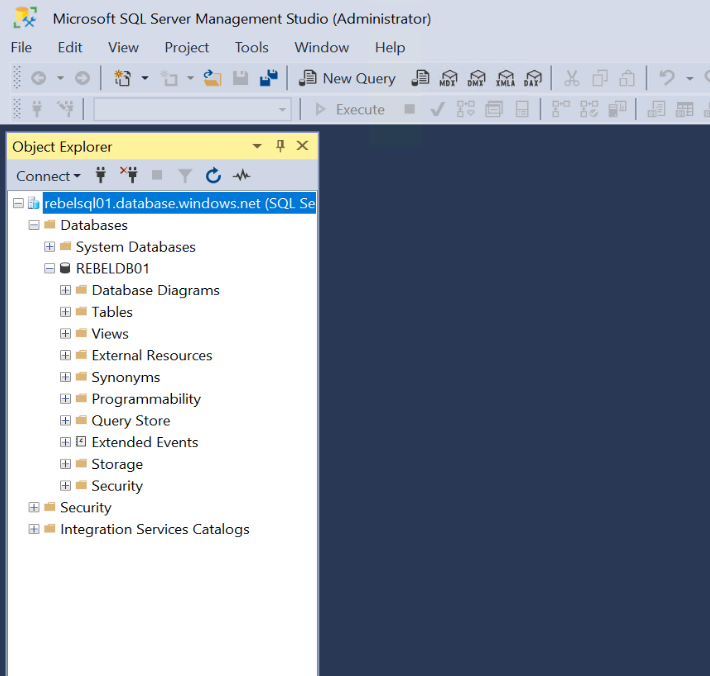
As we can see we were able to connect to SQL server by using Azure private endpoint. We didn’t have to connect to it via the firewall.
This marks the end of this blog post. If you have any further questions about this feel free to contact me on rebeladm@live.com also follow me on twitter @rebeladm to get updates about new blog posts.


1 Comment