
I have a web server running in my on-premises network. I like to allow access to it from the internet via TCP port 443. To do that, I need to create two types of rules in my edge firewall. I need a NAT (Network Address Translation) rule to map a public IP address to the private IP address of the webserver. I also need an ACL rule to allow only relevant traffic (TCP 443). This ensures the traffic to web server from the public is protecting via edge firewall. In Azure, we can use the same topology to filter inbound internet traffic. For that, we have to use Azure Firewall Destination Network Address Translation (Azure Firewall DNAT). This is doing the same thing what NAT rule does but Microsoft calls it as DNAT. In this demo, I am going to demonstrate how to set up Azure Firewall and how to use it to filter incoming internet traffic.
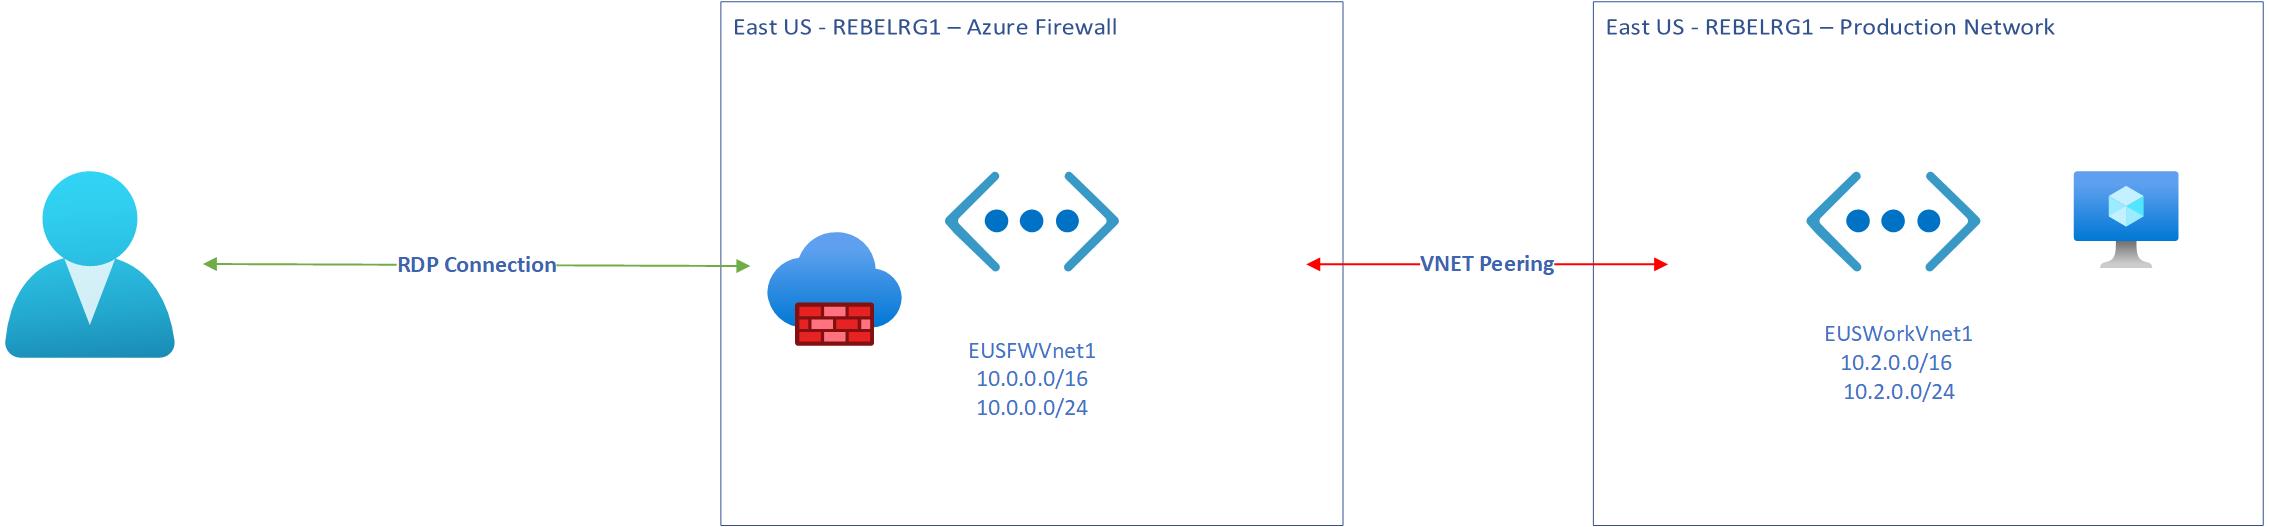
In my demo environment, I have two virtual networks.
• EUSFWVnet1 – This network hosts the Azure firewall.
• EUSWorkVnet1 – This virtual network is the production network. This is where I create VMs.
The above two networks are connected using Azure VNet Peering method. With VNet peering, virtual networks are connected via the Azure backbone network. If we compare this with on-premises network, it is similar to the connection between your local network and edge firewall.
So, in this setup, I am going to allow RDP access to a virtual machine in EUSWorkVnet1 over the internet via Azure Firewall.
For the configuration process, I will be using PowerShell. Therefore, please make sure you have an Azure PowerShell module installed. More info about it can find under https://docs.microsoft.com/en-us/powershell/azure/install-az-ps?view=azps-3.8.0
Setup Resource Group
The first step of the configuration is to create a new resource group. Both virtual networks and other services will be using the same resource group.
To do that,
1. Launch PowerShell console and connect to Azure using Connect-AzAccount
2. Create a new resource group using New-AzResourceGroup -Name REBELRG1 -Location “East US”. Here REBELRG1 is the resource group name and East US is the location.

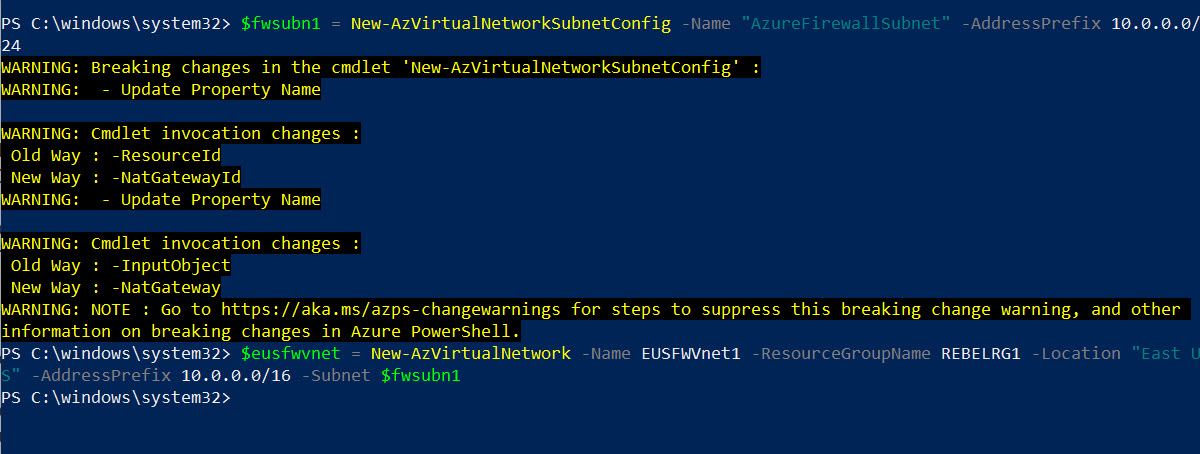
Setup Azure Firewall Network
The next step is to create a new virtual network for Azure Firewall under REBELRG1 resource group.
$fwsubn1 = New-AzVirtualNetworkSubnetConfig -Name “AzureFirewallSubnet” -AddressPrefix 10.0.0.0/24
$eusfwvnet = New-AzVirtualNetwork -Name EUSFWVnet1 -ResourceGroupName REBELRG1 -Location “East US” -AddressPrefix 10.0.0.0/16 -Subnet $fwsubn1
EUSFWVnet1’s address space is 10.0.0.0/16. It is a class B IP address range. We have one subnet under it. AzureFirewallSubnet (10.0.0.0/24) will be used by Azure Firewall. Azure firewall only can be created in a subnet with name ‘AzureFirewallSubnet’
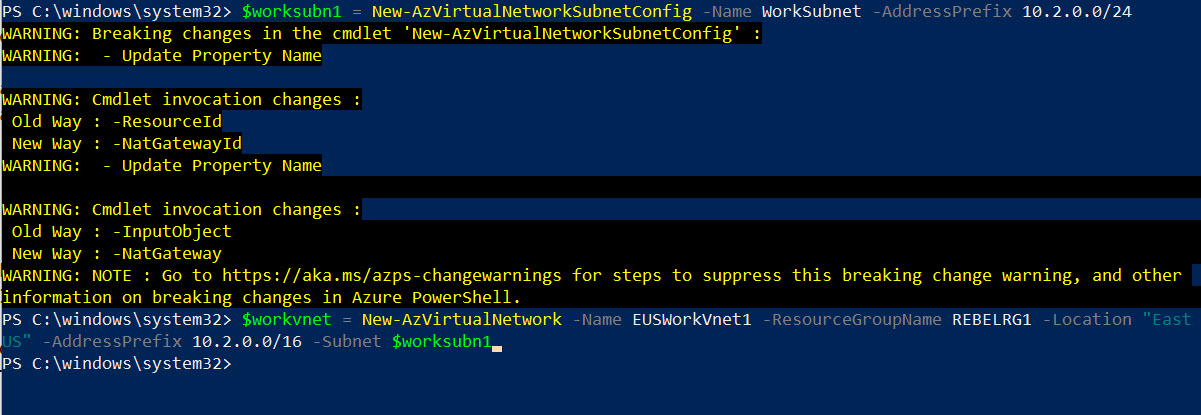
Setup Production Network
The next step of the configuration is to set up a virtual network for production workloads.
$worksubn1 = New-AzVirtualNetworkSubnetConfig -Name WorkSubnet -AddressPrefix 10.2.0.0/24
$workvnet = New-AzVirtualNetwork -Name EUSWorkVnet1 -ResourceGroupName REBELRG1 -Location “East US” -AddressPrefix 10.2.0.0/16 -Subnet $worksubn1
EUSWorkVnet1’s address space is 10.2.0.0/16. We have one subnet under it called WorkSubnet. This is the subnet we will use for the virtual machine.
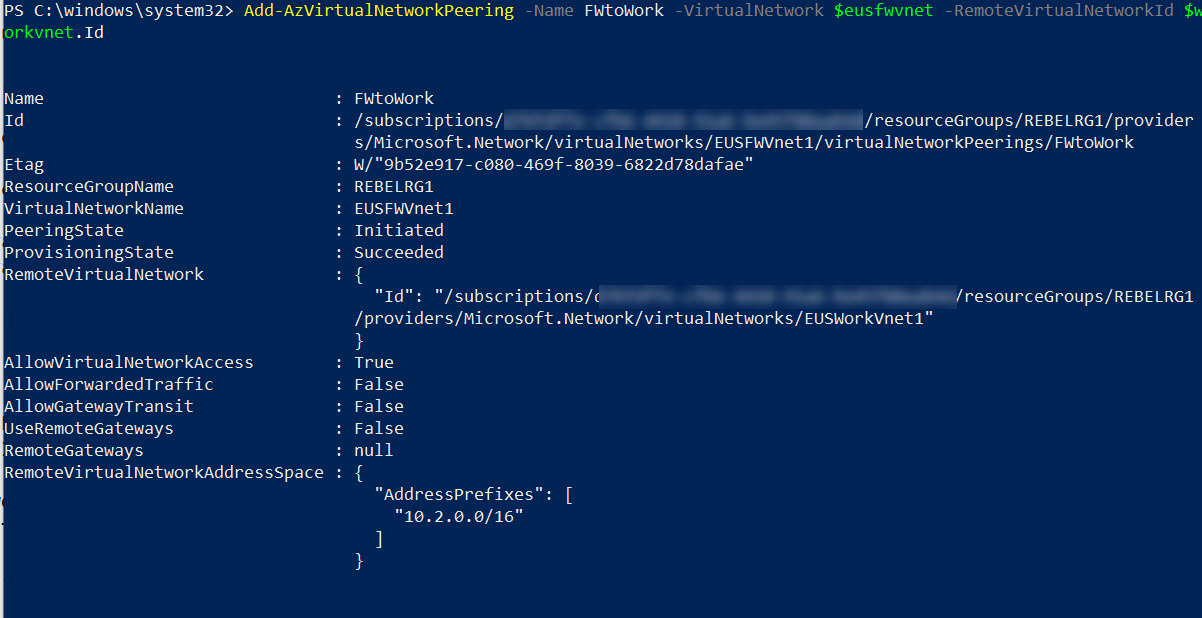
Create VNet Peering between Azure Firewall virtual network and Production network
Azure VNET peering allows connecting virtual networks seamlessly via Azure backbone infrastructure. This is similar to inter-VLAN routing in on-premises networks.
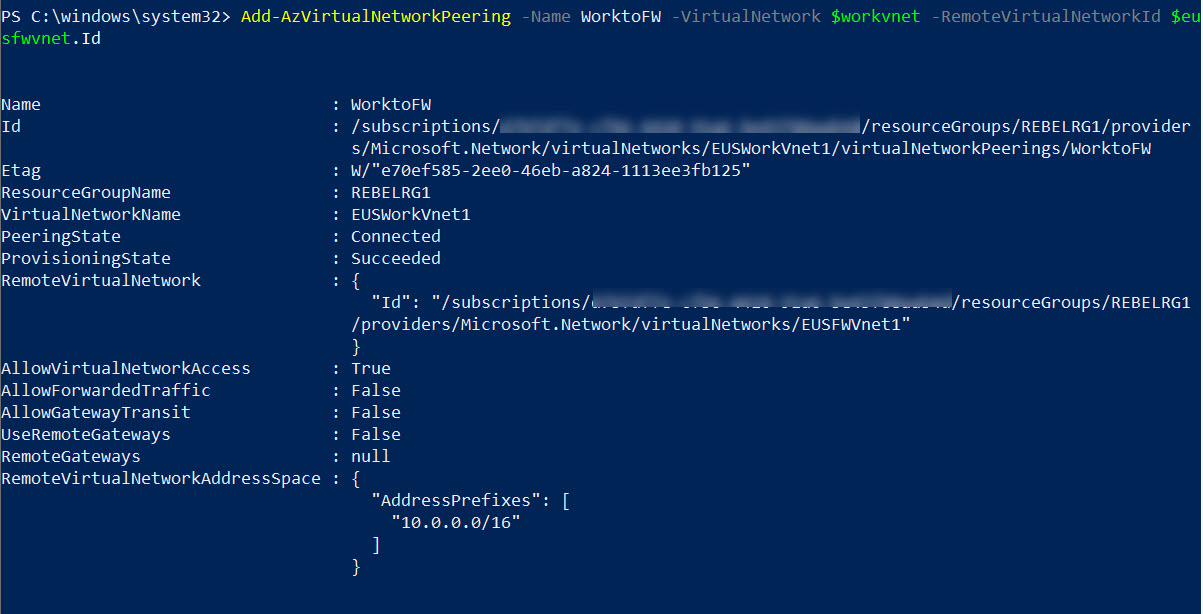
EUSFWVnet1 to EUSWorkVnet1 Peering
Add-AzVirtualNetworkPeering -Name FWtoWork -VirtualNetwork $eusfwvnet -RemoteVirtualNetworkId $workvnet.Id
EUSWorkVnet1 to EUSFWVnet1 Peering
Add-AzVirtualNetworkPeering -Name WorktoFW -VirtualNetwork $workvnet -RemoteVirtualNetworkId $eusfwvnet.Id
More about Azure VNet peering can be found in one of my previous blog posts
Setup Azure Firewall
1. The first step of the firewall configuration process is to set up public IP address for it. We can do it using,
$fwip1 = New-AzPublicIpAddress -Name EUSFWIP1 -ResourceGroupName REBELRG1 -Location “East US” -AllocationMethod Static -Sku Standard
In the above, the public IP allocation method is static and SKU is set to standard.

2. Then we can set up Azure firewall using,
$EUSFW = New-AzFirewall -Name EUSFW01 -ResourceGroupName REBELRG1 -Location “East US” -VirtualNetworkName EUSFWVnet1 -PublicIpName EUSFWIP1
In the above firewall is using the EUSFWVnet1 virtual network.
![]()
3. Once the firewall is up, we need to gather its private IP information to use later in this configuration.
$EUSFWPrivateIP = $EUSFW.IpConfigurations.privateipaddress
$EUSFWPrivateIP

Setup Virtual Machine in Production Network
Before we create routing rule and Azure Firewall DNAT rule, we need to create a virtual machine for testing purposes.
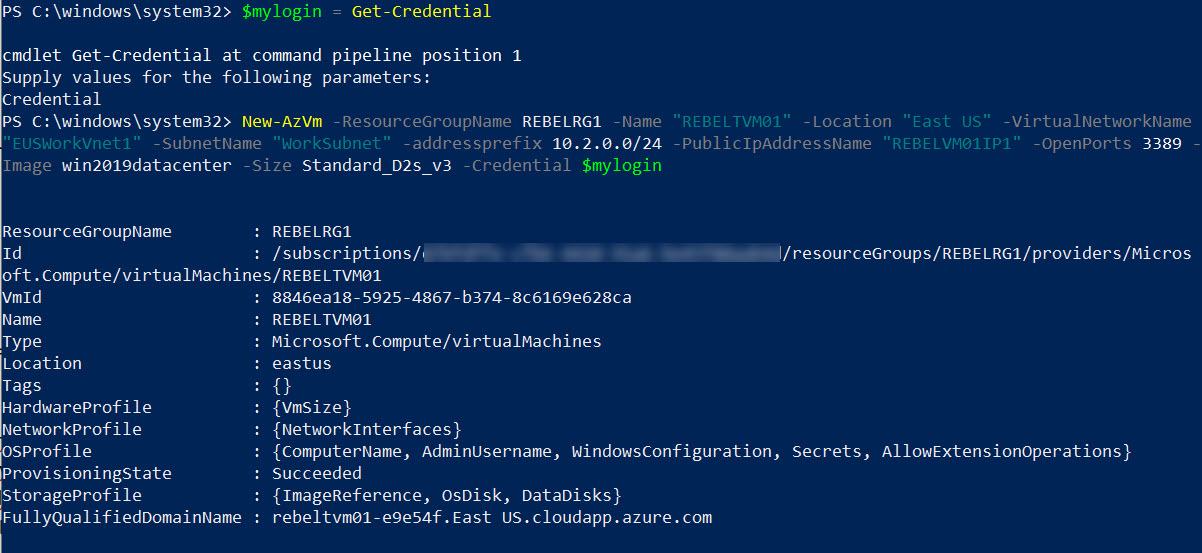
$mylogin = Get-Credential
New-AzVm -ResourceGroupName REBELRG1 -Name “REBELTVM01” -Location “East US” -VirtualNetworkName “EUSWorkVnet1” -SubnetName “WorkSubnet” -addressprefix 10.2.0.0/24 -PublicIpAddressName “REBELVM01IP1” -OpenPorts 3389 -Image win2019datacenter -Size Standard_D2s_v3 -Credential $mylogin
In the above, I am creating a virtual machine called REBELTVM01. It is running windows server 2019 data center edition. I have specified it using -Image parameter. It also using Standard_D2s_v3 vm size. For networking, it uses EUSWorkVnet1 virtual network and subnet 10.2.0.0/24.
In theory, this VM should not need public IP address as we are going to access it via private ip. But I created it to show that we can’t the VM through public IP.
Create Default Route
The production network sits behind the firewall network. To control traffic, we need to process incoming and outgoing traffic to the production network through Azure firewall.
To do that,
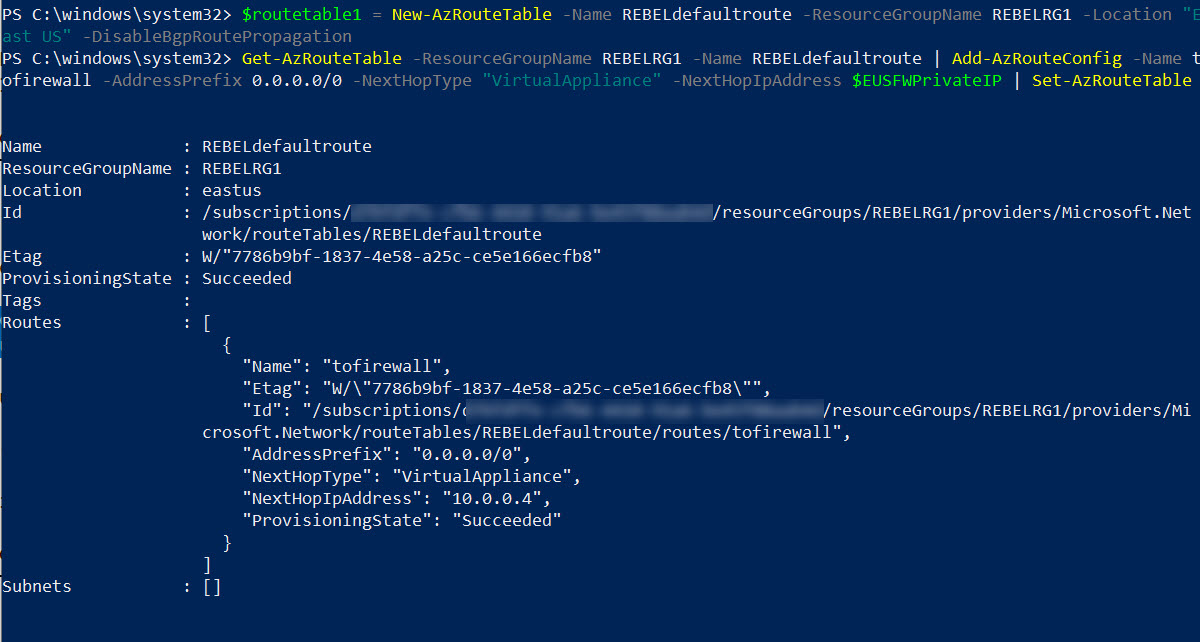
1. Let’s go ahead and create a new route table.
$routetable1 = New-AzRouteTable -Name REBELdefaultroute -ResourceGroupName REBELRG1 -Location “East US” -DisableBgpRoutePropagation
Here we are using -DisableBgpRoutePropagation parameter to disable BGP route auto propagation.
2. Then let’s go ahead and create default route for production VM subnet to process traffic via Azure firewall private IP.
Get-AzRouteTable -ResourceGroupName REBELRG1 -Name REBELdefaultroute | Add-AzRouteConfig -Name tofirewall -AddressPrefix 0.0.0.0/0 -NextHopType “VirtualAppliance” -NextHopIpAddress $EUSFWPrivateIP | Set-AzRouteTable
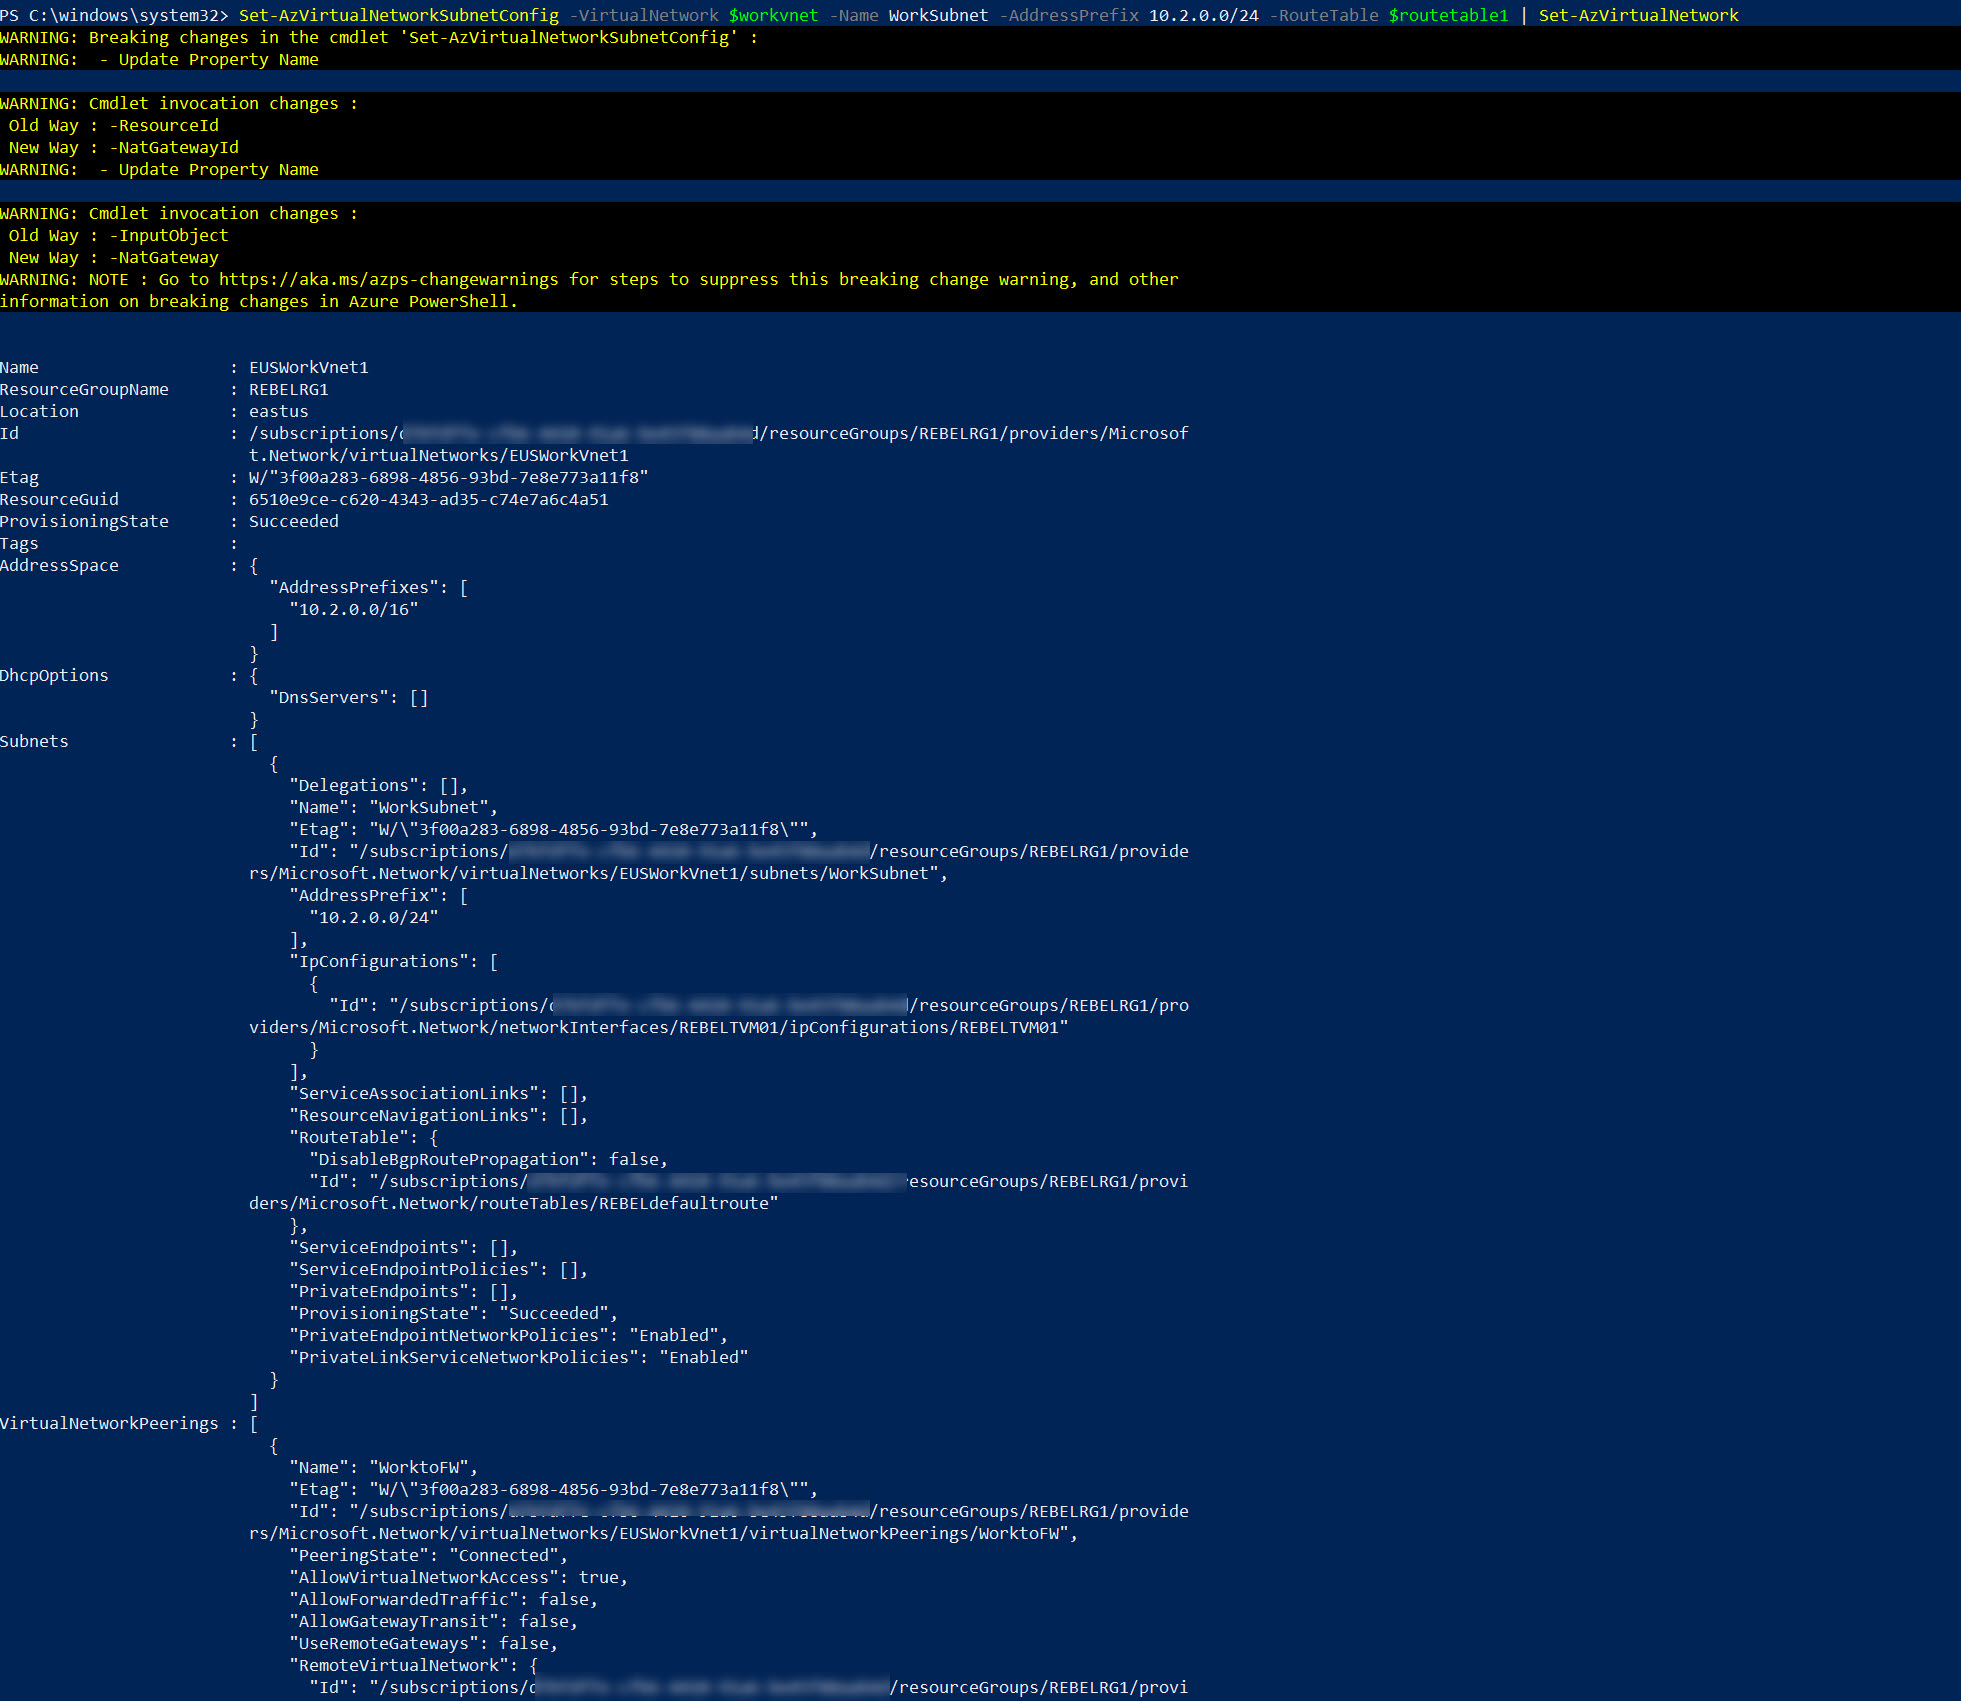
3. Once it is created, we need to associate the routing table with the production network’s VM subnet.
Set-AzVirtualNetworkSubnetConfig -VirtualNetwork $workvnet -Name WorkSubnet -AddressPrefix 10.2.0.0/24 -RouteTable $routetable1 | Set-AzVirtualNetwork
Setup Azure Firewall DNAT Rule
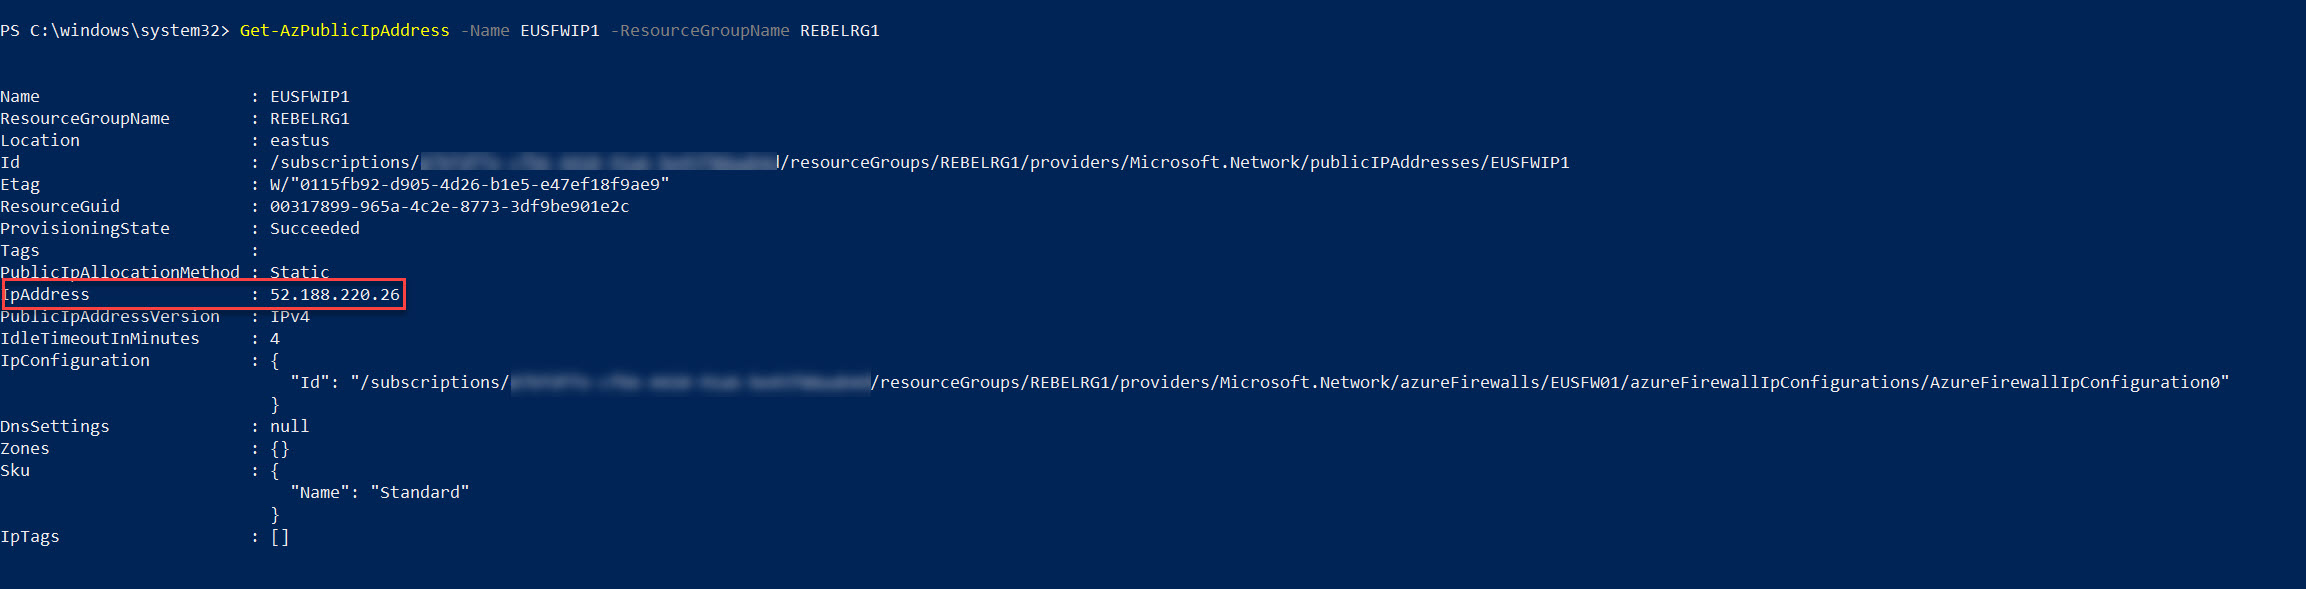
The next step of the configuration is to set up NAT rule. Before we start with NAT rule, we need to find the public IP address of the Azure Firewall. We can do this by using,
Get-AzPublicIpAddress -Name EUSFWIP1 -ResourceGroupName REBELRG1
We also need to find the Private IP address of the VM we just created. We can do it using,
Get-AzNetworkInterface -ResourceGroupName REBELRG1 | ForEach { $Interface = $_.Name; $IPs = $_ | Get-AzNetworkInterfaceIpConfig | Select PrivateIPAddress; Write-Host $Interface $IPs.PrivateIPAddress }

Now we have the required data to setup NAT rule.
$fwnatrule1 = New-AzFirewallNatRule -Name “DNAT1” -Protocol “TCP” -SourceAddress “*” -DestinationAddress “52.188.220.26” -DestinationPort “3389” -TranslatedAddress “10.2.0.4” -TranslatedPort “3389”
In the above I am allowing any external network to RDP to VM (10.2.0.4) in the production network via Azure Firewall public IP address.

Once the rule is created, we need to associate it with NAT rule collection.
$fwnatrulecollection1 = New-AzFirewallNatRuleCollection -Name RDPAccess -Priority 200 -Rule $fwnatrule1
$EUSFW.NatRuleCollections = $fwnatrulecollection1

Then write the configuration to the firewall using,
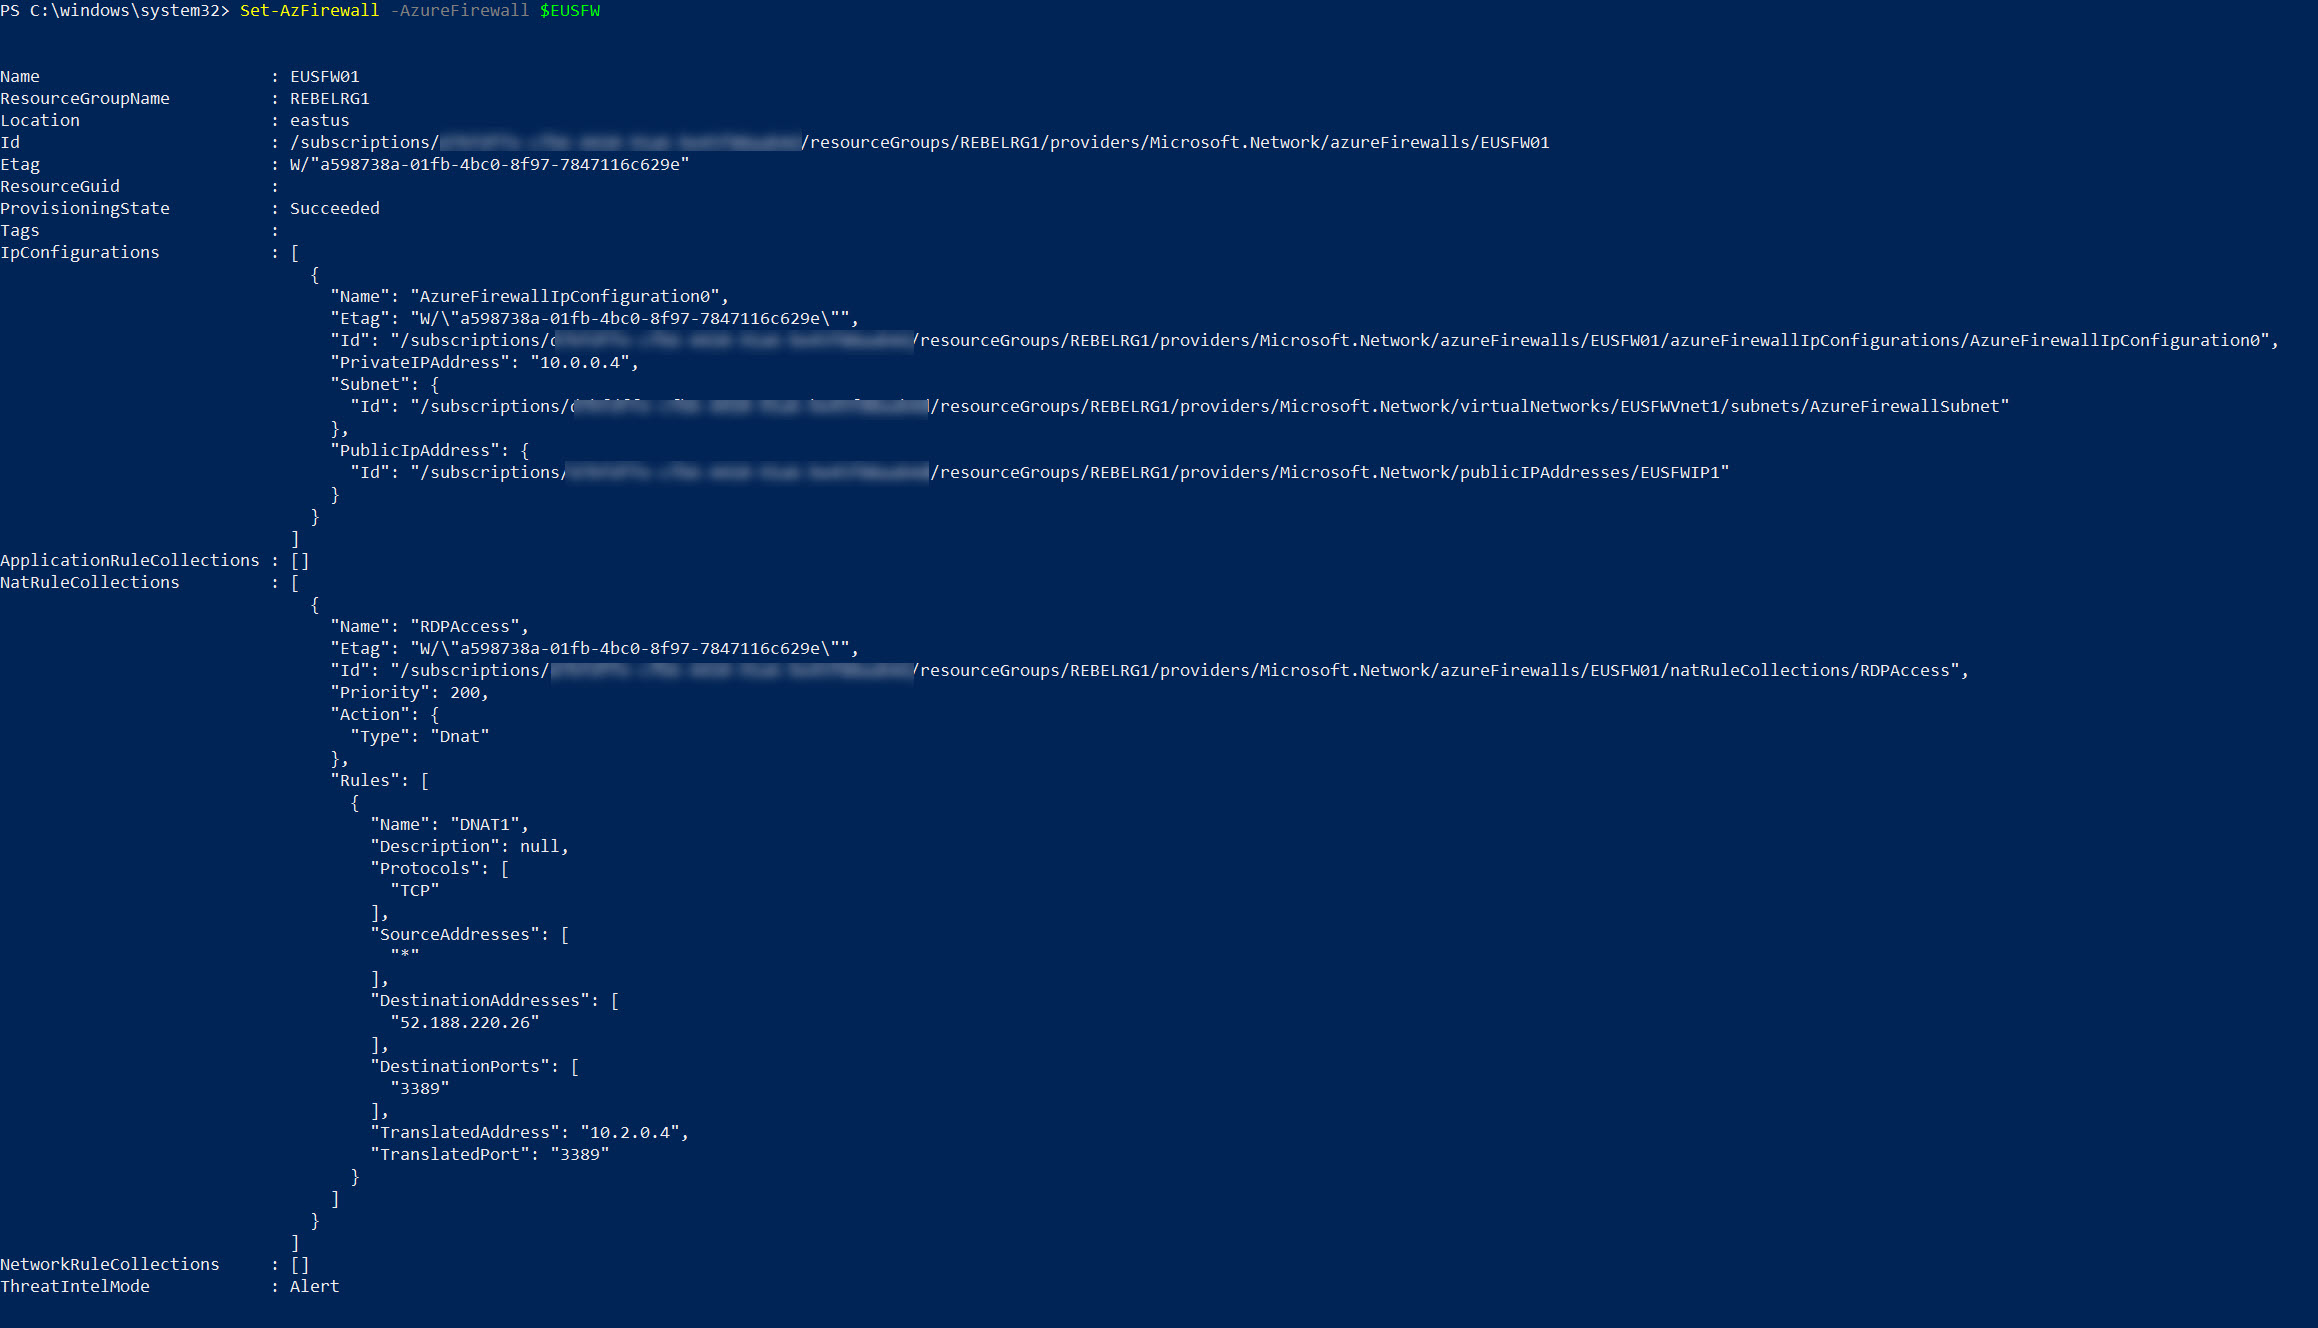
Set-AzFirewall -AzureFirewall $EUSFW
This completes the configuration tasks.
Azure Firewall DNAT rule testing
In one of the above tasks, I have created the VM in the production network. When I create VM, I also assign a public IP address to it. In theory, I should not be able to connect to this VM directly using this IP address. To test it first we need to find the public IP address of the VM. We can do it using,
Get-AzPublicIpAddress -Name REBELVM01IP1 -ResourceGroupName REBELRG1

Let’s see if we can connect to it using TCP 3389
Test-NetConnection -ComputerName 52.255.147.240 -Port 3389
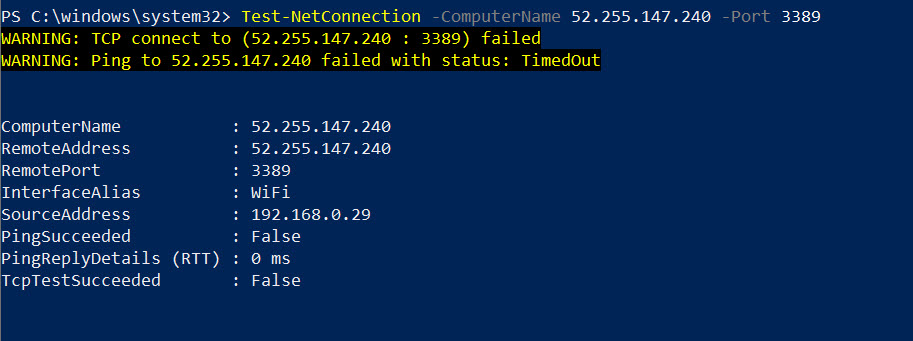
As expected, the connection is failing.
Now let’s try the same thing using firewall public IP address.
Get-AzPublicIpAddress -Name EUSFWIP1 -ResourceGroupName REBELRG1

As expected, we can connect to VM by using firewall public IP address.
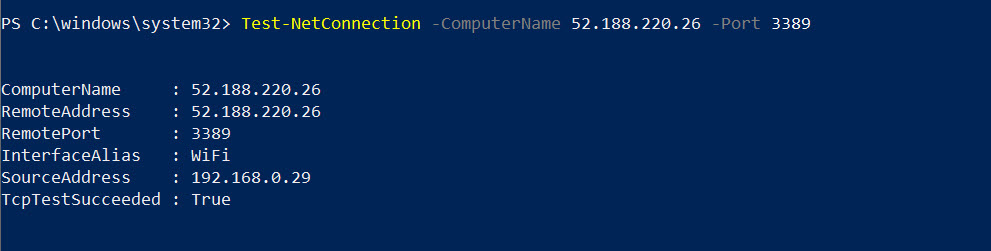

As we can see, the incoming traffic is successfully managed by Azure firewall.
All the commands used in the demo is available as a script under https://github.com/rebeladm/rebeladm/blob/master/DNAT.ps1
This marks the end of this blog post. I hope now you have a better understanding of how to use Azure Firewall DNAT to filter incoming internet traffic. If you have any further questions about this feel free to contact me on rebeladm@live.com also follow me on twitter @rebeladm to get updates about new blog posts.


Thanks for this, helped me get my firewall running!