
In my previous blog post, I have explained what is Server-Side Encryption (SSE) for Azure Managed Disks. If you didn’t read it yet, please go ahead and read it using this link. In there I have created a new virtual machine with encrypted managed disks. But sometimes we may have to do the same for the existing Azure Managed Disks. In this blog post, I am going to demonstrate how we can encrypt an existing data disk (Azure Managed Disk) using SSE and CMK.
Prerequisite
Before we go ahead with configuration, we need to make sure the following prerequisites are in place.
Azure Key Vault with DisKEncryptionSet – I have covered the configuration steps for this in my previous blog post https://www.rebeladmin.com/2021/01/encrypt-azure-managed-disks-using-server-side-encryption-sse-and-customer-managed-keys-cmk/. Please go ahead and configure the Azure Key Vault before we proceed further.
Azure PowerShell – For the configuration process, I will be using PowerShell. Therefore, please make sure you have an Azure PowerShell module installed. More info about it can find under https://docs.microsoft.com/en-us/powershell/azure/install-az-ps?view=azps-3.8.0
Verify Existing Windows VM Configuration
For the demo, I have created a new Windows VM called REBEL01 in East US Azure region. It is running windows server 2019 data center edition. It is using Standard_DS1_v2 VM size. This VM has two disks. REBEL01_OSDisk is OS disk and REBEL01DataDisk1 is Data Disk.
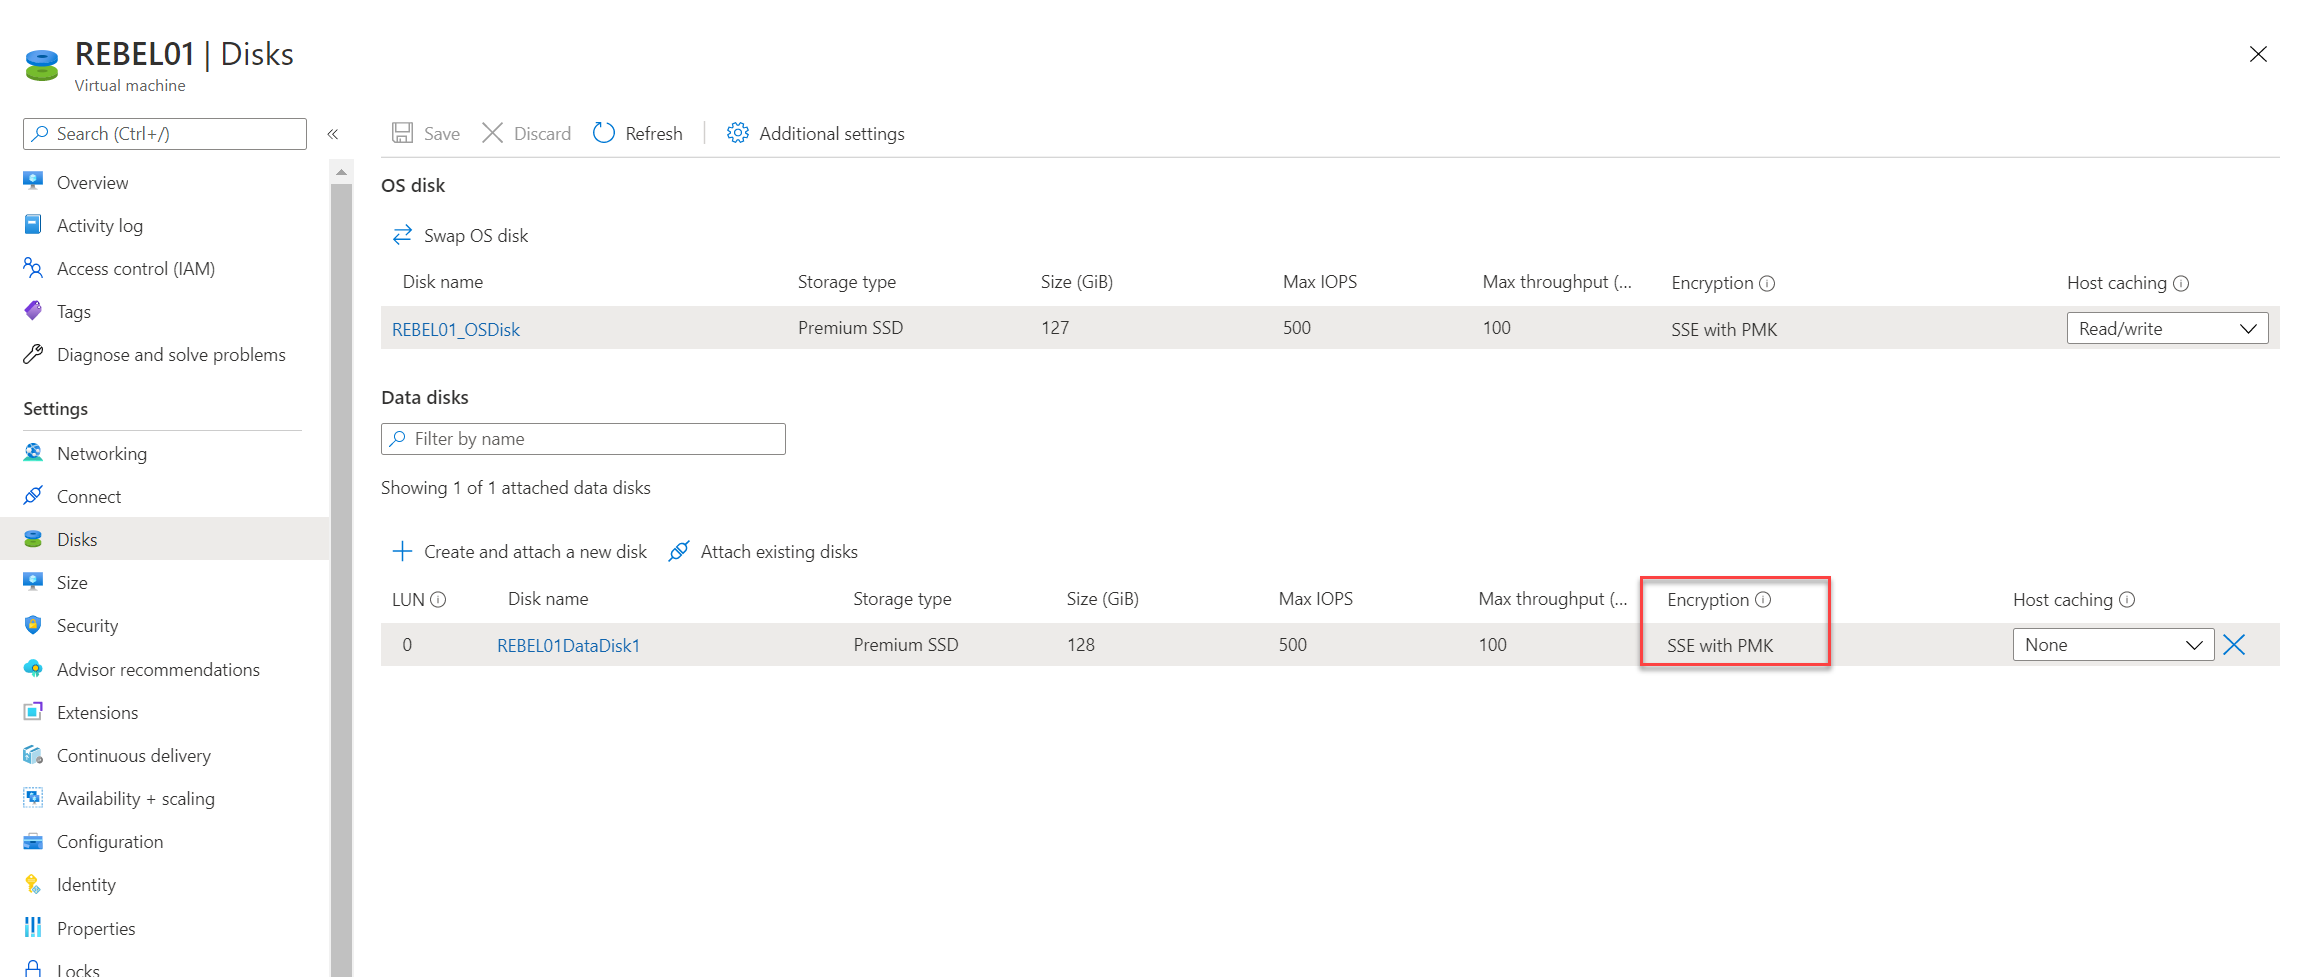
As we can see above, the data disk is encrypted using platform managed keys. This is the default setup for Azure managed disks. My plan is to encrypt this disk with Customer Managed Key (CMK). We can’t encrypt the existing OS disk using the same method.
Detach Managed Disk
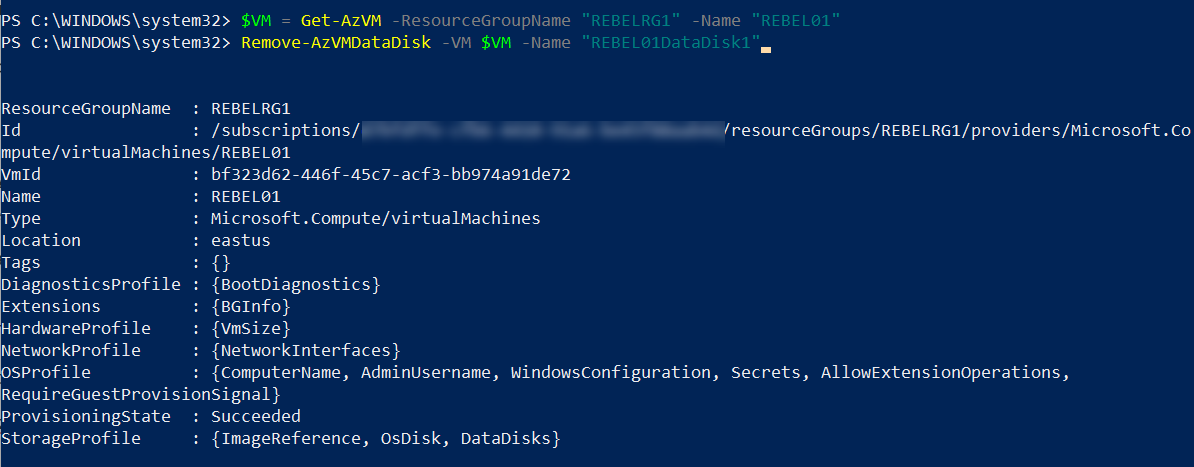
We can’t change the encryption of a disk that is attached to a running VM. So, we need to detach the disk first. To do that we can use the following commands,
$VM = Get-AzVM -ResourceGroupName “REBELRG1” -Name “REBEL01”
Remove-AzVMDataDisk -VM $VM -Name “REBEL01DataDisk1”
Then we need to update the VM config using
Update-AzVM -ResourceGroupName “REBELRG1” -VM $VM

Encrypt disk with SSE and CMK
Next step of the configuration is to encrypt the disk we just detached. To do that,
$enset = Get-AzDiskEncryptionSet -ResourceGroupName “REBELRG1” -Name “RDES1”
New-AzDiskUpdateConfig -EncryptionType “EncryptionAtRestWithCustomerKey” -DiskEncryptionSetId $enset.Id | Update-AzDisk -ResourceGroupName “REBELRG1” -DiskName “REBEL01DataDisk1”
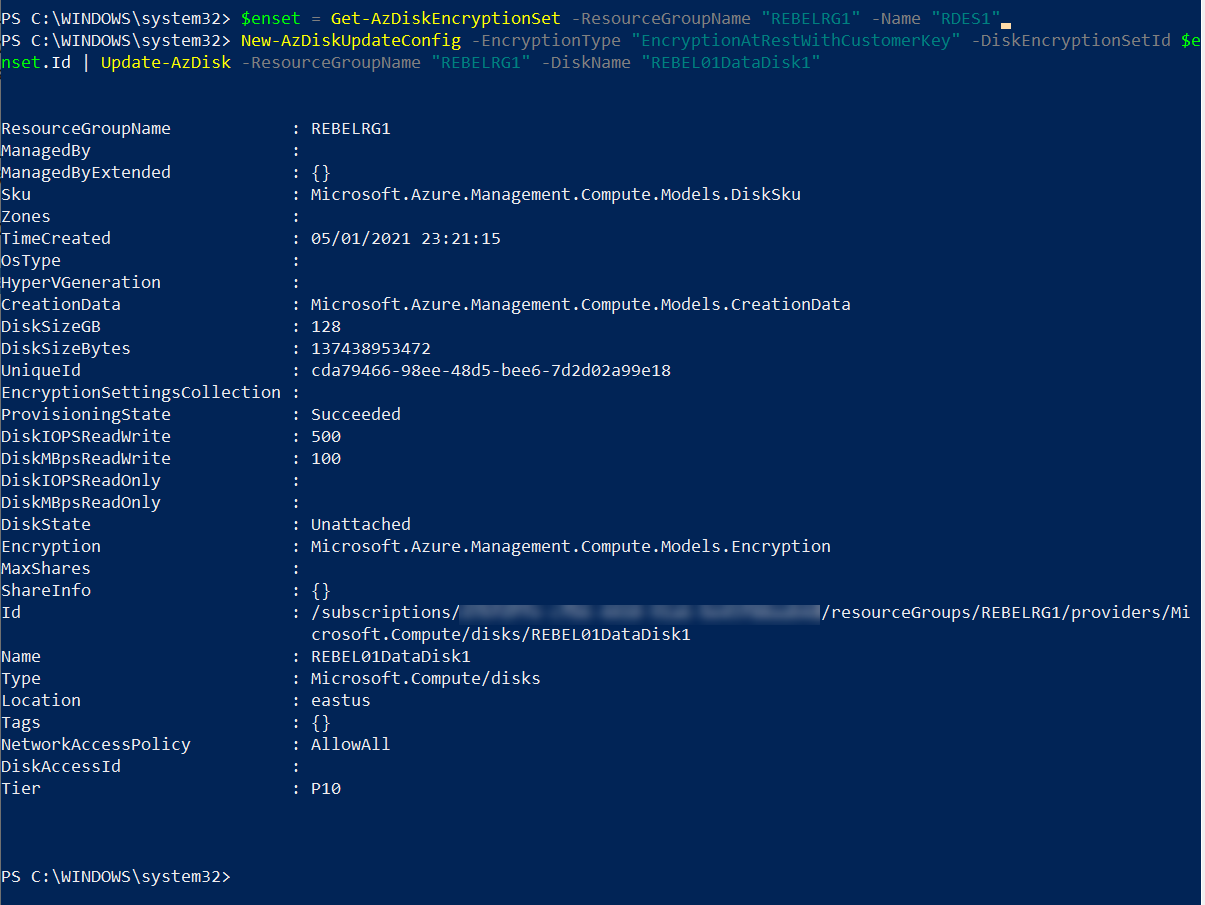
As per above, I am adding the disk to the DisKEncryptionSet I have already created. The encryption type is set to EncryptionAtRestWithCustomerKey and it means SSE with CMK.
Attach Encrypted Disk
Now we have an encrypted disk. The next step of the configuration is to attach this disk to the running VM.
$disk = Get-AzDisk -ResourceGroupName “REBELRG1” -DiskName “REBEL01DataDisk1”
$vm = Get-AzVM -Name “REBEL01” -ResourceGroupName “REBELRG1”
$vm = Add-AzVMDataDisk -CreateOption Attach -Lun 0 -VM $vm -ManagedDiskId $disk.Id

Then we need to update the VM config,
Update-AzVM -VM $vm -ResourceGroupName “REBELRG1”

Verify
Now to verify the changes, I went to the disks option in REBEL01.
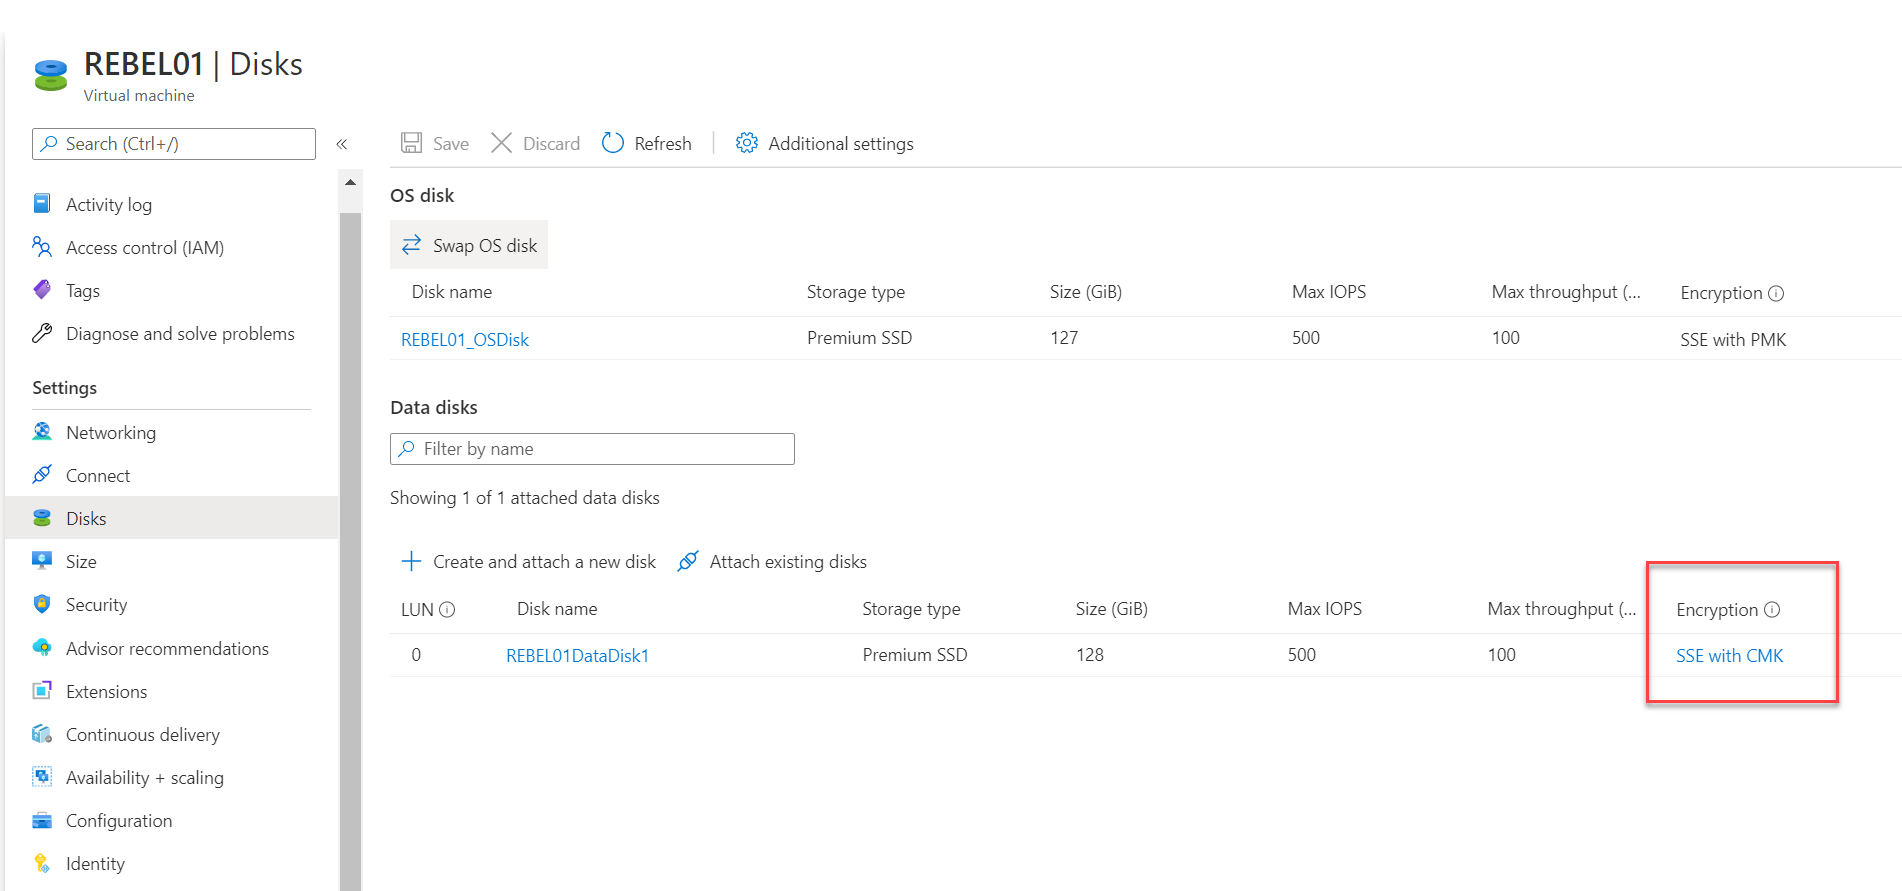
As expected, now the encryption type for the data disk is showing as SSE with CMK.
I hope now you have a better understanding of how we can existing Azure Managed Disks using Server-Side Encryption (SSE) and Customer Managed Keys (CMK). If you have any further questions about this feel free to contact me at rebeladm@live.com also follow me on Twitter @rebeladm to get updates about new blog posts.

