
Disk encryption is a basic data protection method for physical & virtual hard disks. It falls under physical data security and it prevents data breaches from stolen hard disks (physical & virtual). By using Azure Disk Encryption, we can encrypt disks within the guest VM. If the guest VM is running Windows OS, Azure Disk Encryption will use BitLocker. If the guest VM is running Linux, it will be depending on DM-Crypt to encrypt virtual disks. But with Server-Side Encryption (SSE) we can encrypt any OS disk/data disk at the storage service level.
By default, Azure Managed disks are encrypted using 256-bit AES encryption. It is FIPS 140-2 compliant. For this, the system uses platform-managed encryption keys. But for compliance requirements, the organization may want to manage its own encryption keys. These keys are called Customer Managed Keys (CMK). In here, instead of the platform, it is the customer’s responsibility to create, import, delete encryption keys. We can use CMK to encrypt managed disk using Azure Disk Encryption or Server-Side Encryption (SSE). In both methods, we have to use the Azure Key Vault to store the encryption keys. A Key vault admin can either import their own RSA keys or generate new RSA keys in the key vault to use with encryption.
When we using Customer Managed Keys (CMK) we need to consider the following,
1. If the CMK feature is enabled for a disk, it can’t be disabled. If you need you can copy data to a new disk without CMK.
2. Only supported Software and HSM RSA keys with 2048 bit, 3072 bit, and 4096-bit sizes.
3. Managed disk created from custom image or snapshot which is encrypted using SSE & CMK must use same CMK to encrypt.
4. All resources related to CMK such as Azure key vault, DisKEncryptionSet, VMs, Managed Disks must use the same subscription and region.
5. Managed disks currently or previously encrypted using Azure Disk Encryption cannot be encrypted using CMK.
Source: https://docs.microsoft.com/en-us/azure/virtual-machines/disk-encryption#customer-managed-keys
Before we go ahead with configurations let’s see how Server-Side Encryption (SSE) works with Customer Managed Keys (CMK).
1. Admin creates DisKEncryptionSet resource with Azure Key Vault ID and a key URL. This will also create a system-assigned managed identity in Azure Active Directory.
2. Then Azure Key Vault Admin grant permission to this managed identity to perform activities in the relevant key vault.
3. As the next step, VM user can create or associate existing managed disks with DisKEncryptionSet and enable Server-Side Encryption (SSE)
4. Managed disks use system-assigned managed identity in Azure Active Directory to access Key vault
5. Managed disks send a request to Key vault to encrypt or decrypt Data Encryption Key (DEK) to use it with data encryption or decryption.
Let’s go ahead and see how we can use SSE and CMK for managed disk encryption.
For the configuration process, I will be using PowerShell. Therefore, please make sure you have an Azure PowerShell module installed. More info about it can find under https://docs.microsoft.com/en-us/powershell/azure/install-az-ps?view=azps-3.8.0
Setup Azure Resource Group
The first step of the configuration is to create a new resource group.
To do that,
Launch PowerShell console and connect to Azure using Connect-AzAccount
Then create a new resource group using,
New-AzResourceGroup -Name REBELRG1 -Location “East US”
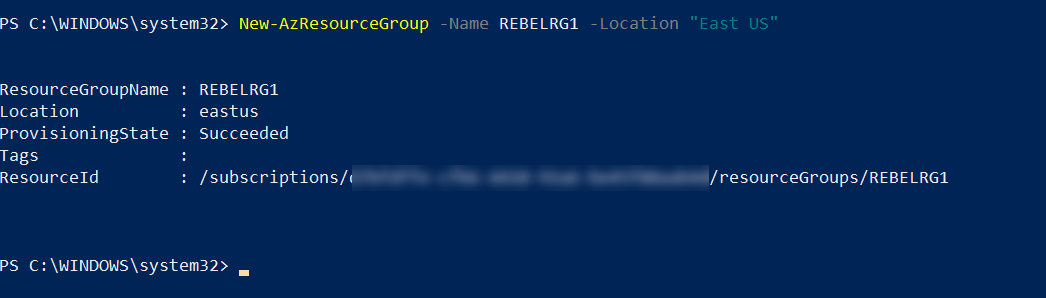
In the above, REBELRG1 is the resource group name and East US is the resource group location.
Setup Azure Key Vault
Next, we need to create a new key vault and encryption key.
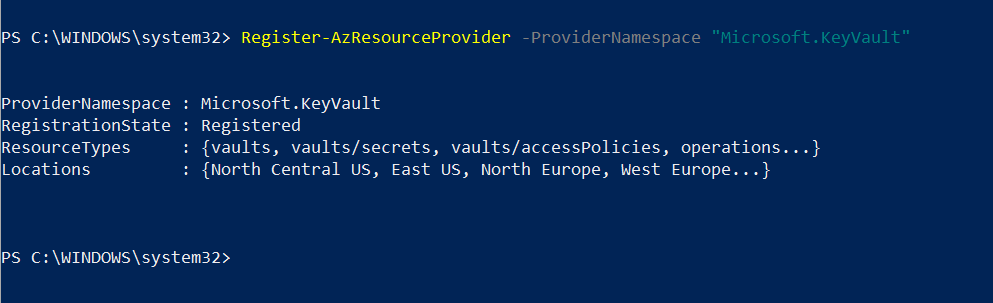
As the first step, let’s go ahead and enable Azure Key Vault provider within the subscription by using,
Register-AzResourceProvider -ProviderNamespace “Microsoft.KeyVault”
Then, let’s go ahead with Azure Vault setup,
$rkv = New-AzKeyVault -VaultName REBELVMKV1 -Location “East US” -ResourceGroupName REBELRG1 -EnablePurgeProtection
In the above, REBELVMKV1 is the key vault name and it is created under REBELRG1 resource group. –EnablePurgeProtection parameter is used to ensure a deleted key from the vault cannot be permanently deleted until it passes the retention period. This option adds extra protection to keys used inside the vault. This must be enabled otherwise the encryption will fail.
As the next step, we need to create an access policy so currently logged-in user can create encryption keys.
Set-AzKeyVaultAccessPolicy -VaultName REBELVMKV1 -ObjectId xxxxxxxxxxxxxxxx -PermissionsToKeys create,import,delete,list -PermissionsToSecrets set,delete -PassThru
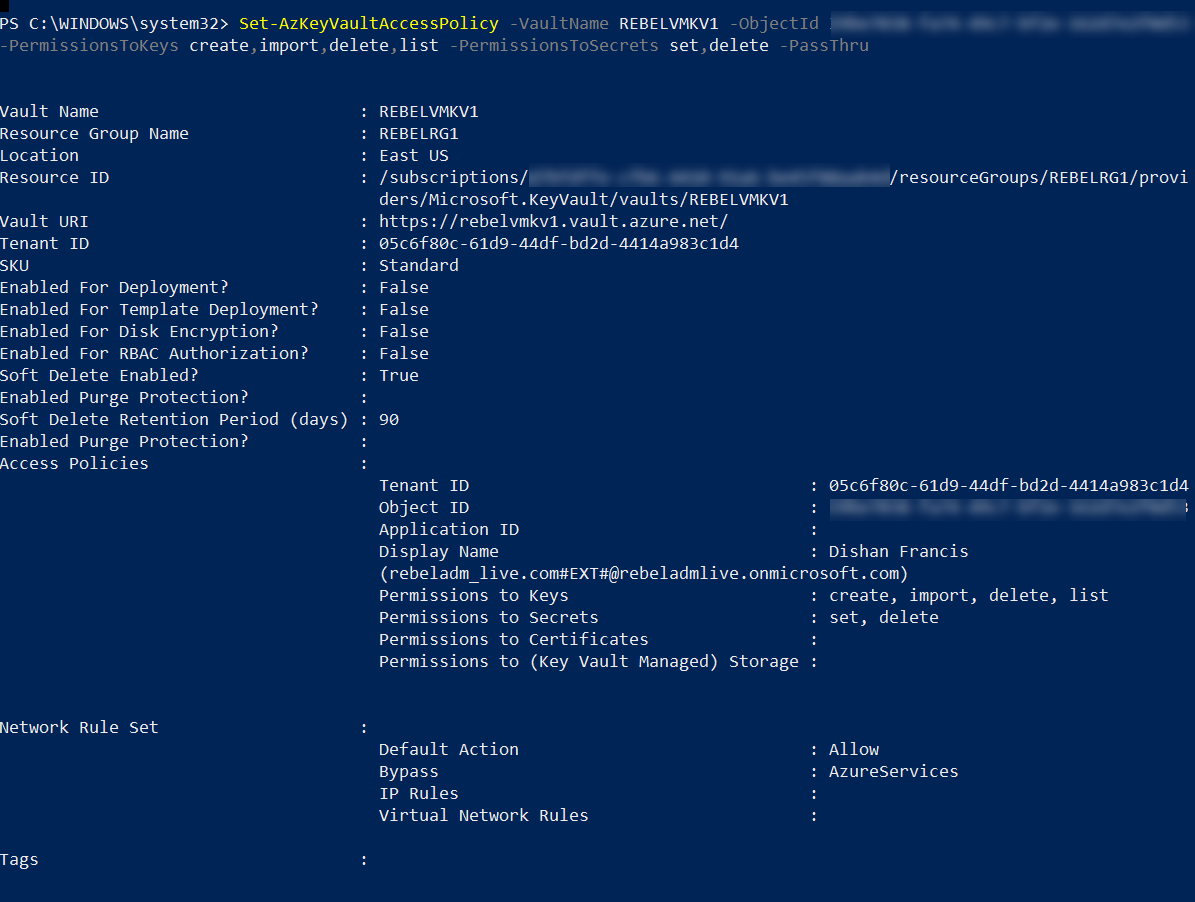
In the above -Objectid value should replace with the actual objectid value of the currently logged in the global admin account. Here -PermissionsToKeys define the permissions allocated for keys and -PermissionsToSecrets defines the permissions allocated for secrets.
Next, we need a new encryption key to use with disk encryption.
$vk1 = Add-AzKeyVaultKey -VaultName REBELVMKV1 -Name “REBELVMKey” -Destination “Software”

In the above, REBELVMKey is the key name. -Destination is defined as Software as we creating the standard encryption key. If required it can be set to Hardware Security Model (HSM) but it comes with additional cost.
Create DisKEncryptionSet Resource
As next step of the configuration we need to create DisKEncryptionSet Resource
$desconf = New-AzDiskEncryptionSetConfig -Location “East US” -SourceVaultId $rkv.ResourceId -KeyUrl $vk1.Key.Kid -IdentityType SystemAssigned
$des1 = New-AzDiskEncryptionSet -Name RDES1 -ResourceGroupName REBELRG1 -InputObject $desconf

In above, I have created new DisKEncryptionSet called RDES1.
Now we need to grant permission to this new DisKEncryptionSet to retrieve/encrypt/decrypt DEK in the key vault.
Set-AzKeyVaultAccessPolicy -VaultName REBELVMKV1 -ObjectId $des1.Identity.PrincipalId -PermissionsToKeys wrapkey,unwrapkey,get
Create Azure VM with SSE and CMK
To start configuration, first, we need to create a new virtual network under REBELRG1 resource group. So we can use it for VM.
$vmsubnet = New-AzVirtualNetworkSubnetConfig -Name vmsubnet -AddressPrefix “10.0.2.0/24”
New-AzVirtualNetwork -Name REBELVN1 -ResourceGroupName REBELRG1 -Location “East US” -AddressPrefix “10.0.0.0/16” -Subnet $vmsubnet
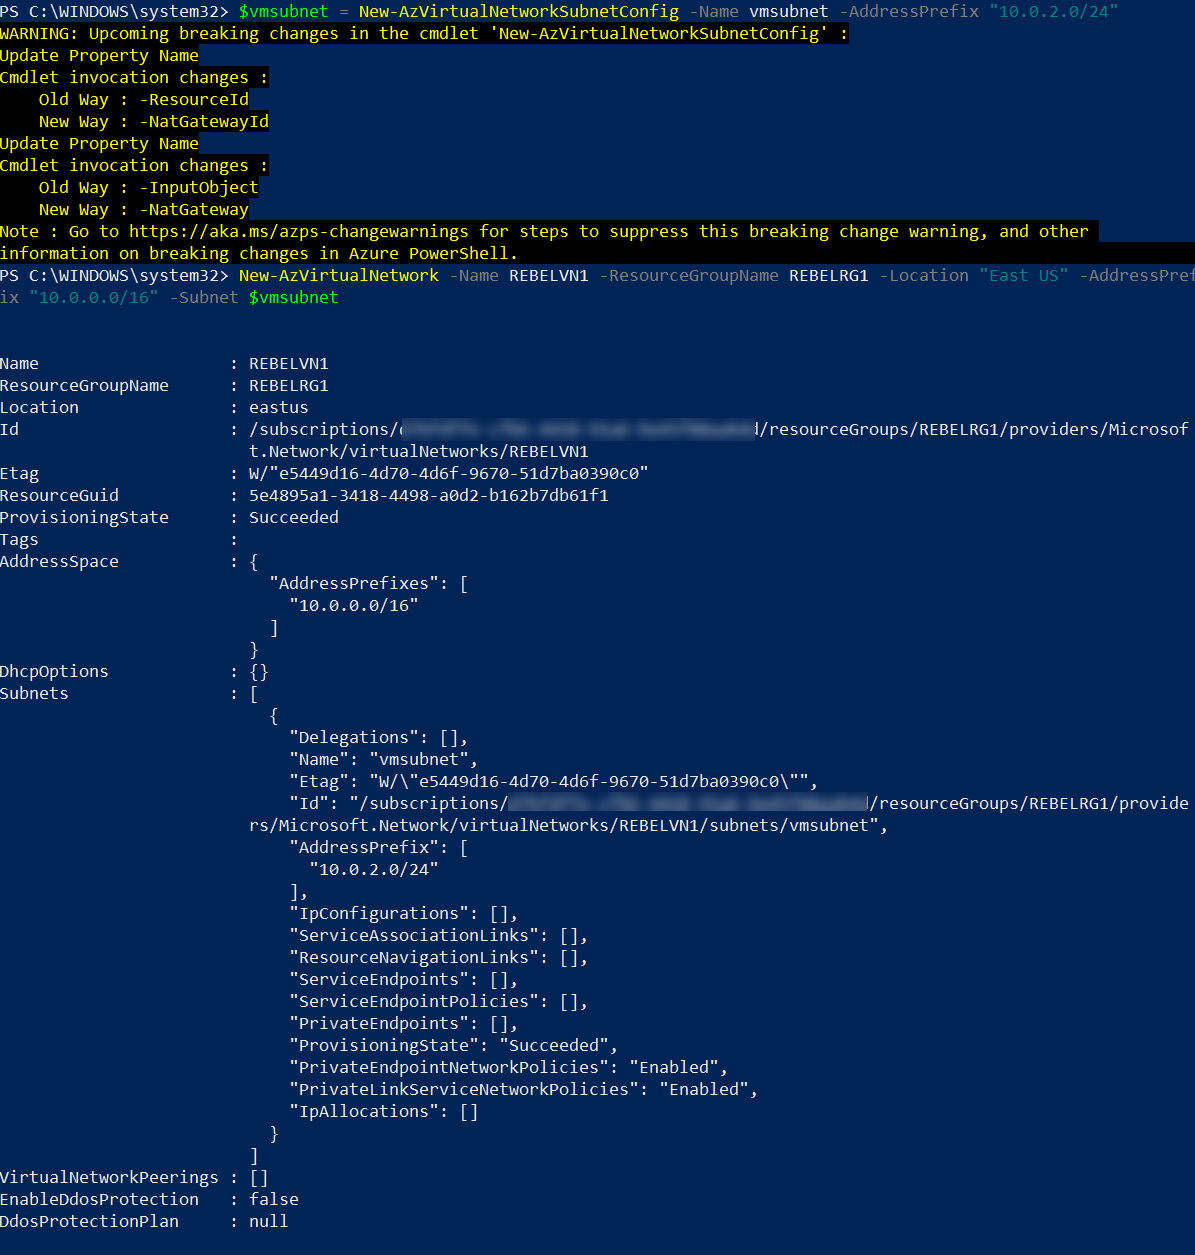
In the above, REBELVN1 is the new virtual network name. It has 10.0.0.0/16 address space. It also has a new subnet 10.0.2.0/24 (vmsubnet) for virtual machines.
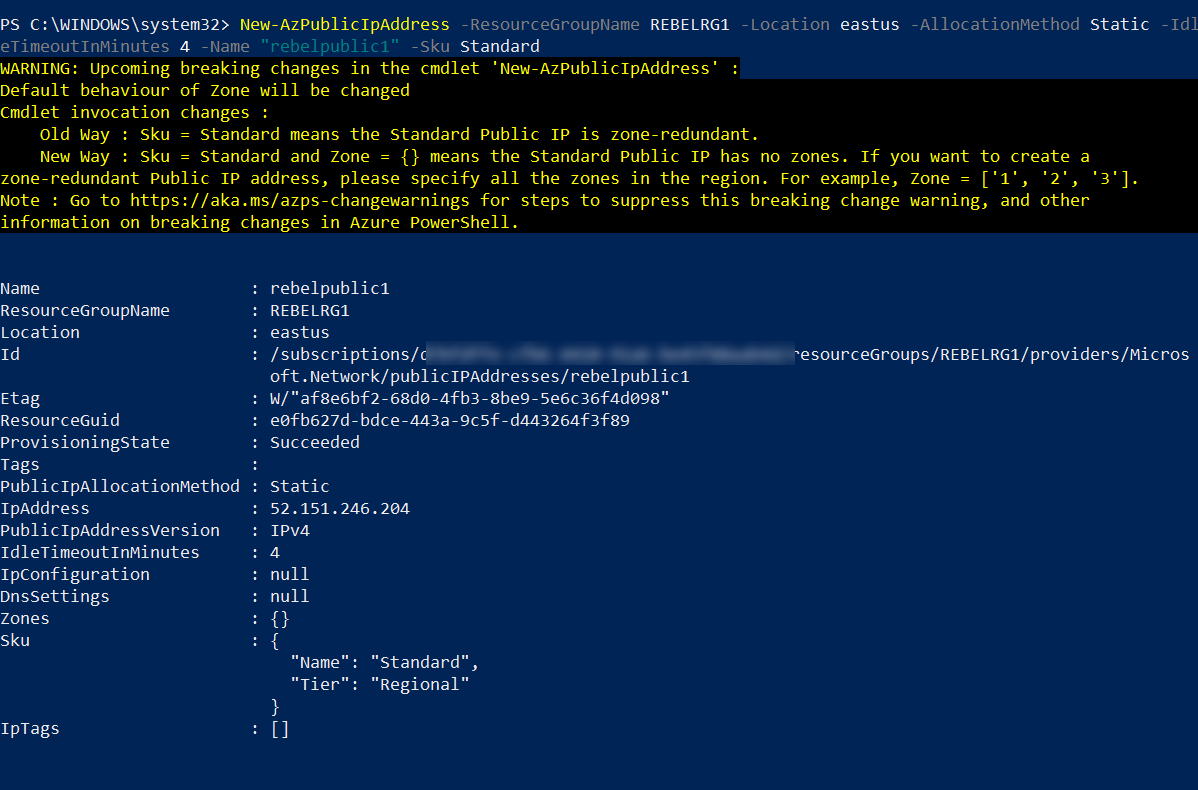
The next step of the configuration is to create a public IP address to use with Azure VM.
New-AzPublicIpAddress -ResourceGroupName REBELRG1 -Location eastus -AllocationMethod Static -IdleTimeoutInMinutes 4 -Name “rebelpublic1” -Sku Standard
To access Azure Virtual Machine over the internet, first, we need to allow TCP 3389 traffic via network security group (NSG). Before we create NSG, let’s go ahead and create the NSG rule.
$rdprule = New-AzNetworkSecurityRuleConfig -Name rebelrdprule -Protocol Tcp -Direction Inbound -Priority 1000 -SourceAddressPrefix * -SourcePortRange * -DestinationAddressPrefix * -DestinationPortRange 3389 -Access Allow
In the above, I created a rule to accept TCP 3389 inbound traffic from any source.
Next, we need to create NSG with this new rule.
$rebelnsg = New-AzNetworkSecurityGroup -ResourceGroupName REBELRG1 -Location eastus -Name rebelNSG1 -SecurityRules $rdprule

Now we have a virtual network, public IP address, and NSG in place. The next step is to create a new NIC using these resources.
$rebelvnet = Get-AzVirtualNetwork -Name REBELVN1 -ResourceGroupName REBELRG1
$publicip = Get-AzPublicIpAddress -Name rebelpublic1 -ResourceGroupName REBELRG1
$rebelnic1 = New-AzNetworkInterface -Name rebelvmnic1 -ResourceGroupName REBELRG1 -Location eastus -SubnetId $rebelvnet.Subnets[0].Id -PublicIpAddressId $publicip.Id -NetworkSecurityGroupId $rebelnsg.Id

Now we have everything in place to create a new Azure VM. Let’s go ahead and complete the process using,
$cred = Get-Credential
$rebelvmconf = New-AzVMConfig -VMName REBEL01 -VMSize Standard_DS1_v2 | Set-AzVMOperatingSystem -Windows -ComputerName REBEL01 -Credential $cred | Set-AzVMSourceImage -PublisherName MicrosoftWindowsServer -Offer WindowsServer -Skus 2019-Datacenter -Version latest | Add-AzVMNetworkInterface -Id $rebelnic1.Id
In the above, I am creating a virtual machine configuration for the new VM called REBEL01 in East US Azure region. It is running windows server 2019 data center edition. It also using Standard_DS1_v2 VM size.
Then we need to add OS disk to the DisKEncryptionSet.
$des = Get-AzDiskEncryptionSet -ResourceGroupName REBELRG1 -Name RDES1
$VM = “REBEL01”
$rebelvmconf = Set-AzVMOSDisk -VM $rebelvmconf -Name $($VM +”_OSDisk”) -DiskEncryptionSetId $des.Id -CreateOption FromImage
Then I am going to add a data disk (128GB) to the vm and it will also encrypt same way.
$rebelvmconf = Add-AzVMDataDisk -VM $rebelvmconf -Name $($VM +”DataDisk1″) -DiskSizeInGB 128 -StorageAccountType Premium_LRS -CreateOption Empty -Lun 0 -DiskEncryptionSetId $des.Id

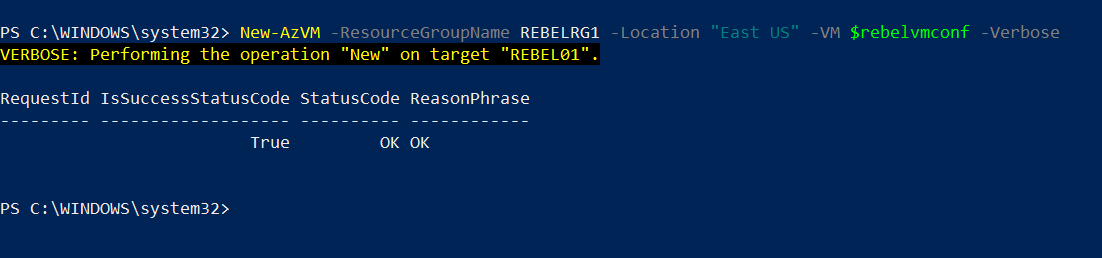
And now everything is ready to create VM.
New-AzVM -ResourceGroupName REBELRG1 -Location “East US” -VM $rebelvmconf -Verbose
After VM is created, we can go and verify the disk encryption in VM.
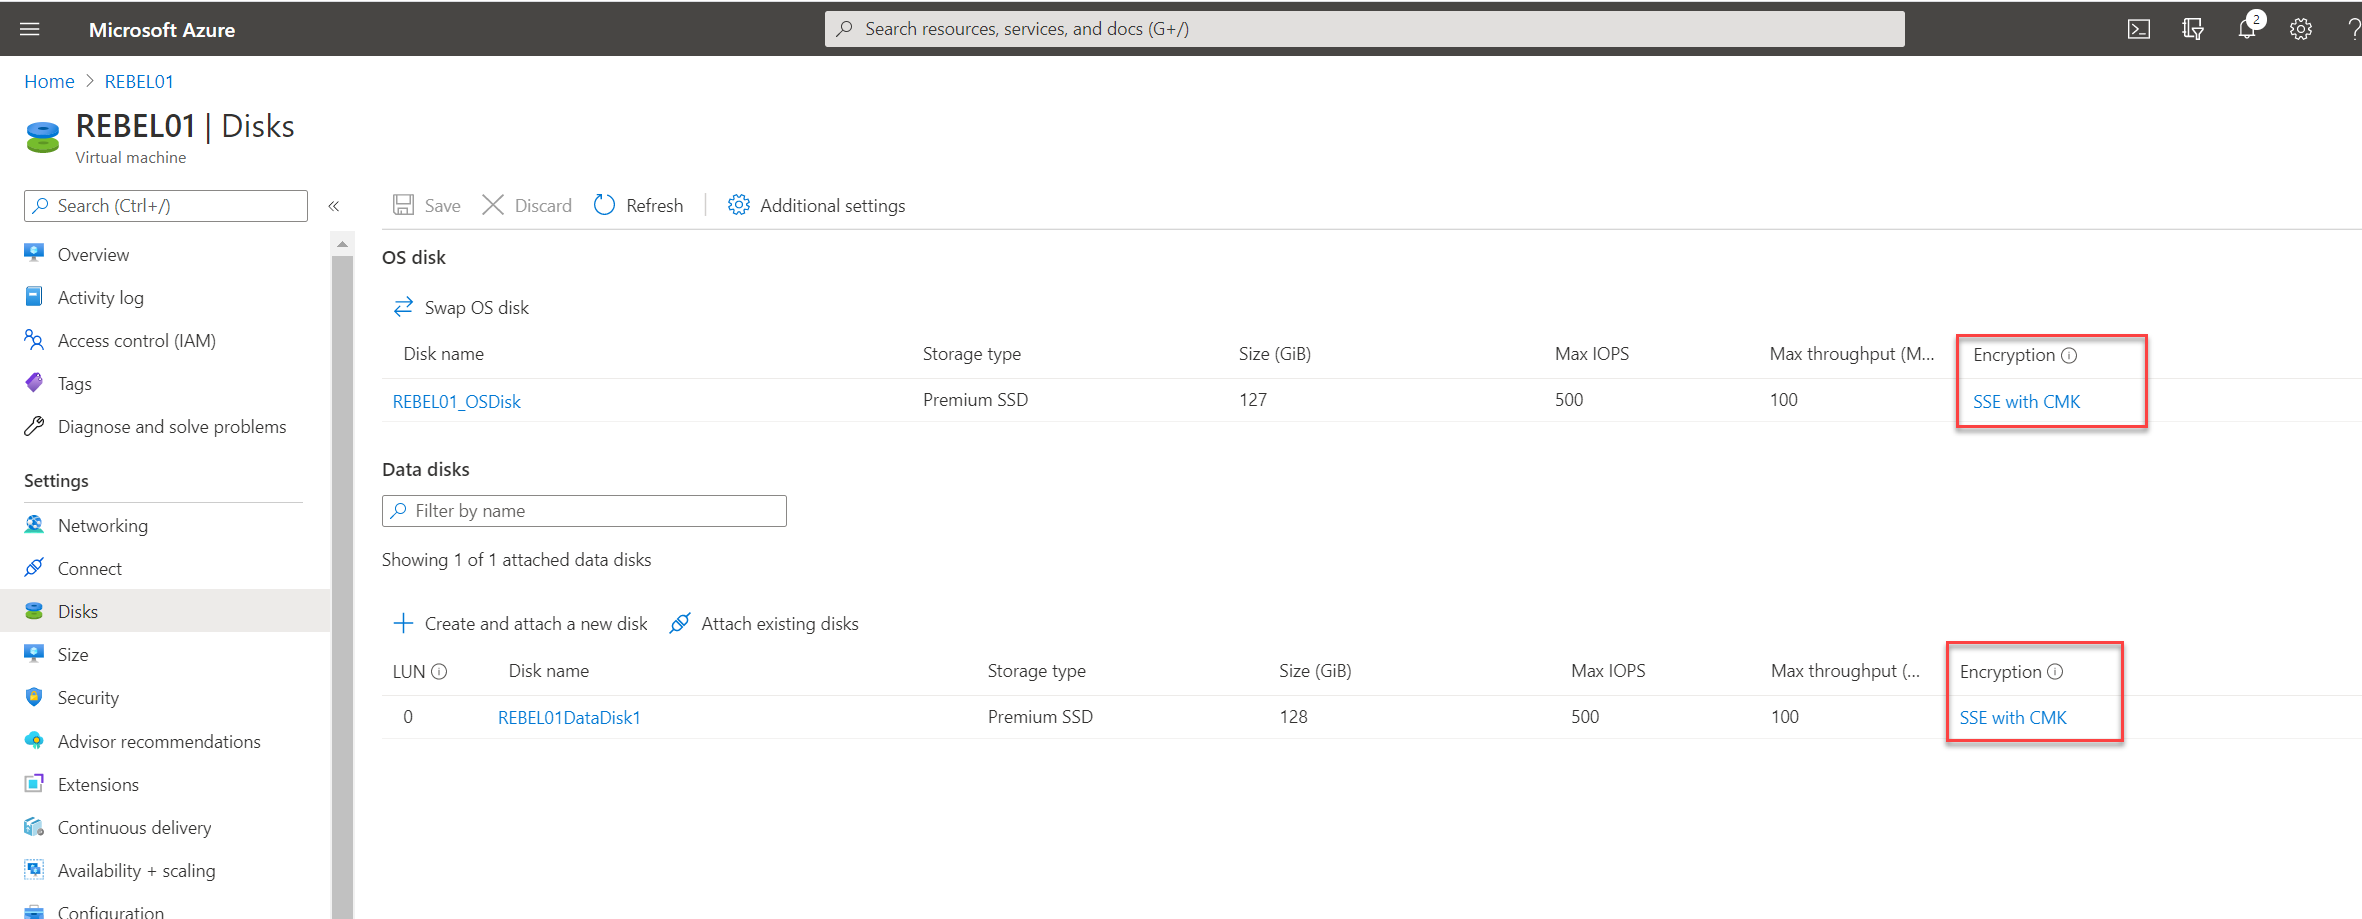
As we can see the VM OS and Data Disks are encrypted using SSE and CMK.
I hope now you have a better understanding of how we can Encrypt Azure VM using Server-Side Encryption (SSE) and Customer Managed Keys (CMK). If you have any further questions about this feel free to contact me at rebeladm@live.com also follow me on Twitter @rebeladm to get updates about new blog posts.
Note : All the PowerShell commands used in here available on https://github.com/rebeladm/rebeladm/blob/master/SSEwithCMK.ps1

