
In infrastructure, there are many reasons for allowing traffic between virtual networks such as application requirements, backup/DR requirements, replication requirements and so on. If it is internal networks, we can do this using inter-VLAN routing. If it is between networks in different physical locations, we can do it using VPN & Firewalls.
If it is Azure, how we can allow traffic between two virtual networks? Well, there are two options to choose from.
1. Azure VPN Gateways
2. Azure VNET Peering
Azure VPN Gateways
If we are connecting virtual networks over the internet, we have to use VPN gateway option. This is the same for connecting Azure networks with on-premises networks. Also, if the encryption is a requirement, we have to use VPN gateways.
Azure VNET Peering
Azure VNET peering allows connecting virtual networks seamlessly via Azure backbone infrastructure. This is similar to inter-VLAN routing in on-premises networks. The traffic will not pass via the public internet. It provides low latency, high bandwidth connectivity between virtual networks. VNET peering can use to connect virtual networks in the same Azure region or different Azure regions.
In this demo, I am going to demonstrate how to connect two virtual networks using Azure VNET peering.
For the configuration process, I will be using PowerShell. Therefore, please make sure you have an Azure PowerShell module installed. More info about it can find under https://docs.microsoft.com/en-us/powershell/azure/install-az-ps?view=azps-2.6.0
Create two resource groups and new virtual networks
As the first part of the configuration, I am going to create two new resource groups and two virtual networks.
1. Launch PowerShell console and connect to Azure using Connect-AzAccount
2. Then create two new resource group using,
New-AzResourceGroup -Name REBELRG1 -Location "East US"
New-AzResourceGroup -Name REBELRG2 -Location "East US"
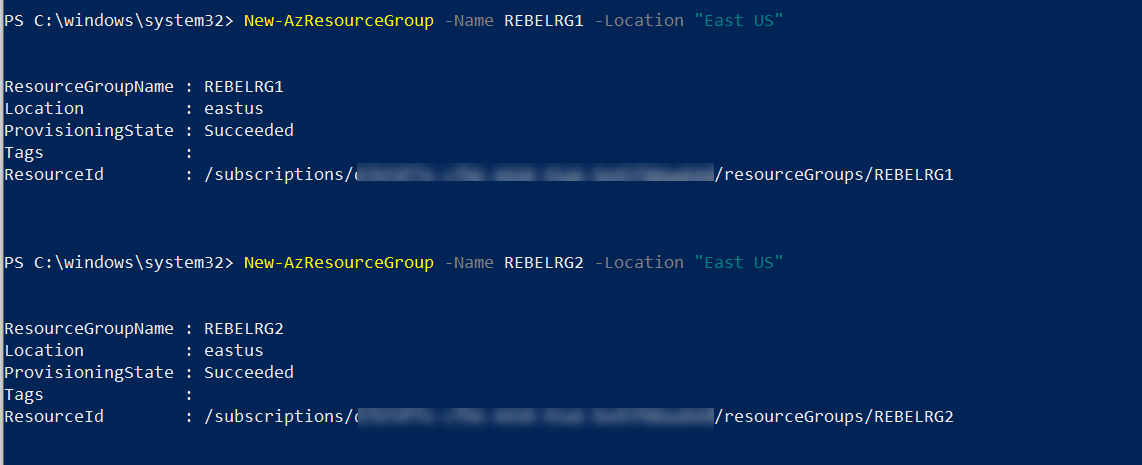
In the above, REBELRG1 & REBELRG2 are the resource group names and East US is the resource group location.
3. The next step is to create a new virtual network under REBELRG1 resource group.
$vmsubnet = New-AzVirtualNetworkSubnetConfig -Name vmsubnet -AddressPrefix "10.0.2.0/24"
New-AzVirtualNetwork -Name REBELVN1 -ResourceGroupName REBELRG1 -Location "East US" -AddressPrefix "10.0.0.0/16" -Subnet $vmsubnet

In the above, REBELVN1 is the new virtual network name. It has 10.0.0.0/16 address space. It also has a new subnet 10.0.2.0/24 (vmsubnet) for virtual machines.
4. Then let's go ahead and create another virtual network under REBELRG2 resource group.
$vmsubnet2 = New-AzVirtualNetworkSubnetConfig -Name vmsubnet2 -AddressPrefix "10.1.3.0/24"
New-AzVirtualNetwork -Name REBELVN2 -ResourceGroupName REBELRG2 -Location "East US" -AddressPrefix "10.1.0.0/16" -Subnet $vmsubnet2
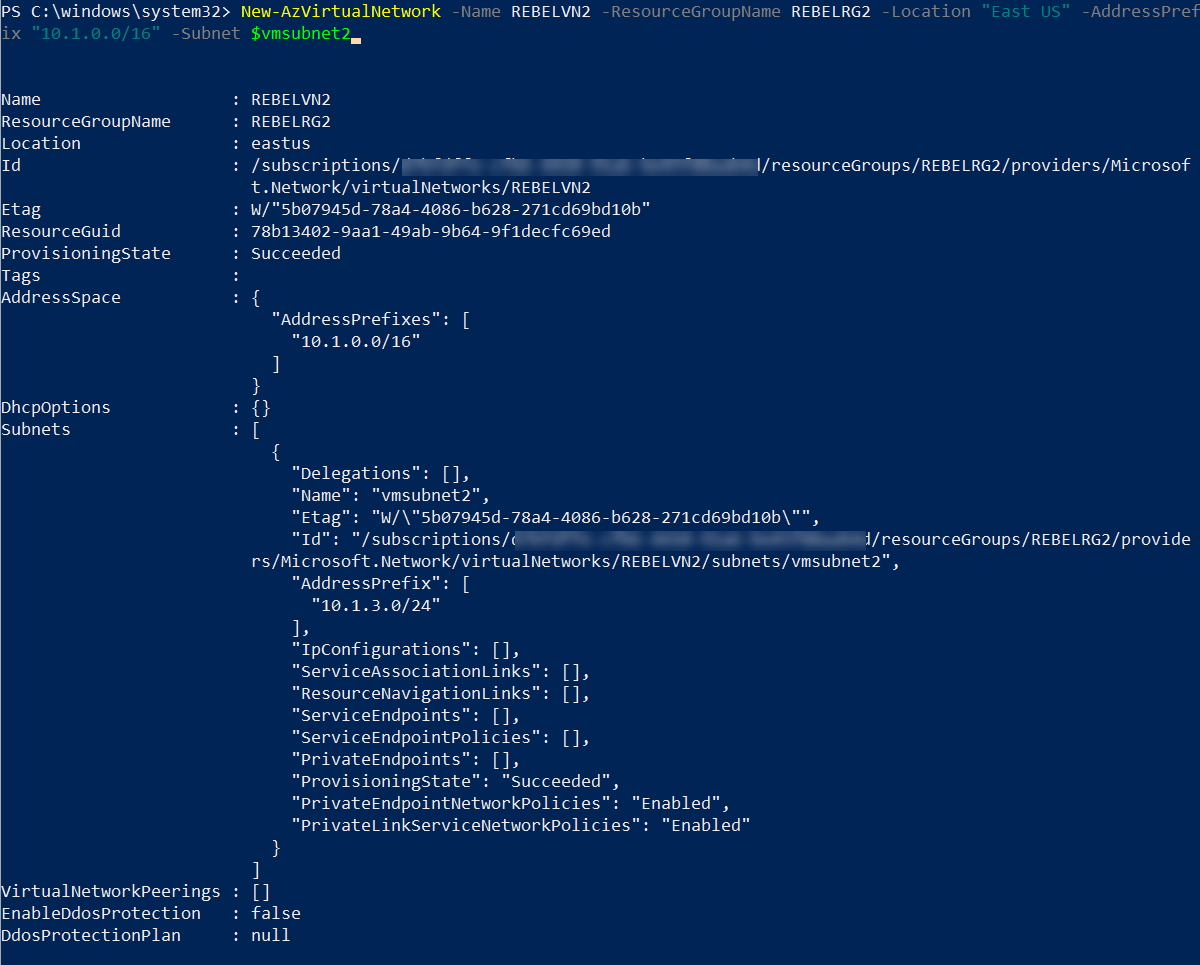
In the above, REBELVN2 is the new virtual network name. It has 10.1.0.0/16 address space. It also has a new subnet 10.1.3.0/24 (vmsubnet2) for virtual machines.
5. As the next step of the configuration, I am going to create a new virtual machine under REBELRG1 resource group. This will be used for testing purposes.
$mylogin = Get-Credential
New-AzVm -ResourceGroupName REBELRG1 -Name "REBELTVM01" -Location "East US" -VirtualNetworkName "REBELVN1" -SubnetName "vmsubnet" -addressprefix 10.0.2.0/24 -PublicIpAddressName "REBELVM01IP1" -OpenPorts 3389 -Image win2019datacenter -Size Standard_D2s_v3 -Credential $mylogin
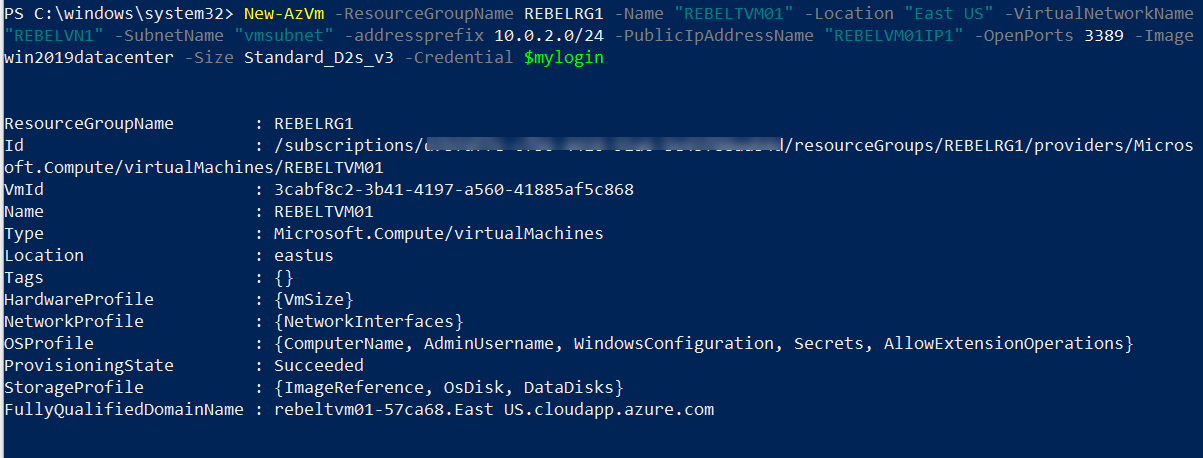
In the above, I am creating a virtual machine called REBELTVM01. It is running windows server 2019 data center edition. I have specified it using -Image parameter. It also using Standard_D2s_v3 vm size. For networking, It uses REBELVN1 virtual network and subnet 10.0.2.0/24.
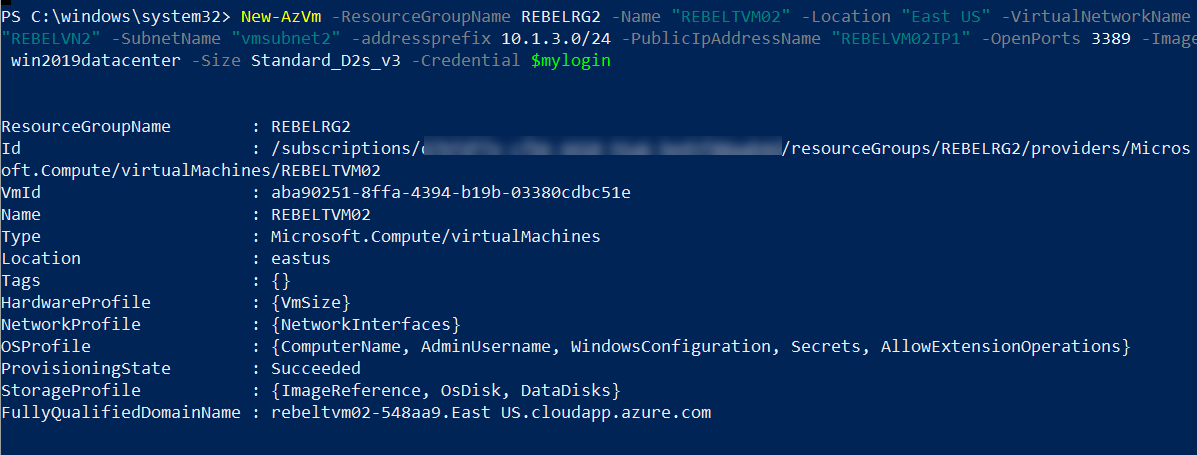
6. Same way, I am going to create a new virtual machine under REBELRG2 resource group. This will also be used for testing purposes.
$mylogin = Get-Credential
New-AzVm -ResourceGroupName REBELRG2 -Name "REBELTVM02" -Location "East US" -VirtualNetworkName "REBELVN2" -SubnetName "vmsubnet2" -addressprefix 10.1.3.0/24 -PublicIpAddressName "REBELVM02IP1" -OpenPorts 3389 -Image win2019datacenter -Size Standard_D2s_v3 -Credential $mylogin
In the above, I am creating a virtual machine called REBELTVM02. It is running windows server 2019 data center edition. I have specified it using -Image parameter. It also using Standard_D2s_v3 vm size. For networking, it uses REBELVN2 virtual network and subnet 10.1.3.0/24.
In the end, we have two virtual machines with the following config.
|
Virtual Machine |
Resource Group |
Virtual Network |
VM Subnet |
IP Address |
|
REBELRG1 |
REBELVN1 |
vmsubnet |
10.0.2.4 |
|
|
REBELTVM02 |
REBELRG2 |
REBELVN2 |
Vmsubnet2 |
10.1.3.4 |
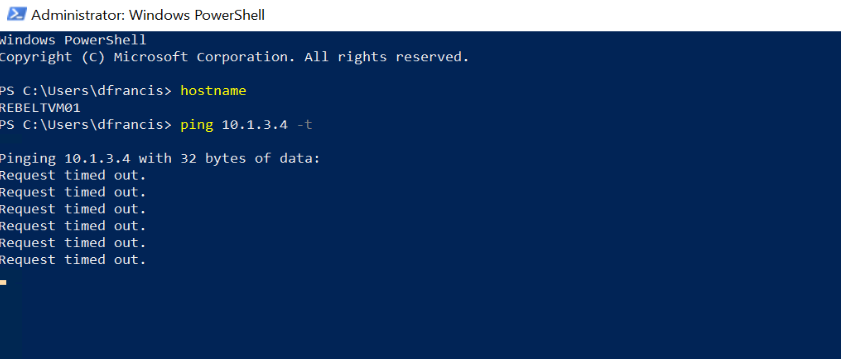
7. I log in to REBELTVM01 and try to ping 10.1.3.4 (REBELTVM02). As we can see it fails. This was the expected behavior.
I did the same from REBELTVM02 and try to ping 10.0.2.4 (REBELTVM01).
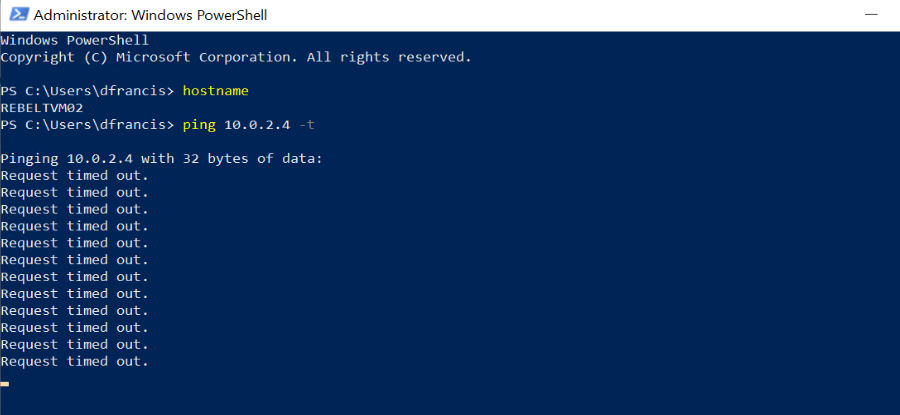
[su_note]We need to allow ICMP traffic first by using VM's windows firewall. By default, it is not allowed.[/su_note]
8. Let's go ahead and create VNET peering. This will allow communication between the above two virtual machines.
First, I am going to create peering from REBELVN1 to REBELVN2
$vnet1 = Get-AzVirtualNetwork -Name REBELVN1 -ResourceGroupName REBELRG1
$vnet2 = Get-AzVirtualNetwork -Name REBELVN2 -ResourceGroupName REBELRG2
Add-AzVirtualNetworkPeering -Name REBELVN1toREBELVN2 -VirtualNetwork $vnet1 -RemoteVirtualNetworkId $vnet2.Id
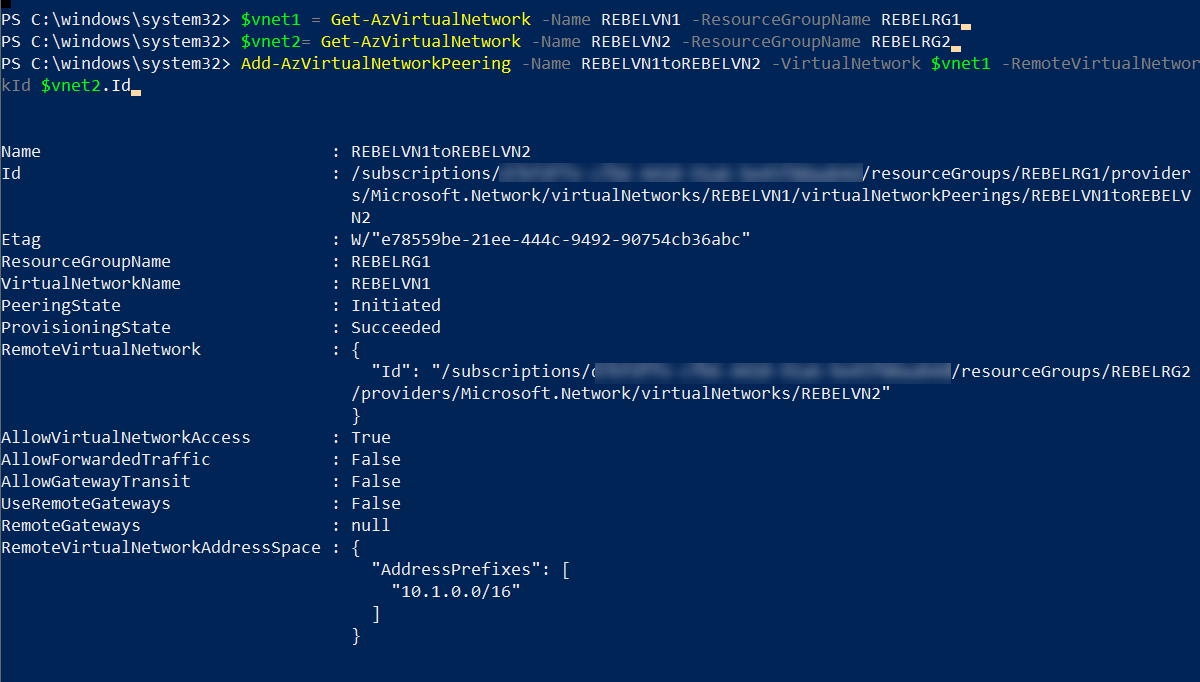
Above creates peering from REBELVN1 to REBELVN2. we need to do the same from REBELVN2 to REBELVN1
$vnet1 = Get-AzVirtualNetwork -Name REBELVN1 -ResourceGroupName REBELRG1
$vnet2 = Get-AzVirtualNetwork -Name REBELVN2 -ResourceGroupName REBELRG2
Add-AzVirtualNetworkPeering -Name REBELVN2toREBELVN1 -VirtualNetwork $vnet2 -RemoteVirtualNetworkId $vnet1.Id
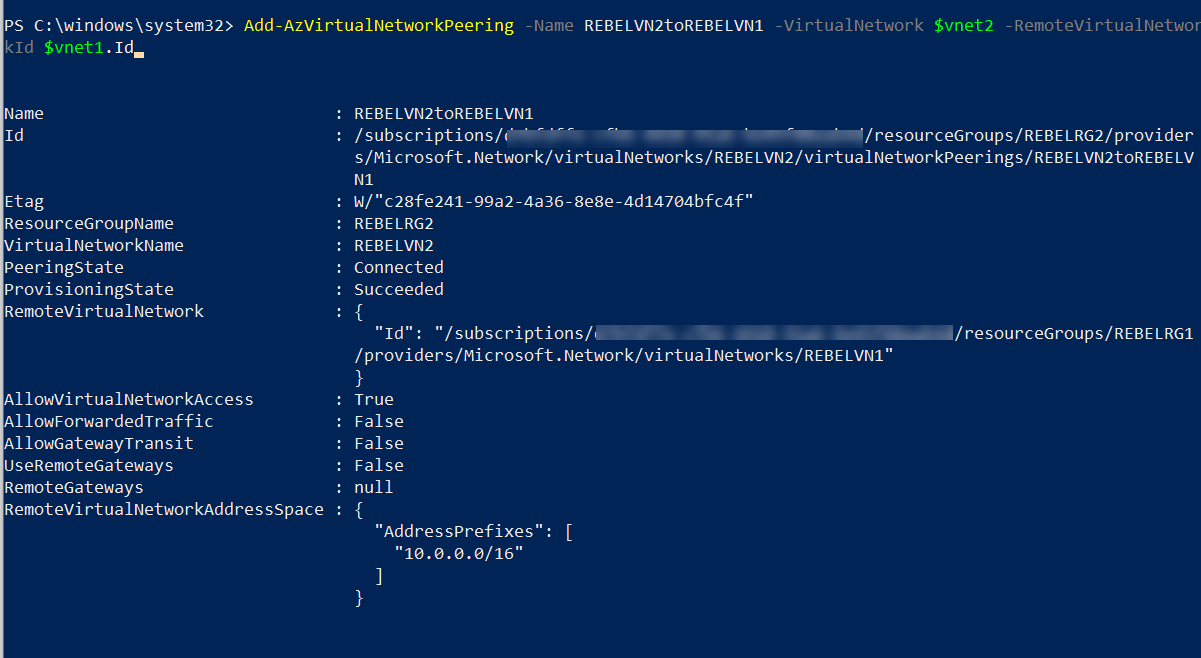
This completes the peering configuration.
9. It is time for testing. Let's go ahead and do the same ping test we have done on step 7.
I log in to REBELTVM01 and try to ping 10.1.3.4 (REBELTVM02). As expected, we can ping now.

I did the same from REBELTVM02 and try to ping 10.0.2.4 (REBELTVM01). That's successful as well.
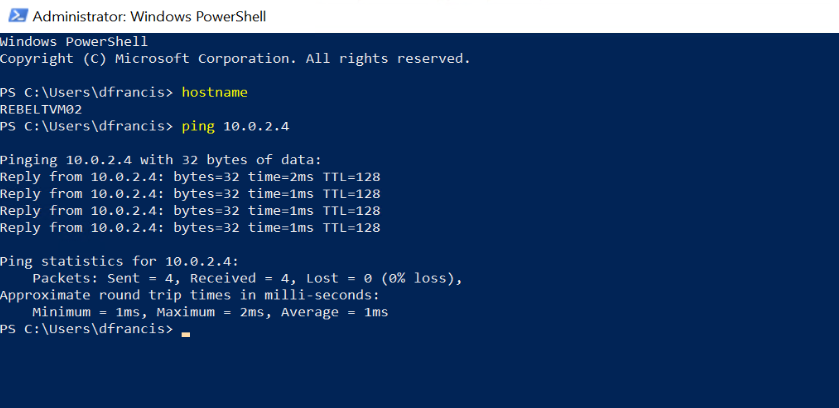
This confirms the VNET peering is working as expected.
I hope now you have a better understanding of how VNET peering works and how we can configure it. This marks the end of this blog post. If you have any further questions about this feel free to contact me on rebeladm@live.com also follow me on twitter @rebeladm to get updates about new blog posts.

