
This is last part of my blog post series which is covering Azure CLI 2.0 functions. If you didn’t read part 01 yet please read it before start on this. You can find it on http://www.rebeladmin.com/2017/10/step-step-guide-manage-azure-storage-using-azure-cli-2-0-part-01/
In my demo setup, I have two VM running. One is created using Azure Managed disks. In part 01 I explained how to add additional disk. It is currently having a 100GB additional disk attached.
Expand Disks
Let’s see how we can expand disks using Azure CLI. Before do this, make sure you log in to Azure CLI using az login
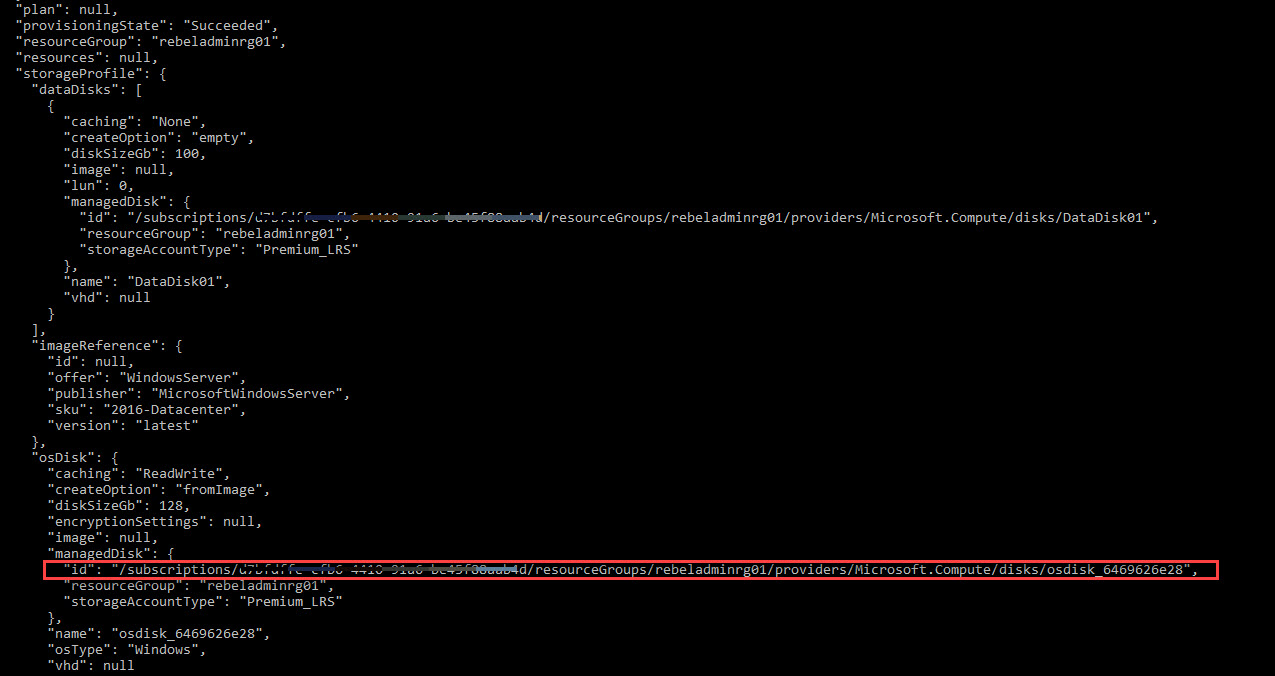
let’s start with expanding azure managed disks. First, we can verify the VM’s storage configuration using,
az vm show --resource-group rebeladminrg01 --name REBLEVM101
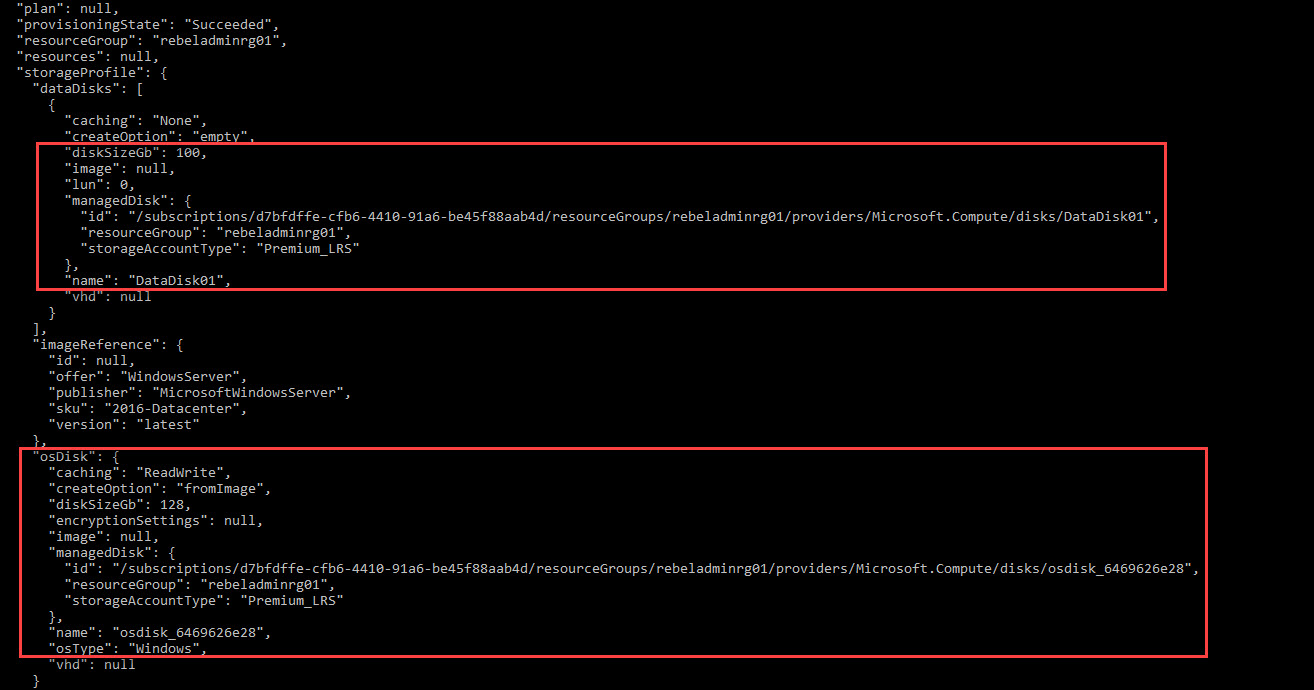
In there I have two disks. One is for OS called osdisk_6469626e28 and the other data disk called DataDisk01
We can’t increase the disk on a running VM. Not even a data disk. So first we need to deallocate the VM. We can do it using.
az vm deallocate --resource-group rebeladminrg01 --name REBLEVM101
in above command –resource-group defines resource group VM belongs to. –name defines the VM name.

once it is completed we can increase the disk sizes.
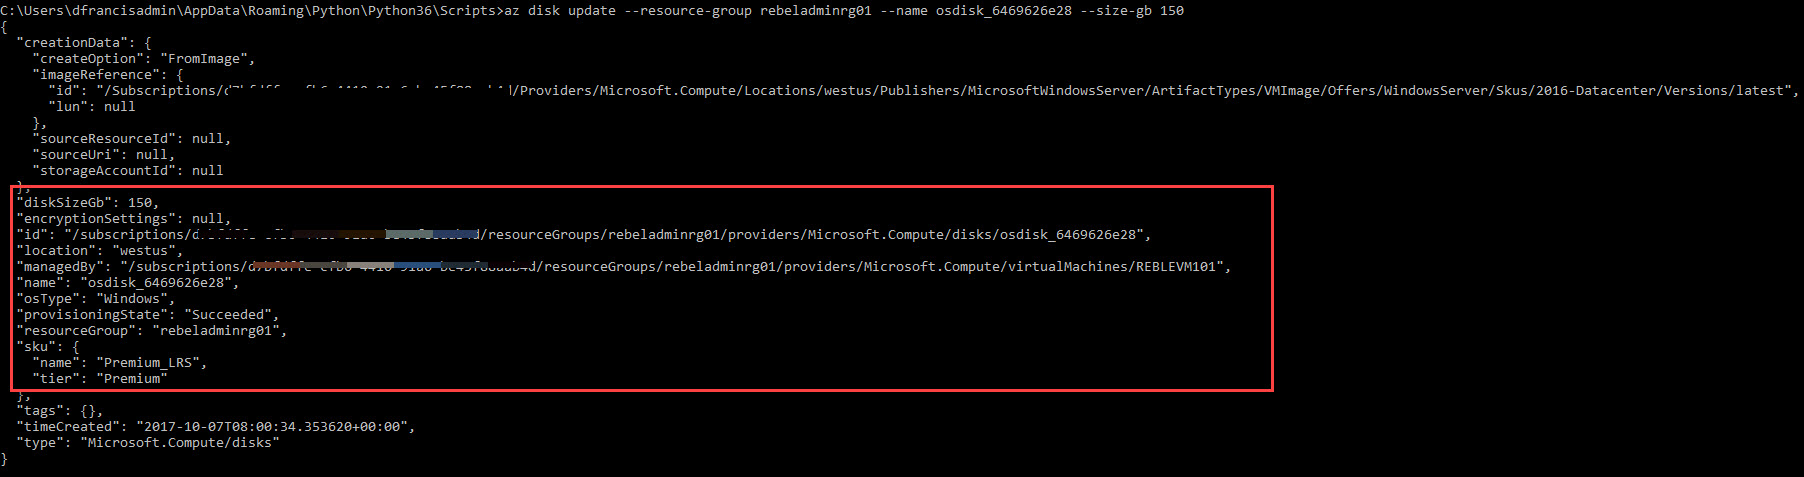
I need to expand os Disk size to 150 GB. I can do it using,
az disk update --resource-group rebeladminrg01 --name osdisk_6469626e28 --size-gb 150
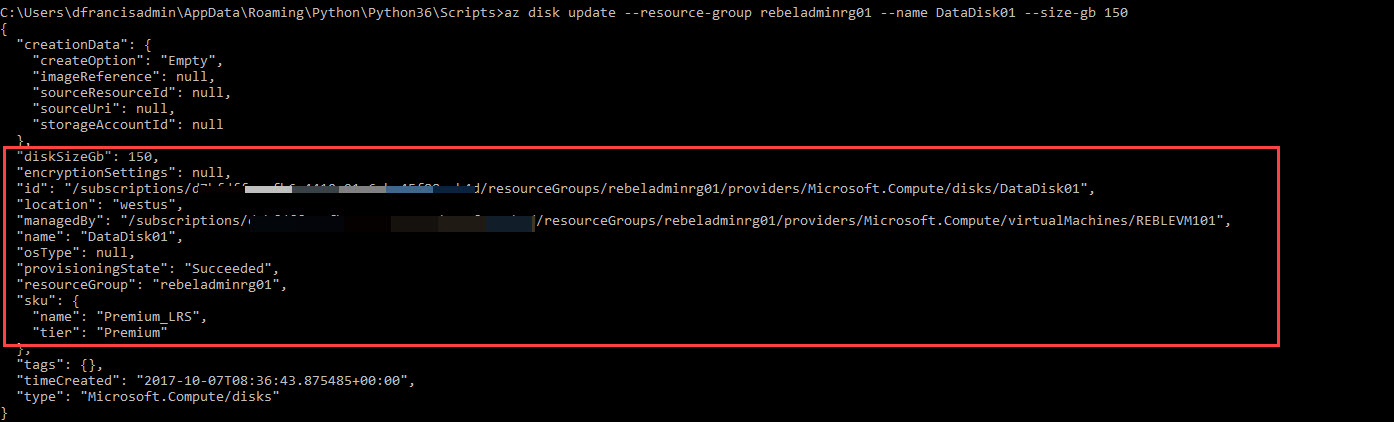
I also like to expand data disk to 150 GB. I can do it using,
az disk update --resource-group rebeladminrg01 --name DataDisk01 --size-gb 150
in above commands, –resource-group defines resource group disks belongs to. –name defines the disk’s name.
after finish, we can start the VM using,
az vm start --resource-group rebeladminrg01 --name REBLEVM101
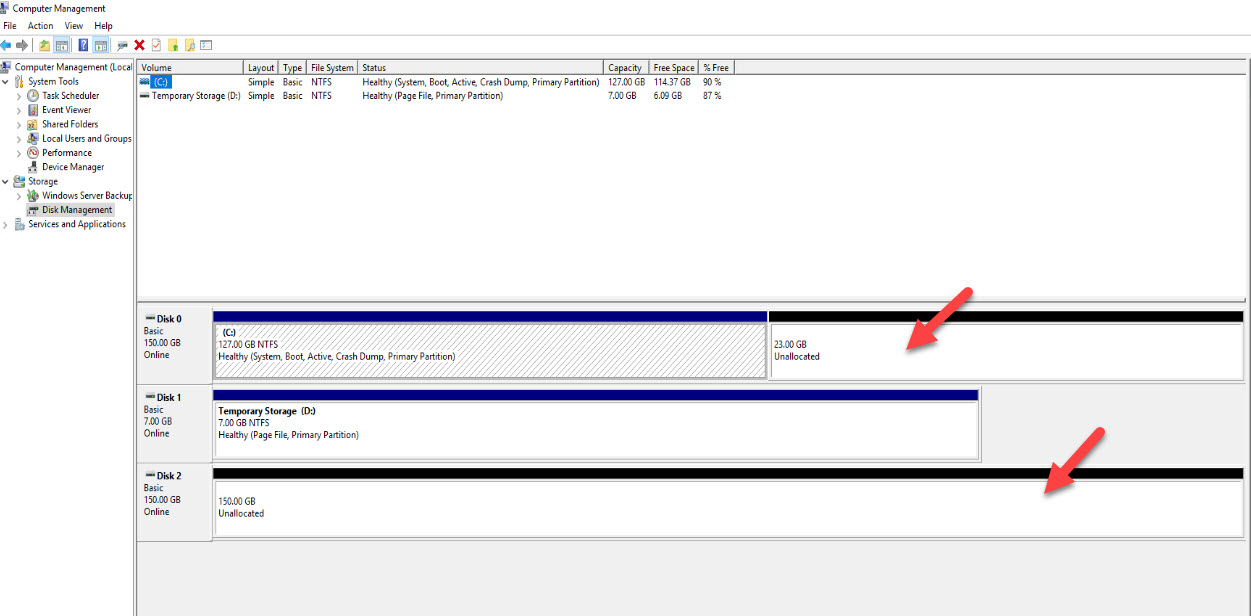
once VM is up we can go in and expand the disk in OS level.
if you looking to expand disk for unmanaged disks it can be done via interface or Azure CLI 1.0. more info can find in https://docs.microsoft.com/en-us/azure/virtual-machines/linux/expand-disks-nodejs
the document itself for Linux vm but expand part work same way.
Snapshots
We also can take snapshots of disk as quick recovery option. It is full copy of a disk in the time it’s taken. It can keep as a backup or attach to another machine for troubleshooting.
In my demo, I am going to take snapshot of an azure managed OS disk. Before do that I need to find the disk ID. It can be done using
az vm show --resource-group rebeladminrg01 --name REBLEVM101
then we can take snapshot using,
az snapshot create -g rebeladminrg01 --source "/subscriptions/xxxxx/resourceGroups/REBELADMINRG01/providers/Microsoft.Compute/disks/osdisk_6469626e28" --name vm101osDisk-backup
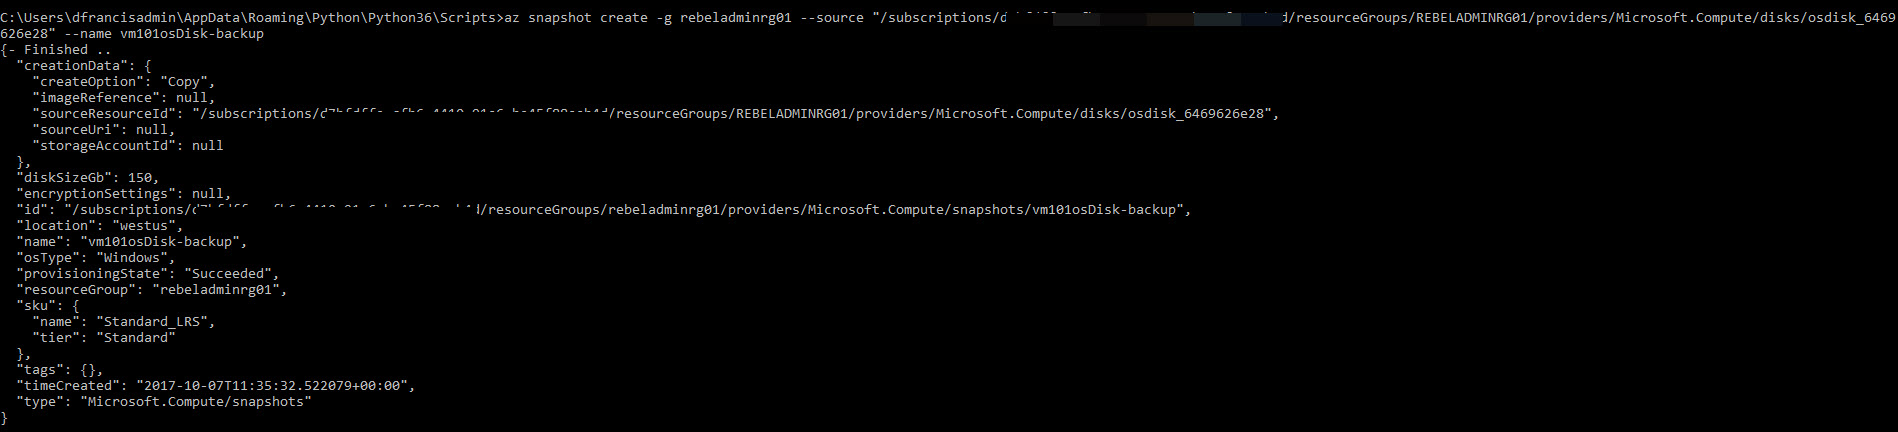
in above –source defines the disk id and –name defines the snapshot name.
if it is a unmanaged disk, snapshot works on different way. You can read more about it from https://docs.microsoft.com/en-us/azure/virtual-machines/linux/incremental-snapshots
Convert to Managed Disks
if required we can convert vm with unmanaged disks to managed disk. To do that first we need to deallocate the VM.
az vm deallocate --resource-group rebeladminrg01 --name REBELVM102
then we can start the converting process using,
az vm convert --resource-group rebeladminrg01 --name REBELVM102
once process is finished it will start the VM.

Manage blobs
We also can create, manage and delete blobs using Azure CLI.
To create a container we can simply use,
az storage container create --name datastorage01 --connection-string "DefaultEndpointsProtocol=https;EndpointSuffix=core.windows.net;AccountName=rebelstorage01;AccountKey=xxxxxxx/ixi+FKRr3YUS9CgEhCciGVIyI9+6CtqjTIiPvbXkmpFDK9sINE28jdbIwLLOUZyiAtQ3Edzx2y89RPQ=="
in above –name defines the container name. AccountName specify the storage account name and AccountKey specify the auth key for the storage account.
By default, the container data is set to private. If need it can set to public read access for blobs (blob) or public read and list access to whole container (container). It can define using –public-access
Once container is created we can upload blob using,
az storage blob upload --file C:\myzip1.zip --container-name datastorage01 --name myzip1.zip --connection-string "DefaultEndpointsProtocol=https;EndpointSuffix=core.windows.net;AccountName=rebelstorage01;AccountKey=xxxxxx/ixi+FKRr3YUS9CgEhCciGVIyI9+6CtqjTIiPvbXkmpFDK9sINE28jdbIwLLOUZyiAtQ3Edzx2y89RPQ=="
in above, –file defines the local file path. –container-name defines the container name it is uploading to. –name defines the blob name once it is uploaded.

to verify, we can list down the files in blob using,
az storage blob list --container-name datastorage01 --output table --connection-string "DefaultEndpointsProtocol=https;EndpointSuffix=core.windows.net;AccountName=rebelstorage01;AccountKey=xxxxxx/ixi+FKRr3YUS9CgEhCciGVIyI9+6CtqjTIiPvbXkmpFDK9sINE28jdbIwLLOUZyiAtQ3Edzx2y89RPQ=="

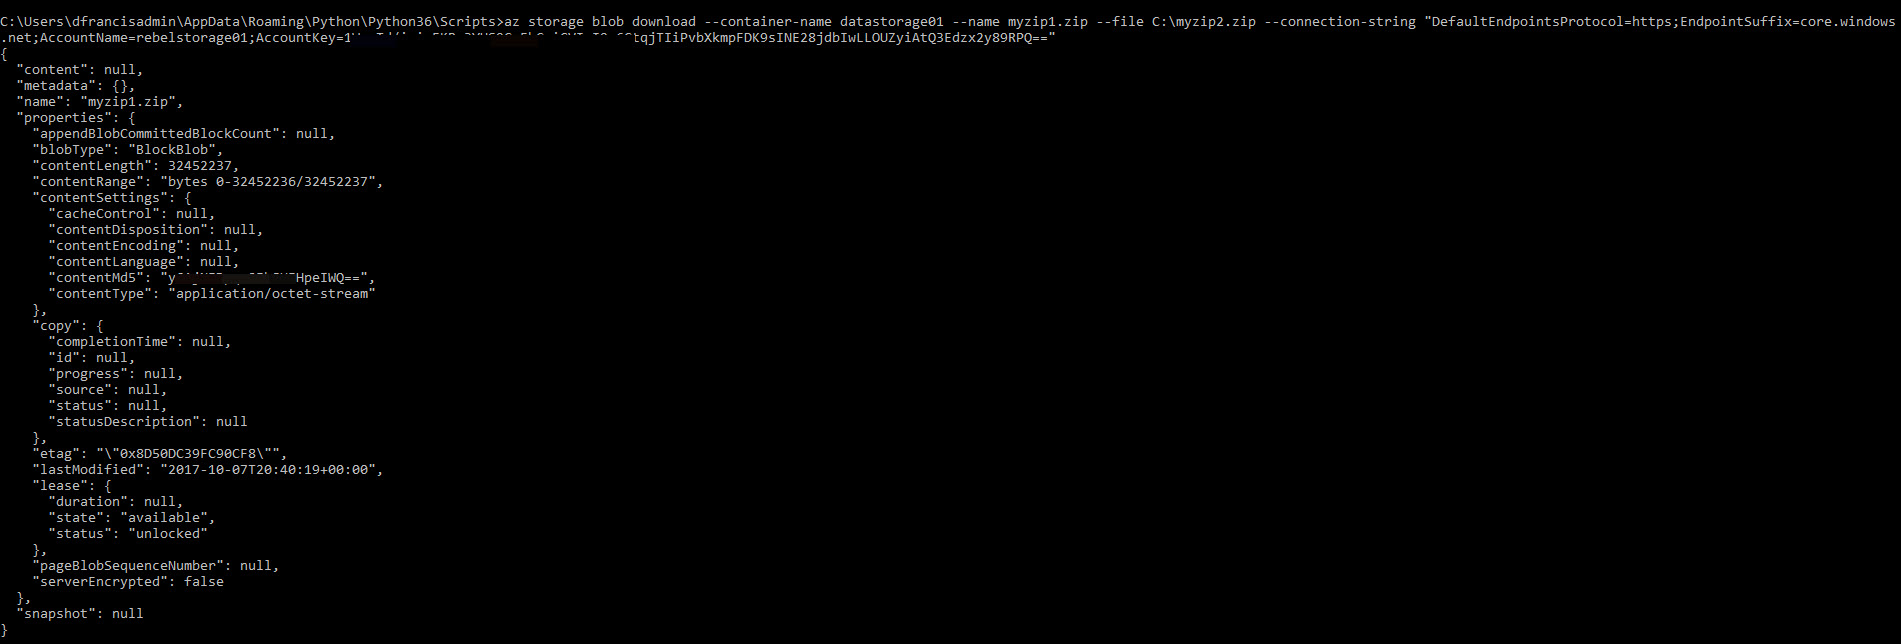
we can download blob to local storage using,
az storage blob download --container-name datastorage01 --name myzip1.zip --file C:\myzip2.zip --connection-string "DefaultEndpointsProtocol=https;EndpointSuffix=core.windows.net;AccountName=rebelstorage01;AccountKey=xxxx/ixi+FKRr3YUS9CgEhCciGVIyI9+6CtqjTIiPvbXkmpFDK9sINE28jdbIwLLOUZyiAtQ3Edzx2y89RPQ=="
in above, –file defines the path and name it will have when downloaded to the local storage.
we can delete a blob using command similar to,
az storage blob delete --container-name datastorage01 --name myzip1.zip --connection-string "DefaultEndpointsProtocol=https;EndpointSuffix=core.windows.net;AccountName=rebelstorage01;AccountKey=1WzgTd/ixi+FKRr3YUS9CgEhCciGVIyI9+6CtqjTIiPvbXkmpFDK9sINE28jdbIwLLOUZyiAtQ3Edzx2y89RPQ=="

This marks the end of the blog post and hope it was useful. If you have any questions feel free to contact me on rebeladm@live.com also follow me on twitter @rebeladm to get updates about new blog posts.

