
In my previous article about terraform, I explain what is terraform and what it can do. Also, I explain how to set it up and how we can use it with Azure to simplify infrastructure configuration. If you didn’t read it before you can view it using this link
In this post, we are going to look further in to Azure infrastructure setup using terraform.
Before that lets look in to sample configuration of an Azure resource and see how syntax been used.
resource "azurerm_resource_group" "test" {
name = "acctestrg"
location = "West US"
}
resource "azurerm_virtual_network" "test" {
name = "acctvn"
address_space = ["10.0.0.0/16"]
location = "West US"
resource_group_name = "${azurerm_resource_group.test.name}"
}
Above code is to create an Azure resource group and Azure virtual network. In the code azurerm_resource_group and azurerm_virtual_network defines the azure resource type. The text test defines the name for that resource instance. This is not the azure resource group or azure virtual network name. This is the instance name. so, if you have another resource group it can be test2. Actual resource names are defined using name attribute. So, in above code the actual resource name for resource group is acctestrg and for virtual network its acctvn.
In above example, new virtual network is need placed under the acctestrg resource group. in the code it is defined using,
resource_group_name = "${azurerm_resource_group.test.name}"
in there, by azurerm_resource_group.test it defines the related resource group instance. In our example, it is test. Then using .name it calls for the attribute value of name under that particular resource group.
In the plan stage terraform creates the execution plan. It does not process the code top to bottom. It evaluates the code and then build the plan logically. There for it no longer consider the resource order. Let’s try it with an example,
resource "azurerm_virtual_network" "test" {
name = "acctvn"
address_space = ["10.0.0.0/16"]
location = "West US"
resource_group_name = "${azurerm_resource_group.test.name}"
}
resource "azurerm_resource_group" "test2" {
name = "acctestrg2"
location = "West US"
}
resource "azurerm_virtual_network" "test2" {
name = "acctvn2"
address_space = ["11.0.0.0/16"]
location = "West US"
resource_group_name = "${azurerm_resource_group.test2.name}"
}
resource "azurerm_resource_group" "test" {
name = "acctestrg"
location = "West US"
}
In above example, I am creating two resources group and two virtual networks. If you look in to highlighted sections, I placed the code related to virtual network before creating resources group. But when I run terraform plan it creates the execution plan in correct order.
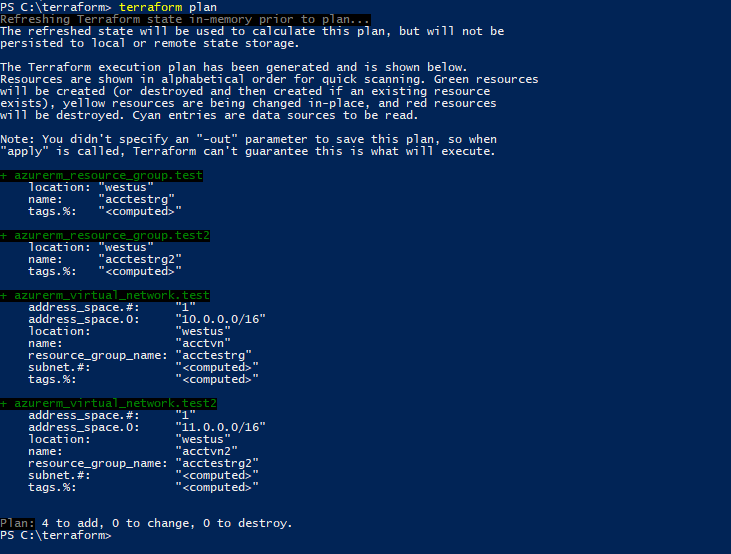
And once it is executed, it creates the expected resources.

As next step on demo, let’s see how we can create virtual machines in Azure using terraform.
resource "azurerm_virtual_machine" "testvm" {
name = "acctvm"
location = "West US"
resource_group_name = "${azurerm_resource_group.test.name}"
network_interface_ids = ["${azurerm_network_interface.test.id}"]
vm_size = "Standard_A0"
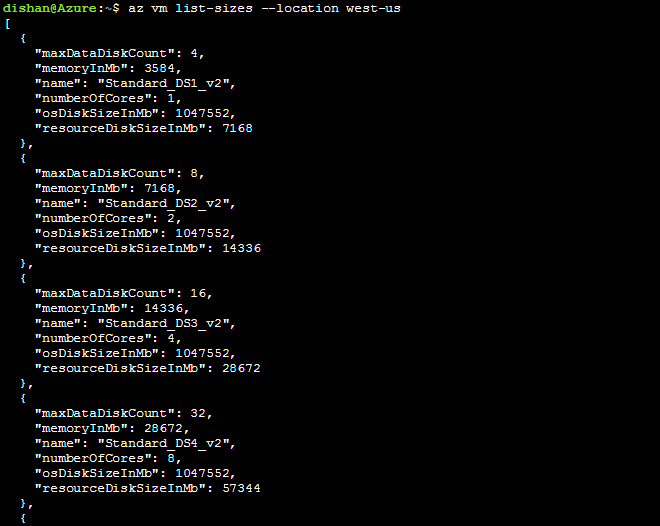
above code is an example to create a VM in azure. In code sample, azurerm_virtual_machine defines the resource type. testvm is the resource instance name. acctvm is the name of the virtual machine. According to code the resource will deploy under West US region. resource_group_name defines the resource group it belongs to. network_interface_ids defines the network interface id for the VM. vm_size defines the Azure VM template. The template list for the region can list down using following Azure CLI command.
az vm list-sizes --location west-us
This will list down the all available VM sizes in West US region.
Azure VM also need other components such as virtual network, storages, operating system so on. Let’s see how we can add these to the configuration.
In earlier on the post, I share samples for creating a resources group and virtual network. The next step of it will be to add a subnet under the virtual network.
resource "azurerm_subnet" "sub1" {
name = "acctsub1"
resource_group_name = "${azurerm_resource_group.test.name}"
virtual_network_name = "${azurerm_virtual_network.test.name}"
address_prefix = "10.0.2.0/24"
}
In above I am creating a subnet 10.0.2.0/24 under virtual network and resources group I already have. In code, azurerm_subnet defines the resource type. sub1 is the instance name and acctsub1 is the subnet name. resource_group_name defines on which resources group it belongs to. virtual_network_name defines which azure virtual network it associated with. address_prefix specifies the subnet value.
Now we have subnet also associated with network. We also need public IP address in order to connect to VM from internet.
resource "azurerm_public_ip" "pub1" {
name = "pub1"
location = "West US"
resource_group_name = "${azurerm_resource_group.test.name}"
public_ip_address_allocation = "dynamic"
}
According to above, I am creating public IP instance called pub1 under same resource group. it’s IP allocation is set to Dynamic. If need it can be static as well.
Next step is to create network interface for the VM.
resource "azurerm_network_interface" "ni1" {
name = "acctni1"
location = "West US"
resource_group_name = "${azurerm_resource_group.test.name}"
ip_configuration {
name = "lan1"
subnet_id = "${azurerm_subnet.test.id}"
private_ip_address_allocation = "dynamic"
public_ip_address_id = "${azurerm_public_ip.pub1.id}"
}
In above azurerm_network_interface is the resource type for the network interface. the interface name we are creating is acctni1. the second part of code which starts with ip_configuration defines the IP configuration for the network interface. subnet_id defines the subnet it belongs to. private_ip_address_allocation defines the ip allocation method. It can be Dynamic or Static. public_ip_address_id associates with the public ip created in the previous step. If this is not done you will not be able to connect to VM remotely once it is deployed.
Next thing we need for the VM is storage. Let’s start with creating a Storage Account
resource "azurerm_storage_account" "asa1" {
name = "accsa"
resource_group_name = "${azurerm_resource_group.test.name}"
location = "westus"
account_type = "Standard_LRS"
}
azurerm_storage_account is the resource type and accsa is the name for the account. account_type defines the storage account type. it can be Standard_LRS, Standard_GRS, Standard_RAGRS, Standard_ZRS, or Premium_LRS. More info about these account types can find from https://docs.microsoft.com/en-us/azure/storage/storage-introduction .
as next step, we can create a new storage container under the storage account.
resource "azurerm_storage_container" "con1" {
name = "vhds"
resource_group_name = "${azurerm_resource_group.test.name}"
storage_account_name = "${azurerm_storage_account.test.name}"
container_access_type = "private"
}
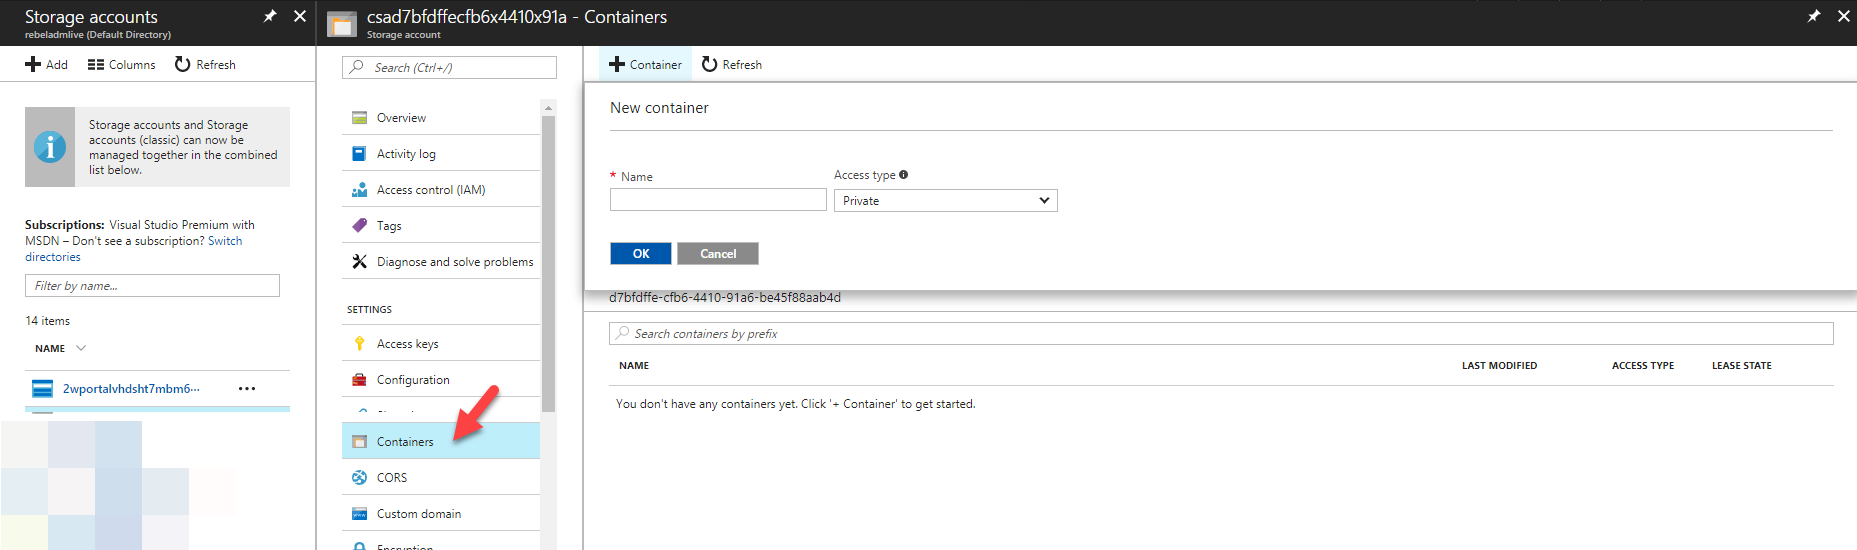
In above azurerm_storage_container is the resource type and it name is vhds. resource_group_name defines the resource group it belongs to and storage_account_name defines storage account it belongs to. container_access_type can be private, blob or container. More info about these container types can find from https://docs.microsoft.com/en-us/azure/storage/storage-introduction
Following image shows what it looks like when using GUI option.
By now we have most of the resources ready for the VM. Next step is to define image for the VM.
storage_image_reference {
publisher = " MicrosoftWindowsServer"
offer = " WindowsServer"
sku = " 2016-Datacenter"
version = "latest"
}
In above I am using windows server 2016 datacenter as image for the VM. Publisher, offer, sku and version info need to provide in order to select correct image. For windows servers, you can find these info in https://docs.microsoft.com/en-us/azure/virtual-machines/windows/cli-ps-findimage. For Linux, this info available at https://docs.microsoft.com/en-us/azure/virtual-machines/linux/cli-ps-findimage
Next step is to add a hard disk,
storage_os_disk {
name = "myosdisk1"
vhd_uri = "${azurerm_storage_account.test.primary_blob_endpoint}${azurerm_storage_container.test.name}/myosdisk1.vhd"
caching = "ReadWrite"
create_option = "FromImage"
}
storage_data_disk {
name = "datadisk0"
vhd_uri = "${azurerm_storage_account.test.primary_blob_endpoint}${azurerm_storage_container.test.name}/datadisk0.vhd"
disk_size_gb = "60"
create_option = "Empty"
lun = 0
}
Above create two disks. one is for OS and one is for data. vhd_uri defines the path for the VHD which is saved under the storage account created.
Last but not least we need to define the OS configuration data such as hostname and administrator account details.
os_profile {
computer_name = "rebelpro1"
admin_username = "rebeladmin"
admin_password = "Password1234!"
}
In above, computer_name specify the hostname of the VM. admin_username specify the local administrator name and admin_password specify the local administrator password.
Now we have all the components ready to deploy a new VM. Some of the components we just need to create one time. as example virtual networks, subnets, storage accounts not need to create for each VM unless there is valid requirement. Let’s put all these together in to a one script so it will make more sense.
# Configure the Microsoft Azure Provider
provider "azurerm" {
subscription_id = "d7xxxxxxxxxxxxxxxxxxxxxx"
client_id = "d9xxxxxxxxxxxxxxxxxxxxxx"
client_secret = "f1xxxxxxxxxxxxxxxxxxxxxx "
tenant_id = "05xxxxxxxxxxxxxxxxxxxxxx "
}
resource "azurerm_resource_group" "rg1" {
name = "acctestrg"
location = "West US"
}
resource "azurerm_virtual_network" "vn1" {
name = "vn1"
address_space = ["10.0.0.0/16"]
location = "West US"
resource_group_name = "${azurerm_resource_group.rg1.name}"
}
resource "azurerm_public_ip" "pub1" {
name = "pub1"
location = "West US"
resource_group_name = "${azurerm_resource_group.rg1.name}"
public_ip_address_allocation = "dynamic"
}
resource "azurerm_subnet" "sub1" {
name = "sub1"
resource_group_name = "${azurerm_resource_group.rg1.name}"
virtual_network_name = "${azurerm_virtual_network.vn1.name}"
address_prefix = "10.0.2.0/24"
}
resource "azurerm_network_interface" "ni1" {
name = "ni1"
location = "West US"
resource_group_name = "${azurerm_resource_group.rg1.name}"
ip_configuration {
name = "config1"
subnet_id = "${azurerm_subnet.sub1.id}"
private_ip_address_allocation = "dynamic"
public_ip_address_id = "${azurerm_public_ip.pub1.id}"
}
}
resource "azurerm_storage_account" "storevm123" {
name = "storevm123"
resource_group_name = "${azurerm_resource_group.rg1.name}"
location = "westus"
account_type = "Standard_LRS"
tags {
environment = "demo"
}
}
resource "azurerm_storage_container" "cont1" {
name = "vhds"
resource_group_name = "${azurerm_resource_group.rg1.name}"
storage_account_name = "${azurerm_storage_account.storevm123.name}"
container_access_type = "private"
}
resource "azurerm_virtual_machine" "vm1" {
name = "vm1"
location = "West US"
resource_group_name = "${azurerm_resource_group.rg1.name}"
network_interface_ids = ["${azurerm_network_interface.ni1.id}"]
vm_size = "Standard_DS2_v2"
storage_image_reference {
publisher = "MicrosoftWindowsServer"
offer = "WindowsServer"
sku = "2016-Datacenter"
version = "latest"
}
storage_os_disk {
name = "osdisk1"
vhd_uri = "${azurerm_storage_account.storevm123.primary_blob_endpoint}${azurerm_storage_container.cont1.name}/osdisk1.vhd"
caching = "ReadWrite"
create_option = "FromImage"
}
storage_data_disk {
name = "datadisk1"
vhd_uri = "${azurerm_storage_account.storevm123.primary_blob_endpoint}${azurerm_storage_container.cont1.name}/datadisk1.vhd"
disk_size_gb = "60"
create_option = "Empty"
lun = 0
}
os_profile {
computer_name = "rebelpro1"
admin_username = "rebeladmin"
admin_password = "Password1234!"
}
tags {
environment = "demo"
}
}
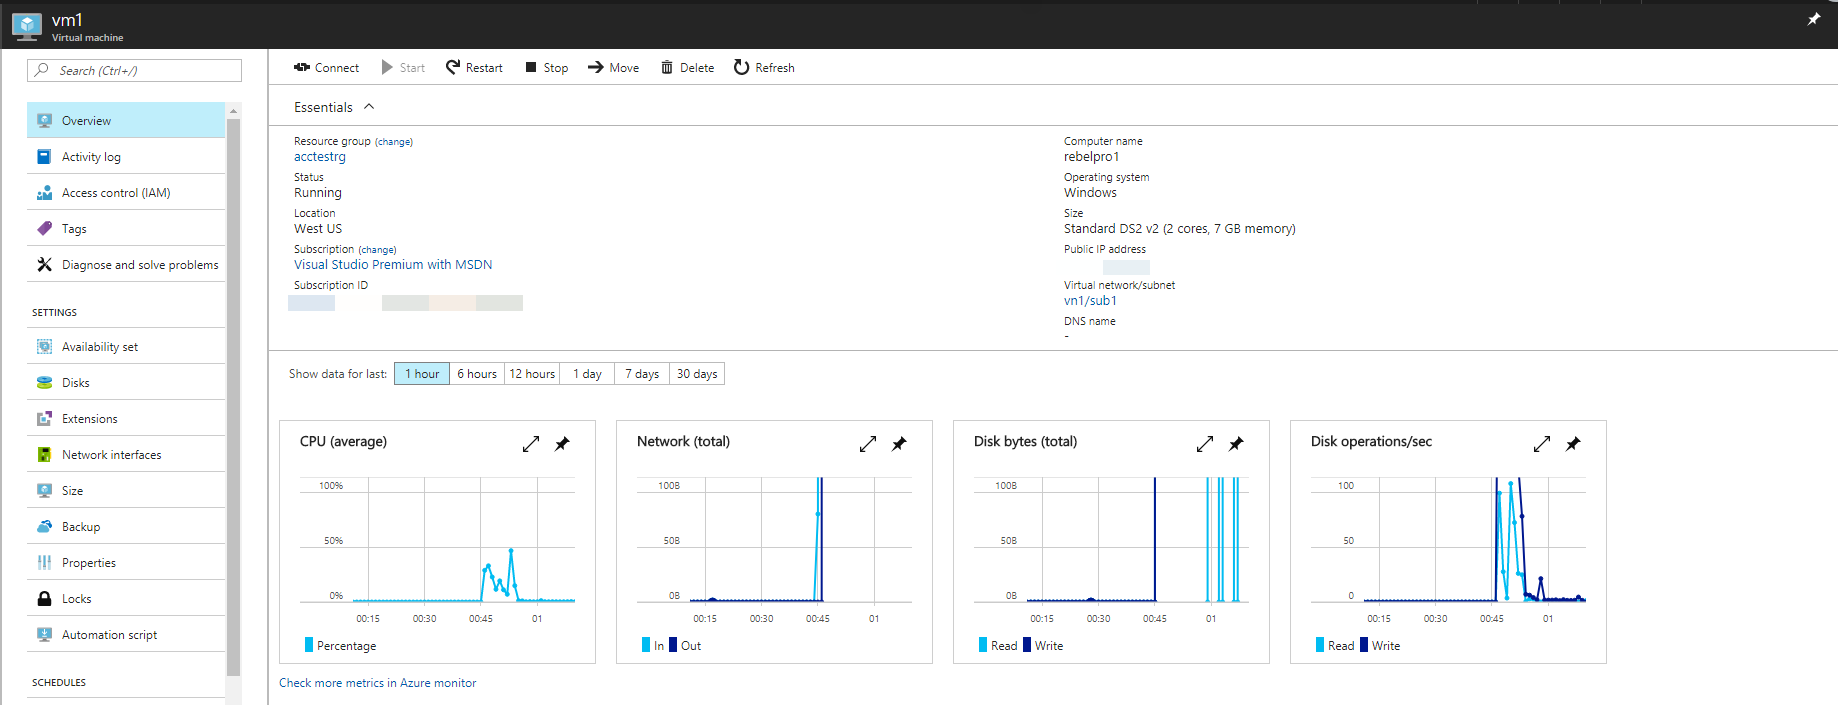
Let’s verify the resources using Azure portal.
As we can see it is created all the expected resource under the resource group acctestrg.
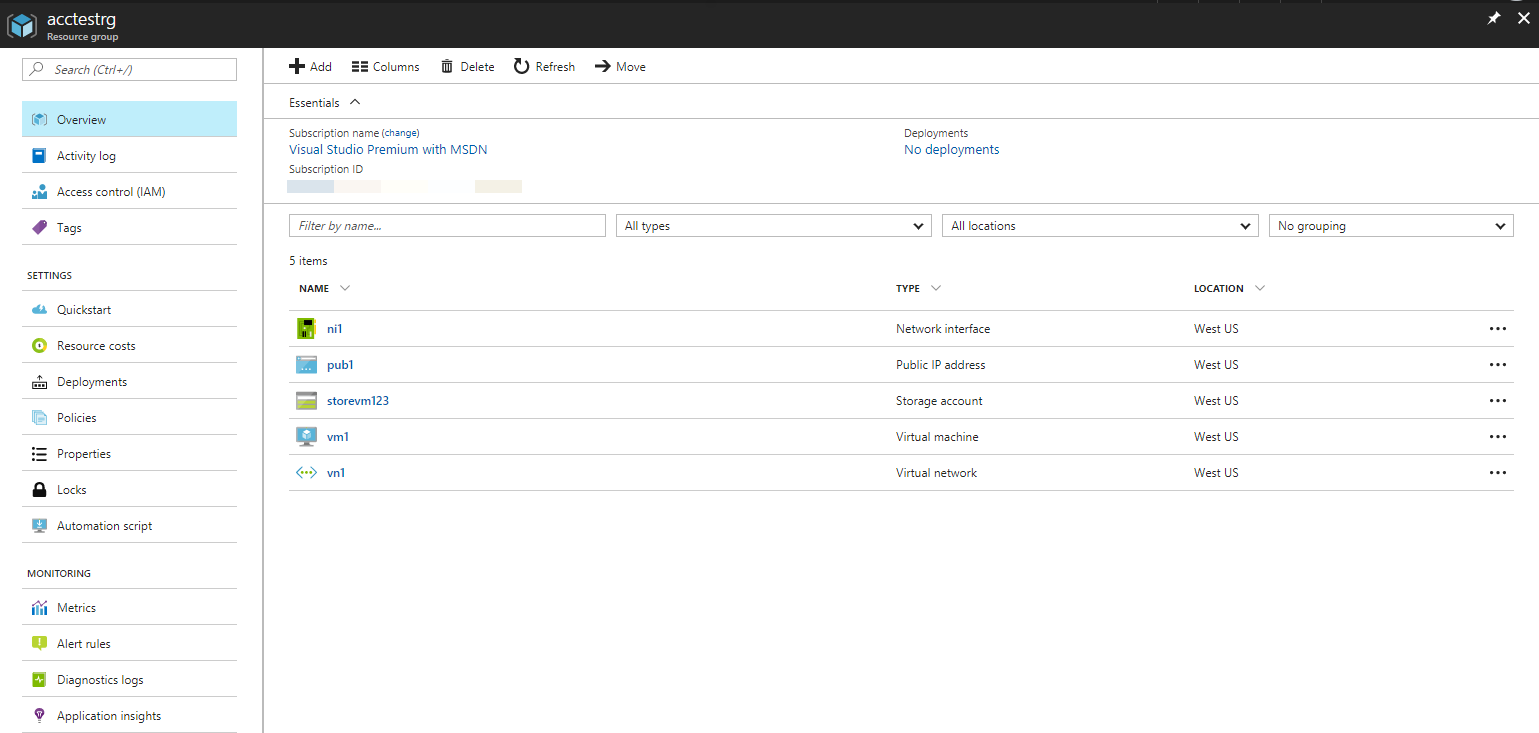
Also, we can see it is created the VM as expected.
In this post, we went through the process of creating Azure VM and related components using terraform. Hope this was useful and if you have any questions feel free to contact me on rebeladm@live.com


Hi man, thanks a lot for this! Do you know how can I create a VM and his NIC link with a subnet that exists in another resource group?
Cheers!
This creates just one VM, how to create multiple using Terraform automation? How to use a custom image?