In one of my previous posts I explain what system state is and how we can use it to backup active directory data. With windows 2008 server Microsoft introduces a new feature called active directory snapshots which can use to backup active directory data. Basically this tools creates a shadow copy of volumes that holds active directory data (Database and logs) using “Volume Shadow Copy Service (VSS)” running on server.
In order to create, view or restore AD snapshots, you need to be member of domain admin group or the enterprise administrator group.
Let’s see how we can create active directory snapshots.
1) Log in the domain controller as a domain administrator or enterprise administrator with appropriate permissions.
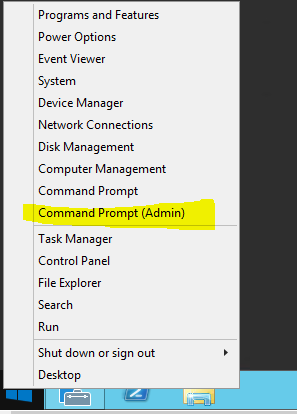
2) Right click on start button and select “Command Prompt (Admin)". It will open up the command line interface.
3) In command prompt type ntdsutil and enter to open up the ntdsutil tool.
4) Then type snapshot and press enter.
5) In next type activate instance ntds and press enter.
6) Then type create and press enter. It will start to create snapshot and give the similar output as following.
7) Type and enter quit to exit from the utility. You have to do it twice.
Before we use a snapshot created by this process we need to mount it using active directory mounting tool. Let’s see how we can do it.
1) Log in the domain controller as a domain administrator or enterprise administrator with appropriate permissions.
2) Right click on start button and select “Command Prompt (Admin)". It will open up the command line interface.
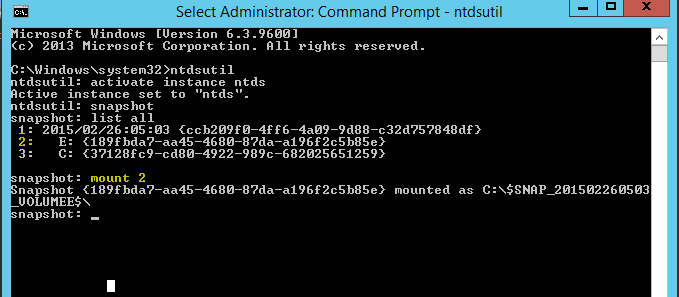
3) In command prompt type ntdsutil and enter to open up the ntdsutil tool.
4) In next type activate instance ntds and press enter.
5) Then type snapshot and press enter.
6) Then type list all
7) It will list down all the snapshot created.
8) Then run command mount 2 ( this is the order number showing in list of snapshot and I needed to mount the one listed in number 2)
9) Then as it saying it successfully mounted to the C: drive with folder $SNAP_201502260503_VOLUMEE$
10) Then enter quit command twice to exit from utility.
Now to connect with the mounted snapshot we need to execute following,
dsamain –dbpath C:\$SNAP_201502260503_VOLUMEE$\ADDB\ntds.dit –ldapport 10000
In here the dbpath will change according to the snapshot mount you made. Ldapport is any openport in the server to run this snapshot instance.
Now we can access snapshot using port 10000.
Keep this open till we finish with next steps.
Let’s see how we can view the content of snapshot using active directory users and computers console.
1) Go to server manager > tools > active directory users and computers
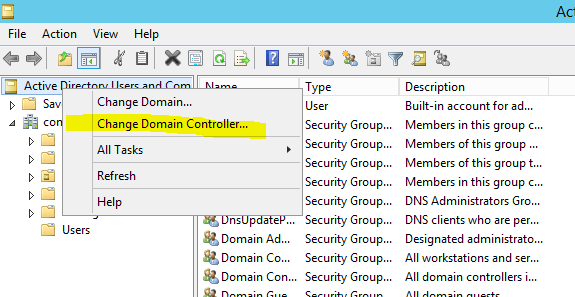
2) In mmc right click on active directory users and computers option and select change domain controller option
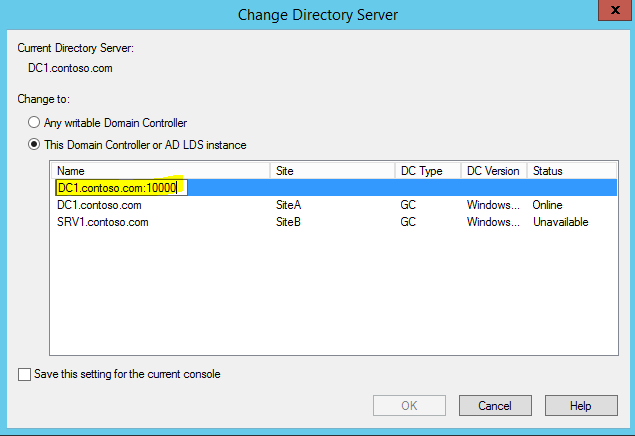
3) In here type the domain controller name and the port. Then click ok. Here according to my demo the port should be 10000 ( the one we use with snapshot)
4) As we can see here it successfully connect with the instance.
Disconnect and unmounts snapshot
In order to disconnect from the running instance, open the command line we left open and press CTRL+C
1) Then type ntdsutil to go in to ntdsutil tool
2) In next type activate instance ntds and press enter.
3) Then type snapshot and press enter.
4) Then type list all
5) It will list down all the snapshot created.
6) Then type unmount 2 ( this is the snapshot number I mapped before ). It will unmount the snapshot.
7) Then enter quit command twice to exit from utility.
In this article I explain what active directory snapshot is and how we can use it for recoveries. If you have any questions feel free to contact me on rebeladm@live.com


Great, you have been very helpful and you have good explaining skills with short and simple steps