
Virtual Machine Snapshots are the quickest way to recover a virtual machine from a disaster. Snapshot is a copy of the virtual machines’ disk file at a given point of time. There are situations where we may need to get certain data out from snapshot without restoring a complete virtual machine. The best way to do that is to create a virtual machine from the snapshot and then retrieve the relevant data. The same method also can use to test application upgrades or risky changes without affecting production servers. In this demo, I am going to demonstrate how we can create an Azure windows virtual machine from a snapshot.
For the configuration process, I will be using PowerShell. Therefore, please make sure you have an Azure PowerShell module installed. More info about it available on this link.
As part of the configuration, I am going to do following,
1. Create a new resource group
2. Create a new virtual network
3. Create Azure windows virtual machine
4. Log in to the new virtual machine and create few test files
5. Create snapshot
6. Create another virtual machine using the snapshot
7. Log in to this new Azure windows virtual machine and verify it has the test files created in original VM.
Create new Azure windows virtual machine
Let’s start the configuration process by creating a new resource group.
1. Launch PowerShell console and connect to Azure using Connect-AzAccount as Global Administrator
2. Then create a new resource group using,
New-AzResourceGroup -Name REBELRG1 -Location “East US”
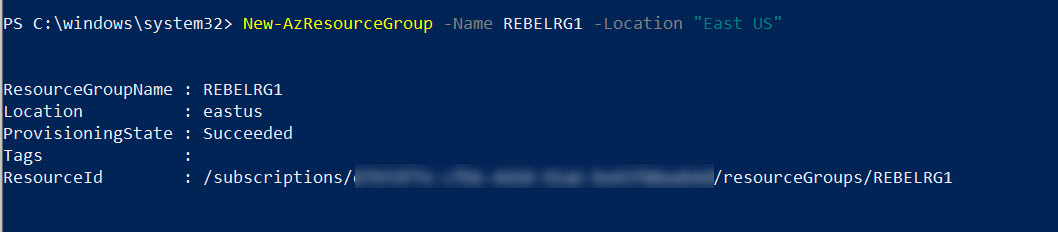
In the above, REBELRG1 is the resource group names and East US is the Azure region.
3. The next step is to create a new virtual network under REBELRG1 resource group.
$vmsubnet = New-AzVirtualNetworkSubnetConfig -Name vmsubnet -AddressPrefix “10.0.2.0/24”
New-AzVirtualNetwork -Name REBELVN1 -ResourceGroupName REBELRG1 -Location “East US” -AddressPrefix “10.0.0.0/16” -Subnet $vmsubnet
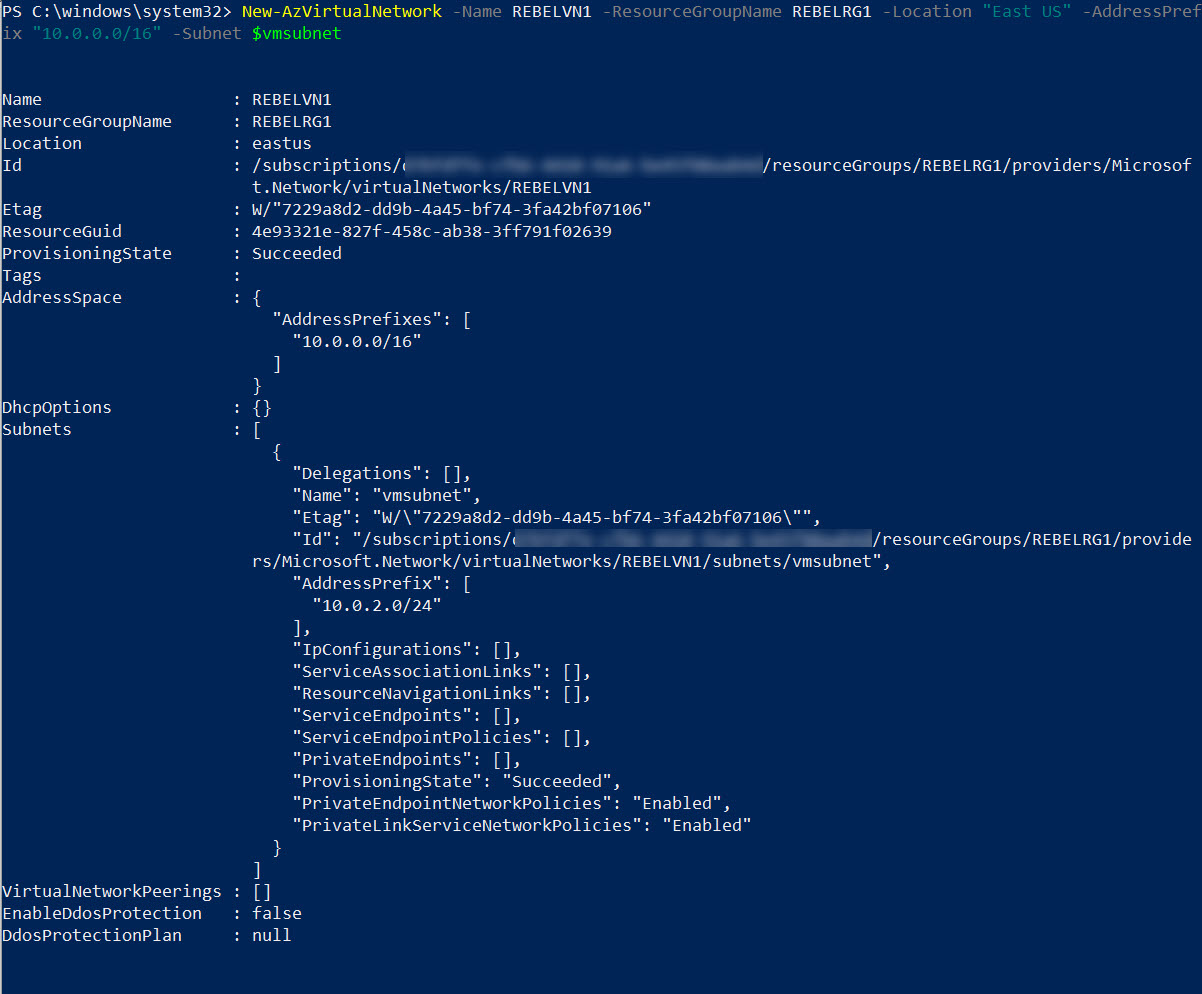
In the above, REBELVN1 is the new virtual network name. It has 10.0.0.0/16 address space. It also has a new subnet 10.0.2.0/24 (vmsubnet) for virtual machines
4. As the next step of the configuration, I am going to create a new virtual machine under REBELRG1 resource group. This will be used for testing purposes.
$mylogin = Get-Credential
New-AzVm -ResourceGroupName REBELRG1 -Name “REBELTVM01” -Location “East US” -VirtualNetworkName “REBELVN1” -SubnetName “vmsubnet” -addressprefix 10.0.2.0/24 -PublicIpAddressName “REBELVM01IP1” -OpenPorts 3389 -Image win2019datacenter -Size Standard_D2s_v3 -Credential $mylogin
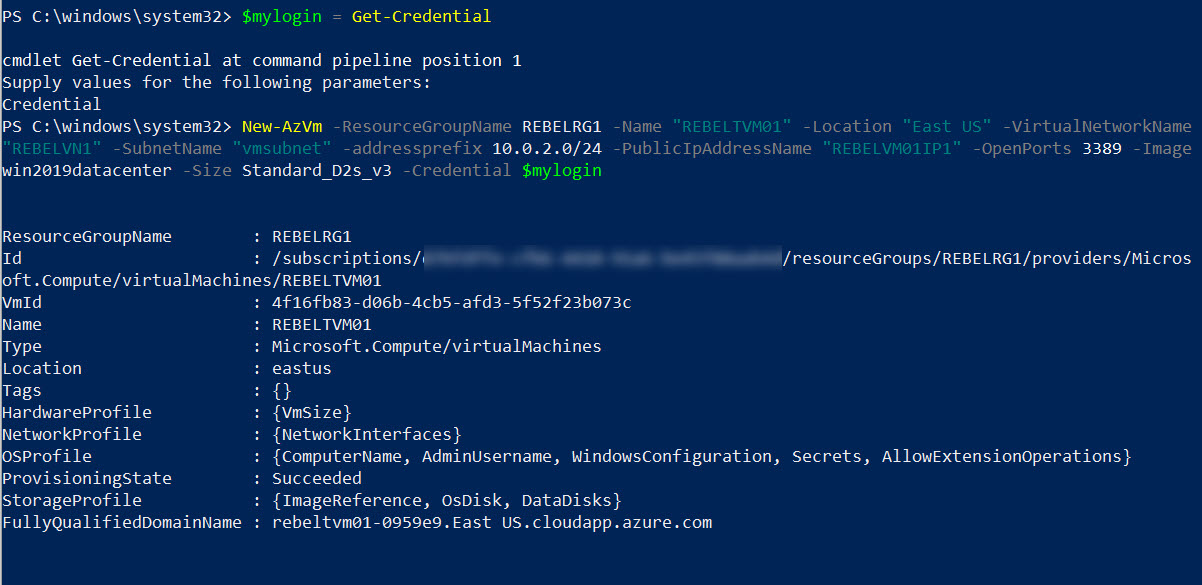
In the above, I am creating a virtual machine called REBELTVM01 in East US Azure region. It is running windows server 2019 data center edition. I have specified it using -Image parameter. It also using Standard_D2s_v3 vm size. For networking, it uses REBELVN1 virtual network and subnet 10.0.2.0/24.
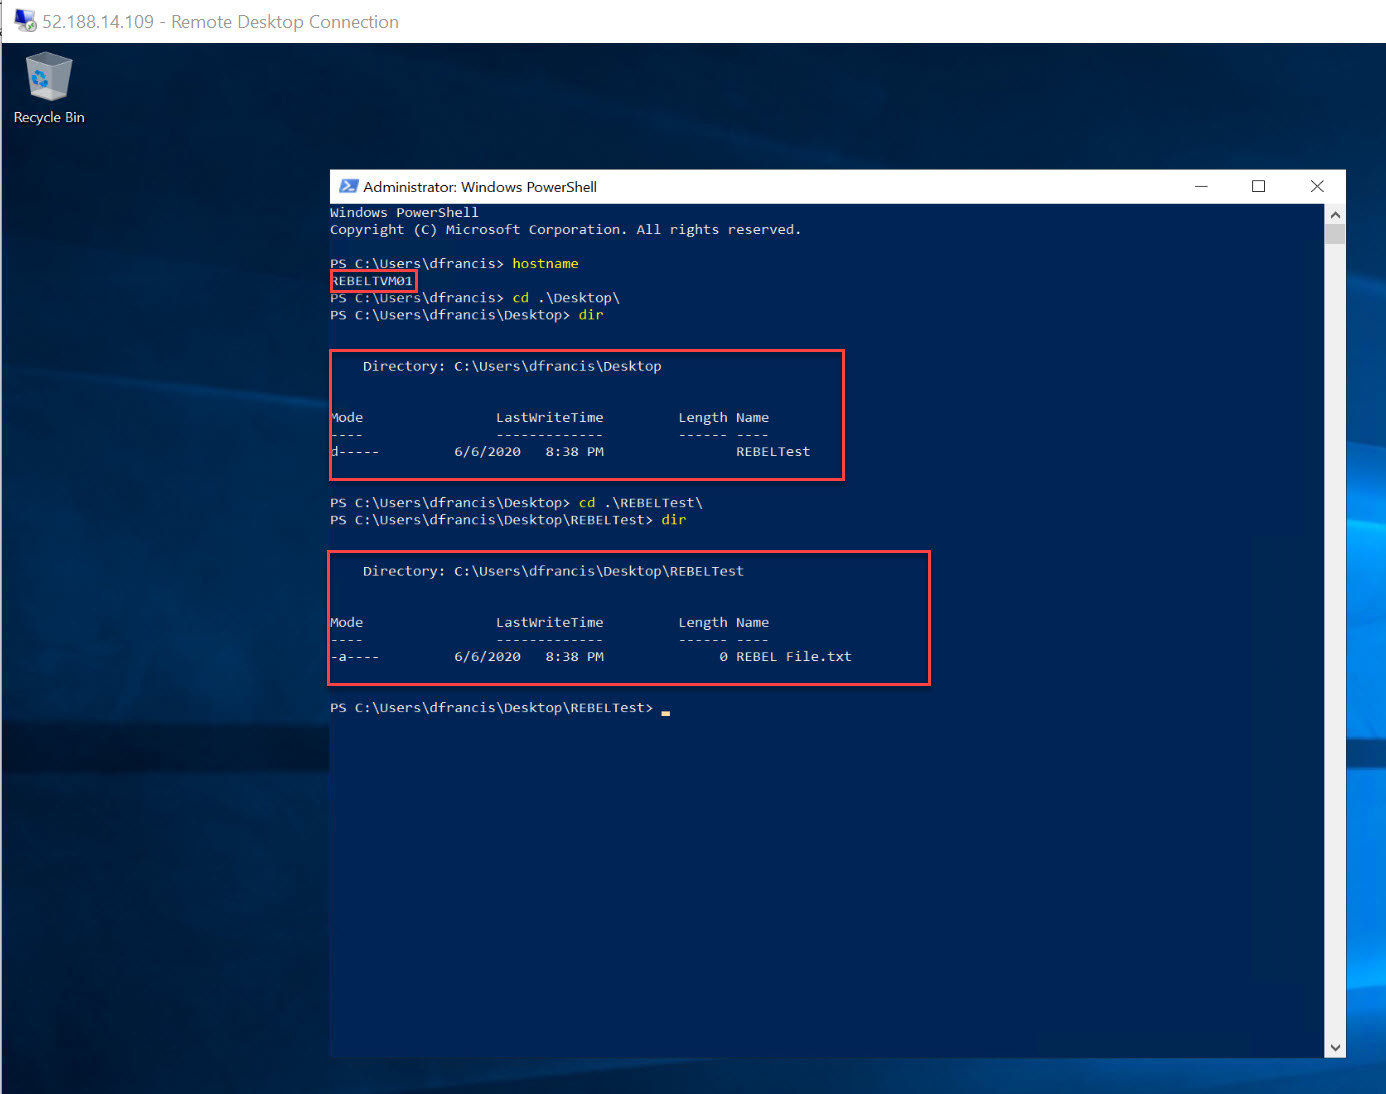
5. I went ahead and log in to this new Azure windows virtual machine. Then created a folder and text file on the desktop. I plan to create a snapshot and then use it to create another VM. So, if it works as expected, I should be able to see the same files in the second VM.
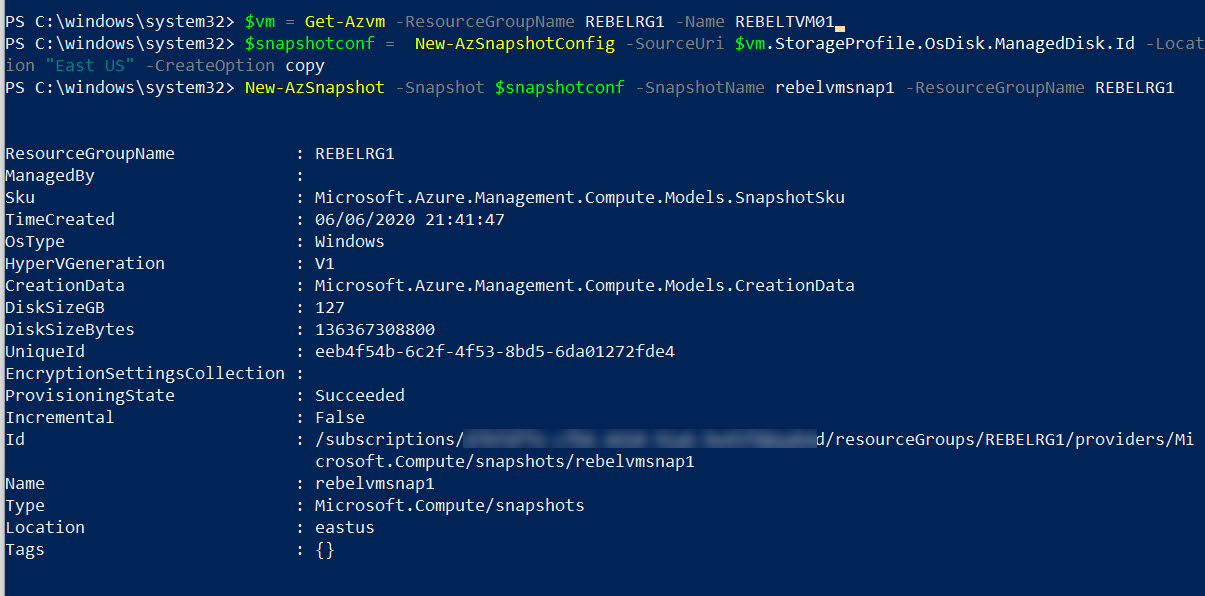
6. Now it’s time to create a snapshot of the VM. To do that first we need to get the VM configuration using,
$vm = Get-Azvm -ResourceGroupName REBELRG1 -Name REBELTVM01
Then we need to create a snapshot configuration.
$snapshotconf = New-AzSnapshotConfig -SourceUri $vm.StorageProfile.OsDisk.ManagedDisk.Id -Location “East US” -CreateOption copy
In the above, we only taking a snapshot of the OS disk.
After that, we can take snapshot using,
New-AzSnapshot -Snapshot $snapshotconf -SnapshotName rebelvmsnap1 -ResourceGroupName REBELRG1
Create Azure windows virtual machine from snapshot
Now we have a snapshot. The next part of the configuration is to create a new VM from it. Let’s start the process by creating a variable with snapshot data.
$snapshot = Get-AzSnapshot -ResourceGroupName REBELRG1 -SnapshotName rebelvmsnap1
Then we going to take a copy of the snapshot and make it as the managed disk for the new VM.
$diskconfig = New-AzDiskConfig -Location “East US” -SourceResourceId $snapshot.Id -CreateOption Copy
$newdisk = New-AzDisk -Disk $diskconfig -ResourceGroupName REBELRG1 -DiskName REBELSNAPDISK1

In the above, REBELSNAPDISK1 is the new managed disk name for the second VM and it is a copy of the snapshot we took in the previous step.
Then we need to initialize virtual machine configuration for the second VM.
$rebelvmconfig = New-AzVMConfig -VMName REBELTVM02 -VMSize Standard_D2s_v3
Here, the second VM will call REBELTVM02 and it will be using Standard_D2s_v3 VM size.
Then we need to attach the managed disk we created. It will map to the VM configuration as OS disk.
$rebelvmconfig = Set-AzVMOSDisk -VM $rebelvmconfig -ManagedDiskId $newdisk.Id -CreateOption Attach -Windows

We also need public IP address for the second VM, so we can connect to it from external.
$vmpublicip = New-AzPublicIpAddress -Name REBELVM02IP1 -ResourceGroupName REBELRG1 -Location “East US” -AllocationMethod Dynamic
In the above, public IP is named as REBELVM02IP1. It is using Dynamic IP allocation method.
Then we need to create NIC for the new VM. Before that, we need to create a variable with Virtual network and subnet data. Here I am going to create the second VM in the same virtual network as the first one.
$vnet = Get-AzVirtualNetwork -Name REBELVN1 -ResourceGroupName REBELRG1
$subnet = Get-AzVirtualNetworkSubnetConfig -Name vmsubnet -VirtualNetwork $vnet
Now we have the relevant variables ready. Let’s go ahead and create the NIC using,
$vmnic = New-AzNetworkInterface -Name “REBELTVM02_nic1” -ResourceGroupName REBELRG1 -Location “East US” -SubnetId $subnet.Id -PublicIpAddressId $vmpublicip.Id

In the above, the NIC name is REBELTVM02_nic1. It is created in “vmsubnet” IP subnet under REBELVN1 virtual network.
Then we need to add it to the VM configuration,
$rebelvmconfig = Add-AzVMNetworkInterface -VM $rebelvmconfig -Id $vmnic.Id
Now we have everything ready for the second VM. Let’s go ahead with VM creation using
New-AzVM -VM $rebelvmconfig -ResourceGroupName REBELRG1 -Location “East US”

8. As we can see the second VM is created successfully. Let’s go ahead and log in to VM and check if it had he test files created in the original VM.
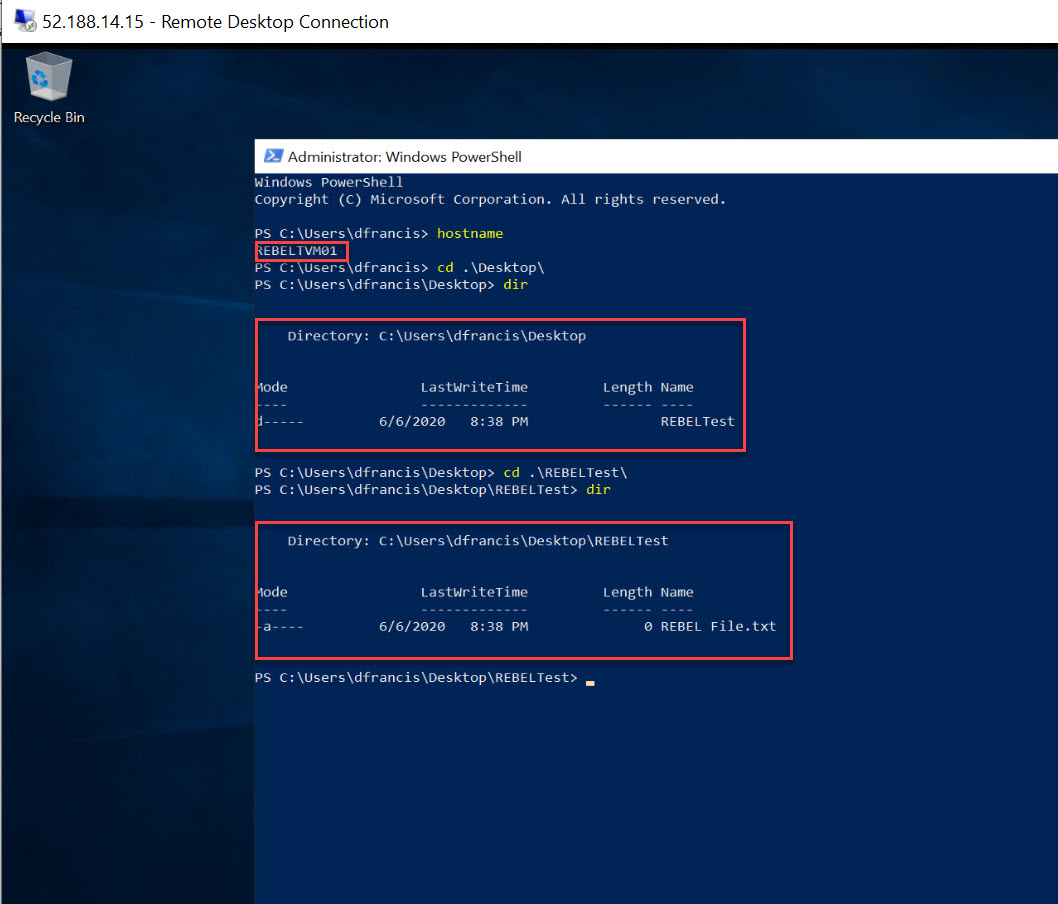
As expected, the test files are available in the second VM.
This marks the end of this blog post. All the commands used in the demo is available as a script under https://github.com/rebeladm/rebeladm/blob/master/snapshotvm.ps1
If you have any further questions about this feel free to contact me on rebeladm@live.com also follow me on twitter @rebeladm to get updates about new blog posts.


1 Comment