
Similar to the on-premises Active Directory, we also can use PowerShell to manage Azure Active Directory. Let's see why we should use PowerShell to manage Azure Active Directory.
Early bird access to features– Microsoft keeps releasing new features, bug fixes, updates, feature enhancements more frequently to Azure AD services than on-premises Active Directory. Microsoft releases new features to the public in two stages. In the first stage, it will be released as a preview version. It is not recommended to use in production but IT professionals can use it for testing and provide feedback to Microsoft. In this stage, the feature can have many updates and most of the time it will take some time to update GUI accordingly. Some of these changes will not be available on GUI until the general release. But if we are using PowerShell, we do not have to wait. We can have early access to features as soon as it is released.
Faster Response – Azure Active Directory portal has many different windows, wizards, forms to configure & manage users, groups, roles, and associated features. GUI makes it easy to do things but it takes time. As an example, if you add a user account using the Azure AD portal, you have to go to four sub-windows at least. But PowerShell allows us to do it using in one window and few lines of commands.
Granular control – Azure AD Portal visualize the data and configuration of the service using different windows. But it may not always show what we want. As an example, let's assume we are looking for a specific value in two user accounts. if we use GUI, we need to go to a few different windows to gather this information. But using PowerShell command or script we will be able to gather the same info in one window. This is really helpful in troubleshooting.
Microsoft Graph Integration – Microsoft Graph provides a unified programmability model to access a vast amount of data in Microsoft 365, Azure Active Directory, Enterprise Mobility Suite, Windows 10 and so on. As part of it, Azure AD PowerShell for Graph module allows us to retrieve data, update directory configuration, add/update/remove objects and configure features via Microsoft Graph.
Installation
Azure Active Directory PowerShell for Graph module comes as two versions. The public preview version is the latest version but it is not recommended to use in production. The installation steps for this version can be found on https://www.powershellgallery.com/packages/AzureADPreview .
General Availability version is the stable and recommended version for production environments. This can be installed in any computer which runs Windows Server 2008 R2 or above with the latest updates. This is also required Microsoft .NET framework 4.5 or above.
Once prerequisites are in place,
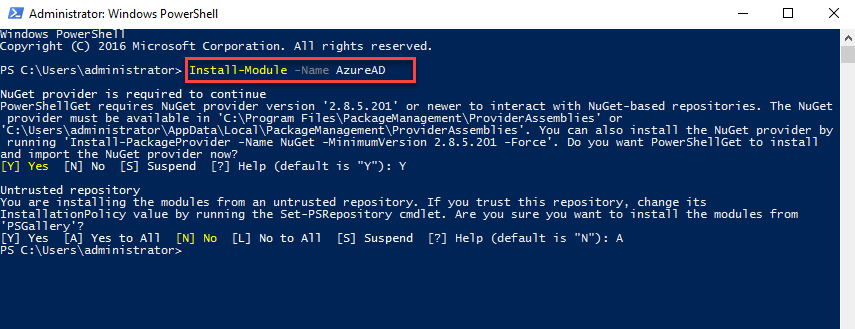
- Log in to the computer you have selected for Azure Active Directory PowerShell for Graph module
- Launch PowerShell console as Administrator
- Run Install-Module -Name AzureAD command. Answer "Yes" if it is required repository update.
4. After installation, we can verify module install using Get-Module AzureAD
5. After the successful module installation, run Connect-AzureAD to initiate the connection to Azure AD tenant.
6. Then it will prompt a login window. Use Azure AD global administrator account details to connect.

Now we have Azure Active Directory PowerShell for Graph module installed. Let's see how we can manage Azure AD hybrid-environment using this module.
Manage Users
Let's see how we can Manage use accounts using Azure Active Directory PowerShell for Graph module.
We can view user accounts details for a known account using,
Get-AzureADUser -ObjectId AdeleV@M365x562652.OnMicrosoft.com | fl
In the above command, AdeleV@M365x562652.OnMicrosoft.com represents the UPN of the user.
We also can use user attributes to find user account details.
Get-AzureADUser -Filter "startswith(GivenName,'Adele')"
Preceding command will filter Azure AD users with Given Name: Adele
We also can filter users based on specific attribute value.
Get-AzureADUser -Filter "GivenName eq 'Adele'"
Above command will search for the exact user with given name-value Adele.
In my demo environment, I like to see list of disabled account. I can do it using,
Get-AzureADUser -All $true -Filter 'accountEnabled eq false'
We can modify the output of the filtered data further.
Get-AzureADUser -All $true -Filter 'accountEnabled eq false' | select DisplayName,UserPrincipalName,Department
Preceding command will display value of DisplayName,UserPrincipalName,Department attributes of filtered accounts.
In hybrid environment, we can filter accounts which is synced from on-premises AD by using,
Get-AzureADUser -All $true -Filter 'DirSyncEnabled eq true'
In above command, value of DirSyncEnabled attribute defines if it's a cloud only account or synced account.
We also can check the last sync value for the synced accounts.
Get-AzureADUser -All $true -Filter 'DirSyncEnabled eq true' | select DisplayName,UserPrincipalName,LastDirSyncTime
In above command, LastDirSyncTime value defines last sync time of the object.
We also can export the output to a CSV file using Export-CSV command.
Get-AzureADUser -All $true -Filter 'DirSyncEnabled eq true' | select DisplayName,UserPrincipalName,LastDirSyncTime | Export-CSV -Path .\syncaccount.csv
ImmutableID value of a user account is used to map Azure AD user object to on-premises user object. It does have a relationship with on-premises user accounts' ObjectGUID . We can use this to identify cloud-only users. If it is a cloud-only user ImmutableID value should be null.
Get-AzureADUser -All $true | where-Object {$_.ImmutableId -eq $null}
Preceding command return list of all the cloud only accounts. We can export the required attribute values to CSV by using,
Get-AzureADUser -All $true | where-Object {$_.ImmutableId -eq $null} | select DisplayName,UserPrincipalName | Export-CSV -Path .\cloudaccount.csv
Another important thing related to account is "licences". If we are going to use Azure AD premium features, we need to have relevant licences assigned. By default, the user only has Azure AD free version features.
To view licenses associated with a user account, we can use,
Get-AzureADUserLicenseDetail -ObjectId MeganB@M365x562652.OnMicrosoft.com | fl
Above command will return the licenses associated with user MeganB@M365x562652.OnMicrosoft.com
We also can view the subscribed SKUs using,
Get-AzureADSubscribedSku | fl
Above command list down all the details about licenses which is associated with the tenant. But mostly we only need to know how many licenses been used and how many licenses available. We can do it using,
Get-AzureADSubscribedSku | select SkuPartNumber,ConsumedUnits -ExpandProperty PrepaidUnits
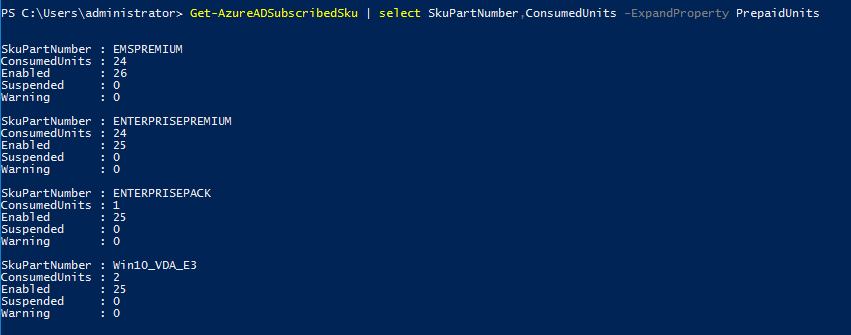
In the preceding example, SkuPartNumber value represent the licence part number. Value of Enabled field represent the number of purchased licences. ConsumedUnits represent the number of used licences.
Let's go ahead and see how we can assign a new licence to a user.
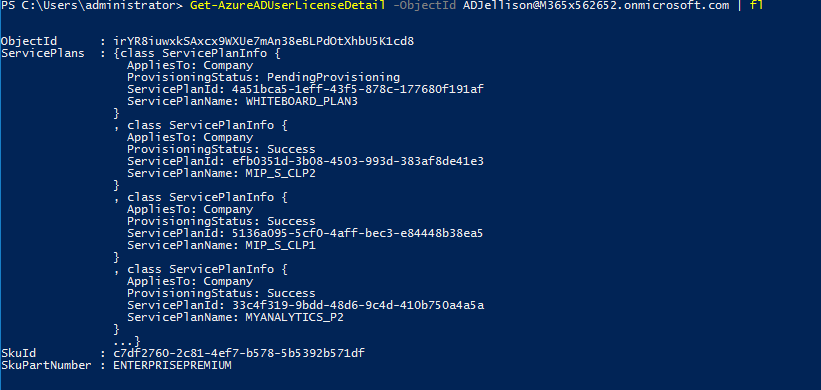
In my environment, I have a user who synced from on-premises Azure AD who doesn't have a licence assigned.
Get-AzureADUserLicenseDetail -ObjectId ADJellison@M365x562652.onmicrosoft.com | fl
![]()
As first step, lets create objects to use in licence assignment process.
$newlicence = New-Object -TypeName Microsoft.Open.AzureAD.Model.AssignedLicense
$newlicenceadd = New-Object -TypeName Microsoft.Open.AzureAD.Model.AssignedLicenses
Then we need to find SkuId of the licences.
I am going to assign ENTERPRISEPREMIUM licence to the user.
$newlicence.SkuId = (Get-AzureADSubscribedSku | Where-Object -Property SkuPartNumber -Value "ENTERPRISEPREMIUM" -EQ).SkuId
Then we need to assign the licences to the object,
$newlicenceadd.AddLicenses = $newlicence
Now we can go ahead and assign the licence to the user,
Set-AzureADUserLicense -ObjectId "ADJellison@M365x562652.onmicrosoft.com" -AssignedLicenses $newlicenceadd
Preceding command assign ENTERPRISEPREMIUM licences to user ADJellison@M365x562652.onmicrosoft.com
[su_note]It is must to set UsageLocation value for users who sync from on-premises AD, before assign licences. We can do it by using, Set-AzureADUser -ObjectId ADJellison@M365x562652.onmicrosoft.com -UsageLocation "US"[/su_note]
We can remove the assigned licences using,
$licenseB = New-Object -TypeName Microsoft.Open.AzureAD.Model.AssignedLicenses
$licenseB.RemoveLicenses = (Get-AzureADSubscribedSku | Where-Object {$_.SkuPartNumber -eq 'ENTERPRISEPREMIUM'}).SkuId
Set-AzureADUserLicense -ObjectId "ADJellison@M365x562652.onmicrosoft.com" -AssignedLicenses $licenseB
Using above commands, I have created following script to do following,
- Search for users who synced from on-premises AD.
- From those users, select the users who doesn't have Azure AD licences assigned.
- Set UsageLocation value for selected users.
- Assign Azure AD licences to selected users.
#######Script to Assign Licences to Synced Users from On-Permises AD#############
Import-Module AzureAD
Connect-AzureAD
###Filter Synced Users who doesnt have licence assigned#######
$ADusers = Get-AzureADUser -All $true -Filter 'DirSyncEnabled eq true'
$notlicenced = Get-AzureADUser -All $true | Where-Object {$ADusers.AssignedLicenses -ne $null} | select ObjectId | Out-File -FilePath C:\users.txt
#####Set UsageLocation value to sync users#########
(Get-Content "C:\users.txt" | select-object -skip 3) | ForEach { Set-AzureADUser -ObjectId $_ -UsageLocation "US" }
#####Set User Licecnes############
$newlicence = New-Object -TypeName Microsoft.Open.AzureAD.Model.AssignedLicense
$newlicenceadd = New-Object -TypeName Microsoft.Open.AzureAD.Model.AssignedLicenses
$newlicence.SkuId = (Get-AzureADSubscribedSku | Where-Object -Property SkuPartNumber -Value "ENTERPRISEPREMIUM" -EQ).SkuId
$newlicenceadd.AddLicenses = $newlicence
(Get-Content "C:\users.txt" | select-object -skip 3) | ForEach { Set-AzureADUserLicense -ObjectId $_ -AssignedLicenses $newlicenceadd }
In hybrid environment, users are mainly created through on-premises Active Directory but there are occasions where we need to add cloud only accounts. This is mainly for cloud management tasks.
We can create a new user by using,
$Userpassword = New-Object -TypeName Microsoft.Open.AzureAD.Model.PasswordProfile
$Userpassword.Password = "London@1234"
New-AzureADUser -DisplayName "Andrew Xavier" -PasswordProfile $Userpassword -UserPrincipalName "Andrew.Xavier@M365x562652.onmicrosoft.com" -AccountEnabled $true -MailNickName "AndrewXavier"
In preceding command, -PasswordProfile is used to define the password profile for the new user account. -MailNickName defines value for user's mail nick name. Above example, add a new user account Andrew.Xavier@M365x562652.onmicrosoft.com with password London@1234
We also can create multiple user accounts using CSV files. In below example, I am using a CSV file to create users.
CSV file contains the following,
UserPrincipalName, DisplayName,MailNickName
DishanM@M365x562652.onmicrosoft.com, Dishan Melroy,DishanMel
JackM@M365x562652.onmicrosoft.com,Jack May,JackMay
RicahrdP@M365x562652.onmicrosoft.com,Richard Parker,RichardPar
Then I can create these new users using,
$Userpassword = New-Object -TypeName Microsoft.Open.AzureAD.Model.PasswordProfile
$Userpassword.Password = "London@1234"
Import-Csv -Path C:\newuser.csv | foreach {New-AzureADUser -UserPrincipalName $_.UserPrincipalName -DisplayName $_.DisplayName -MailNickName $_.MailNickName -PasswordProfile $Userpassword -AccountEnabled $true}
By using above commands, I have created following script to do,
- Create new user accounts using CSV file
- Set UsageLocation for new user accounts
- Assign ENTERPRISEPREMIUM licences to users
########A Script to create new users and assign Azure AD licences#######
Import-Module AzureAD
Connect-AzureAD
###########Create New Users using CSV ###################
$Userpassword = New-Object -TypeName Microsoft.Open.AzureAD.Model.PasswordProfile
$Userpassword.Password = "London@1234"
Import-Csv -Path C:\newuser.csv | foreach {New-AzureADUser -UserPrincipalName $_.UserPrincipalName -DisplayName $_.DisplayName -MailNickName $_.MailNickName -PasswordProfile $Userpassword -UsageLocation "US" -AccountEnabled $true} | select ObjectId | Out-File -FilePath C:\users.txt
###########Assign Licences#################
$newlicence = New-Object -TypeName Microsoft.Open.AzureAD.Model.AssignedLicense
$newlicenceadd = New-Object -TypeName Microsoft.Open.AzureAD.Model.AssignedLicenses
$newlicence.SkuId = (Get-AzureADSubscribedSku | Where-Object -Property SkuPartNumber -Value "ENTERPRISEPREMIUM" -EQ).SkuId
$newlicenceadd.AddLicenses = $newlicence
(Get-Content "C:\users.txt" | select-object -skip 3) | ForEach { Set-AzureADUserLicense -ObjectId $_ -AssignedLicenses $newlicenceadd }
To remove Azure AD user, we can use
Remove-AzureADUser -ObjectId "JDAllen@M365x562652.onmicrosoft.com"
We can combine it with user search,
Get-AzureADUser -Filter "startswith(DisplayName,'Dishan')" | Remove-AzureADUser
Above command will search for user accounts who has DisplayName starts with "Dishan". If there is any, second part of the command will remove it.
This marks the end of this post. I hope this was useful and If you have any questions feel free to contact me on rebeladm@live.com also follow me on twitter @rebeladm to get updates about new blog posts.


Above document very much helpful. I have a query..
How to get all attributes of the user including extensionattributes. like extensionAttribute1,extensionAttribute2,extensionAttribute10
Nice Article Kudos to You