Last Updated on July 15, 2018 by Dishan M. Francis

In previous posts on PKI blog series we learned about theory part of PKI. If you didn’t read those yet, please go ahead and read those before start on deployment part. 

How PKI Works? https://www.rebeladmin.com/2018/05/how-pki-works/ 

Active directory certificate service componentshttps://www.rebeladmin.com/2018/05/active-directory-certificate-service-components/

PKI Deployment Modelshttps://www.rebeladmin.com/2018/05/pki-deployment-models/

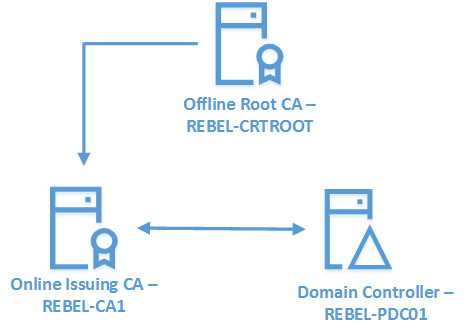
In this post I am going to demonstrate how we can setup PKI using Two-Tier model. I have use this model as it is the recommended model for mid and large organizations. 

 capki1
The above figure explains the setup I am going to do. In there I have one domain controller, one standalone root CA and one Issuing CA. all are running with windows server 2016 with latest patch level. 
 
Setup Standalone Root CA
 
First step is to setup the standalone root CA. This is not a domain member server and it is operating in workgroup level. By configuring it on separate VLAN will add additional security to the root CA as it will not be able to talk to each other directly even its online. 
Once server is ready log in to the server as member of local administrator group. First task is to install the AD CS role service. It can be done using,
 
Add-WindowsFeature ADCS-Cert-Authority -IncludeManagementTools
 
Once role service is installed, next step is to configure the role and get the CA up and running. 
 
Install-ADcsCertificationAuthority -CACommonName “REBELAdmin Root CA” -CAType StandaloneRootCA -CryptoProviderName “RSA#Microsoft Software Key Storage Provider” -HashAlgorithmName SHA256 -KeyLength 2048 -ValidityPeriod Years -ValidityPeriodUnits 20
 
The above command will configure the CA. in the command CACommonName defines the common name for the CA. CAType defines the CA operation type. In our case, it is a StandaloneRootCA. The option for it will be EnterpriseRootCA, EnterpriseSubordinateCA or StandaloneSubordinateCA. CryptoProviderName specify the cryptographic service provider and in the demo, I am using the Microsoft default service provider. HashAlgorithmName defines the hashing algorithm use by the CA. The option for it will be change based on the CSP we choose. SHA1 is no longer counted as secure algorithm as recommended to use SHA256 or above. KeyLength specify the key size for the algorithm. In this demo, I am using 2048 key. ValidityPeriod defines the validity period of CA certificates. It can be hours, days, weeks, months or years. ValidityPeriodUnits is followed by the ValidityPeriod and specify how many hours, days, weeks, months or years it will valid. In our demo, we are using 20 years. 
 
capki2
 
Now we have the root CA up and running. But before we use it we need to do certain configuration changes. 
 
DSConfigDN
 
As I mentioned early this is a standalone root CA and it is not part of the domain. However, CDP (Certificate Revocation List Distribution Points) and AIA (Authority Information Access) locations which required by CA will be storing in DC. Since those use DN names with domain, root CA need to be aware of the domain information to publish it properly. It will retrieve this information via registry key. 
 
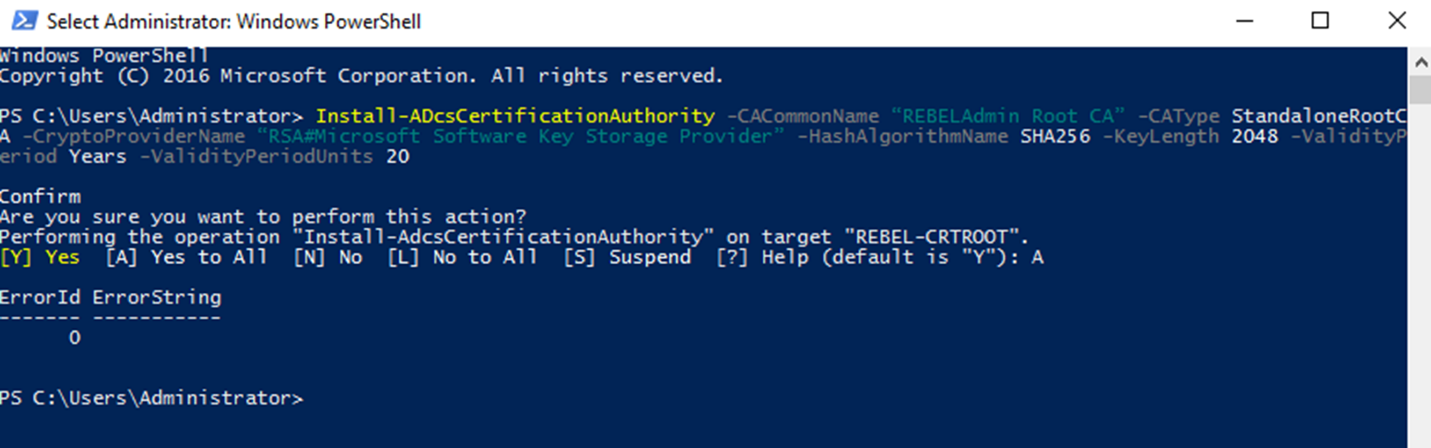
certutil.exe –setreg ca\DSConfigDN CN=Configuration,DC=rebeladmin,DC=com
 
CDP Location
 
CDP is stands for Certificate Revocation List Distribution Points and it is defined the location where CRL can retrieve. This is web based location and should be able to access via HTTP. This list will be used by the certificate validator to verify the given certificate is not in revocation list.  
Before we do this, we need to prepare the web server for that task. This task will use the same server built for online issuing CA.
The web server can be install using, 
 
Install-WindowsFeature Web-WebServer -IncludeManagementTools
 
Next step is to create a folder and create share so that can be use as the virtual directory.
 
mkdir C:\CertEnroll 

New-smbshare -name CertEnroll C:\CertEnroll -FullAccess SYSTEM,"rebeladmin\Domain Admins" -ChangeAccess "rebeladmin\Cert Publishers"
 
As part of the exercise it will set share permissions to rebeladmin\Domain Admins (Full Access) and rebeladmin\Cert Publishers (Change Access).
After that load the IIS manager and add a Virtual Directory CertEnroll with the above path. 
 
capki3
 
Last but not least we need to create a DNS record to use this publication point using FQDN. In this demo, I am using crt.rebeladmin.com. This will allow to access the new distribution point using http://crt.rebeladmin.com/CertEnroll
Now everything ready and we can publish the CDP settings using,
 
certutil -setreg CA\CRLPublicationURLs "1:C:\Windows\system32\CertSrv\CertEnroll\%3%8%9.crl \n10:ldap:///CN=%7%8,CN=%2,CN=CDP,CN=Public Key Services,CN=Services,%6%10\n2:http://crt.rebeladmin.com/CertEnroll/%3%8%9.crl"
 
The single numbers in the command refers to the options and numbers with % refers to the variables.


Option

Details

0

No Changes

1

Publish CRL to the given location

2

Attach CDP extensions of issued certificates

4

Include in CRL to find the delta CRL locations

8

Specify if need to publish all CRL info to AD when publishing manually

64

Delta CRL location

128

Include IDP extension of issued CRL

All these settings also can specify using GUI. In order to access it, got to Server Manager > Tools > Certificate Authority > Right click and select properties of the server > Go to the Extension Tab

There you can add all the above using GUI.

Variable

GUI Reference

Details

%1

<ServerDNSName>

DNS Name of the CA server

%2

<ServerShortName>

NetBIOS name of the CA server

%3

<CAName>

Given Name for the CA

%4

<CertificateName>

Renewal Extension of the CA

%6

<ConfigurationContainer>

DN of the Configuration Container in AD

%7

<CATruncatedName>

Truncated Name of the CA ( 32 Characters )

%8

<CRLNameSuffix>

Inserts a name suffix at the end of the file name before publishing a CRL

%9

<DeltaCRLAllowed>

When this called, this will replace the CRLNameSuffix with a separate suffix to use the delta CRL

%10

<CDPObjectClass>

Object Class identifier for CDP

%11

<CAObjectClass>

Object Class identifier for a CA
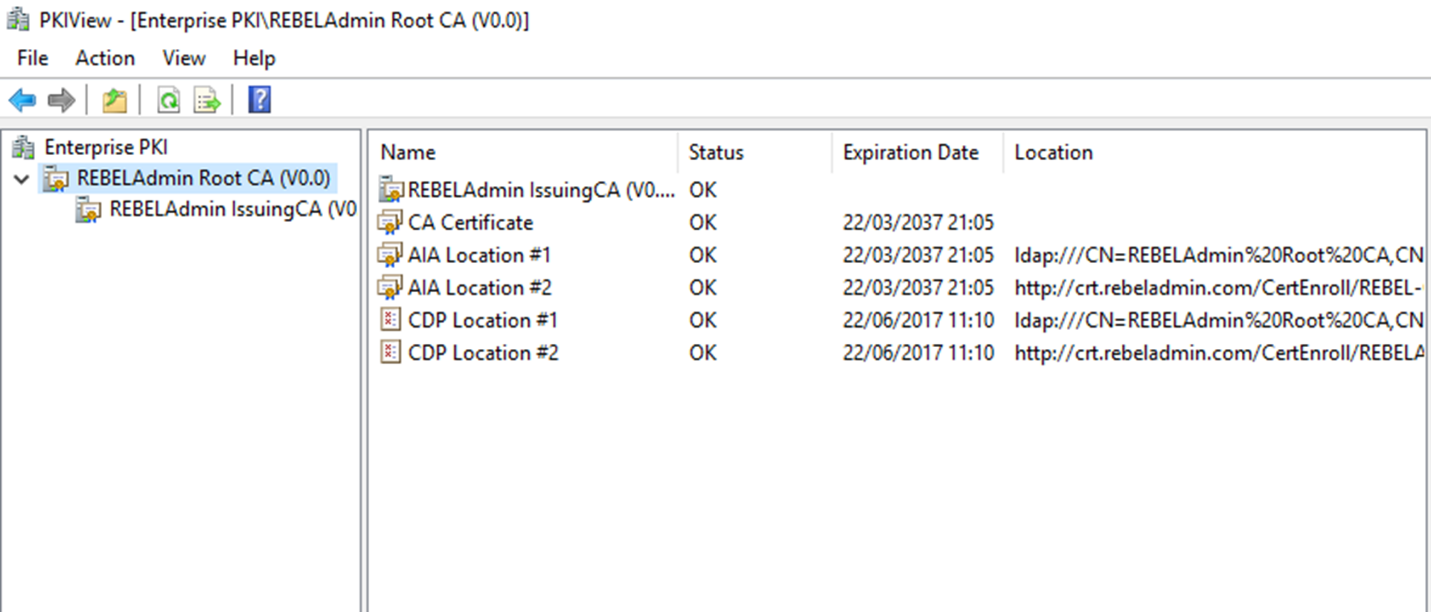
AIA Location 

AIA (Authority Information Access) is an extension which is in certificate and it defines the location where application or service can retrieve issuing CA’s certificate. This is also a web based path and we can use the same location we used for the CDP.

This can be set using,

certutil -setreg CA\CACertPublicationURLs "1:C:\Windows\system32\CertSrv\CertEnroll\%1_%3%4.crt\n2:ldap:///CN=%7,CN=AIA,CN=Public Key Services,CN=Services,%6%11\n2:http://crt.rebeladmin.com/CertEnroll/%1_%3%4.crt"

The Options are very much similar to the CDP with few smaller changes.

Option

Details

0

No Changes

1

Publish CA certificate to given location

2

Attach AIA extensions of issued certificates

32

Attach Online Certificate Status Protocol (OCSP) Extensions

CA Time Limits

When we setup the CA we have defined CA validity period as 20 years. but it doesn’t mean every certificate it issue will have 20 years’ valid period. Root CA will issue certificates only to Issuing CAs. Certificate request, approval and renewal processes are manual. There for typically these certificates will have longer validity periods. In demo, I will set it for 10 years. 

certutil -setreg ca\ValidityPeriod "Years"

certutil -setreg ca\ValidityPeriodUnits 10

CRL Time Limits

CRL also got some time limits associated. 

Certutil -setreg CA\CRLPeriodUnits 13

Certutil -setreg CA\CRLPeriod "Weeks"

Certutil -setreg CA\CRLDeltaPeriodUnits 0

Certutil -setreg CA\CRLOverlapPeriodUnits 6

Certutil -setreg CA\CRLOverlapPeriod "Hours"

In above commands, 

CRLPeriodUnits – Specify the number of days, weeks, months or years CRL will be valid. 

CRLPeriod – Specify whether CRL validity period is measured by days, weeks, months or years. 

CRLDeltaPeriodUnit – Specify the number of days, weeks, months or years delta CRL will be valid. For offline CA this should be disabled. 

CRLOverlapPeriodUnits – This specify the number of days, weeks, months or years that CRL can overlap. 

CRLOverlapPeriod – This Specify whether CRL overlapping validity period is measured by days, weeks, months or years.

Now we have all the settings submitted and in order to apply changes cert service need to be restarted. 

Restart-Service certsvc

New CRL

Next step is to create new CRL and it can generate using,

certutil -crl

Once it’s done, there will be two files under C:\Windows\System32\CertSrv\CertEnroll

capki4
 
Publish Root CA Data in to Active Directory 
 
in above list we have two files. One is end with .crt. This is the root CA certificate. In order to trust it by other clients in domain, it need to publish to the active directory. To do that first need to copy this file from root CA to Active Directory server. Then log in to AD as domain admin or enterprise admin and run,
 
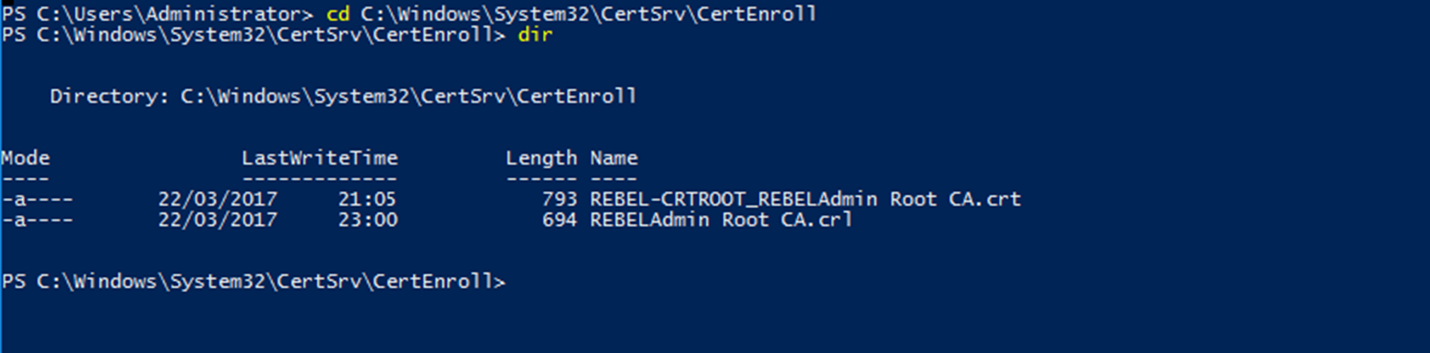
certutil –f –dspublish "REBEL-CRTROOT_REBELAdmin Root CA.crt" RootCA
 
The next file is ends with .crl. This is the root CA’s CRL. This also need to publish to AD. So, everyone in domain aware of that too. In order to do that copy the file from root CA to domain controller and run the command,
 
certutil –f –dspublish "REBELAdmin Root CA.crl"
 
Setup Issuing CA
 
Now we finished with the root CA setup and next step is to setup Issuing CA. Issuing CA will be running from a domain member server and it will be AD integrated. In order to perform the installation, need to log in to the server as domain admin or enterprise admin. 
First task will be to install the AD CS role. 
 
Add-WindowsFeature ADCS-Cert-Authority -IncludeManagementTools
 
I also going to use same server for the web enrollment role service from the same service. So it can be add using
 
Add-WindowsFeature ADCS-web-enrollment
 
After that we can configure the role service using,
 
Install-ADcsCertificationAuthority -CACommonName “REBELAdmin IssuingCA” -CAType EnterpriseSubordinateCA -CryptoProviderName “RSA#Microsoft Software Key Storage Provider” -HashAlgorithmName SHA256 -KeyLength 2048
 
In order to configure the web enrollment role service
 
Install-ADCSwebenrollment
 
capki5
 
Issue Certificate for Issuing CA
 
In order to get AD CS running on issuing CA, it needs the certificate issued from the parent CA which is the root CA we just deployed. During the role configuration process, it automatically creates the certificate request under the C:\ and exact file name will be listed in command output from the previous command.
 
The file need to copy from the issuing CA to the root CA and the execute the command,
 
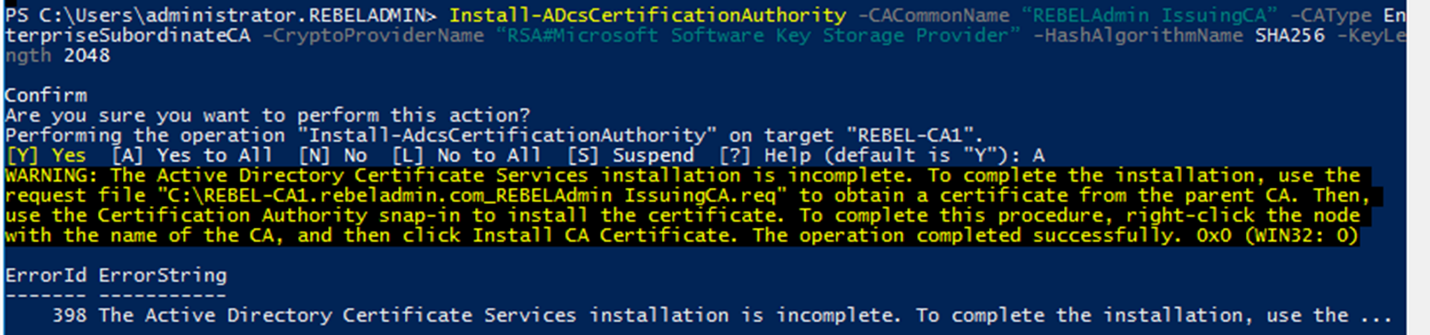
certreq -submit "REBEL-CA1.rebeladmin.com_REBELAdmin IssuingCA.req"
 
As I explain before any request to root CA will process manually and this request also will be waiting for manual approval. In order to approve the certificate, go to Server Manager > Tools > Certificate Authority > Pending Certificates and the right click on the certificate > All Tasks > Issue
 
capki6

 
Once it is issued, it need to be export and import in to Issuing CA. 
 
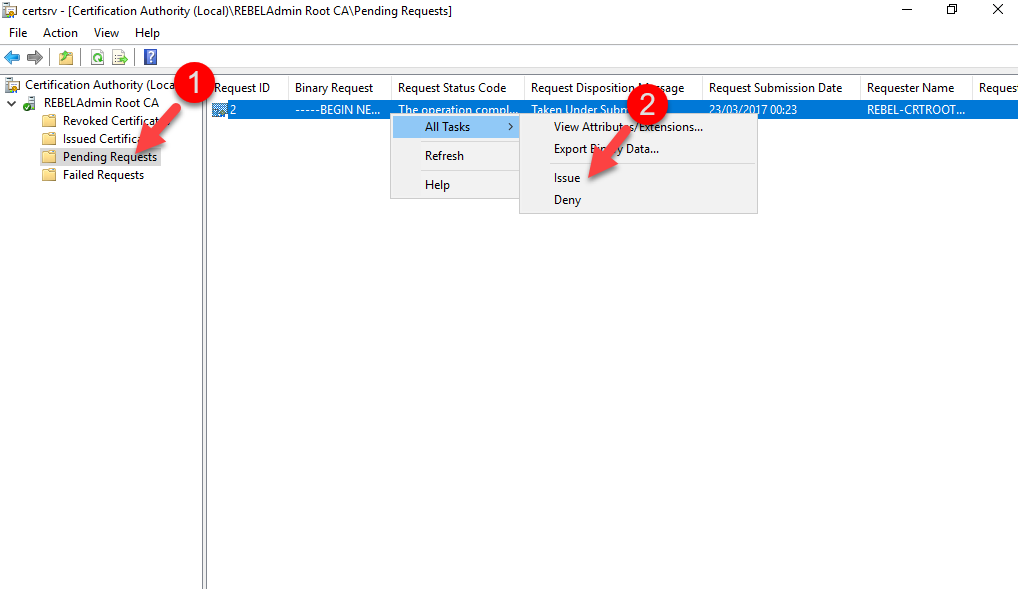
certreq -retrieve 2 "C:\REBEL-CA1.rebeladmin.com_REBELAdmin_IssuingCA.crt"
 
above command will export the certificate. The number 2 is the “Request ID” in the CA mmc. 
 
Once it exports, move the file to issuing CA and from there run command,
 
Certutil –installcert "C:\REBEL-CA1.rebeladmin.com_REBELAdmin_IssuingCA.crt"

start-service certsvc
 
Post Configuration Tasks 
 
Similar to the root CA, after the initial service setup, we need to define some configuration values.
 
CDP Location
 
It is similar to the root CA and I am going to use already created web location for it. 
 
certutil -setreg CA\CRLPublicationURLs "1:%WINDIR%\system32\CertSrv\CertEnroll\%3%8%9.crl\n2:http://crt.rebeladmin.com/CertEnroll/%3%8%9.crl\n3:ldap:///CN=%7%8,CN=%2,CN=CDP,CN=Public Key Services,CN=Services,%6%10"
 
AIA Location
 
Similar way AIA location also specified using,
 
certutil -setreg CA\CACertPublicationURLs "1:%WINDIR%\system32\CertSrv\CertEnroll\%1_%3%4.crt\n2:http://crt.rebeladmin.com/CertEnroll/%1_%3%4.crt\n3:ldap:///CN=%7,CN=AIA,CN=Public Key Services,CN=Services,%6%11"
 
CA and CRL Time Limits
 
CA and CRL Time limits also need to adjust,
 
certutil -setreg CA\CRLPeriodUnits 7
certutil -setreg CA\CRLPeriod “Days”
certutil -setreg CA\CRLOverlapPeriodUnits 3
certutil -setreg CA\CRLOverlapPeriod “Days”
certutil -setreg CA\CRLDeltaPeriodUnits 0
certutil -setreg ca\ValidityPeriodUnits 3
certutil -setreg ca\ValidityPeriod “Years”
 
Once all these done, in order to complete the configuration, restart the cert service using,
 
Restart-Service certsvc
 
Last but not least run,
 
certutil -crl

To generate CRLs. 
 
Once all done we can run PKIView.msc to verify the configuration. 
 
capki7
 
Note – PKIVIEW was first introduced with windows 2003 and it gives visibility over enterprise PKI configuration. It also verifies the certificates and CRL for each CA to maintain integrity.
 
Certificate Templates
 
Now we have the working PKI and we can turn off the standalone root CA. it only should bring online if the Issuing CA certificates are expired or PKI compromised to generate new certificates.
Once CA is ready, objects and services can use it for certificates. CA comes with predefined “Certificates Templates”. These can use to build custom certificate templates according to organization requirements and publish it to AD. 
Certificate Templates MMC can access using Run > MMC > File > Add/Remove Snap In > Certificate Templates
 
To create a custom template, Right Click on a template and click on Duplicate Template
 
capki8
 
Then it will open up the properties window and can change the settings of the certificate template to match the requirements. Some common settings to change in templates are,
 
Template display name (General Tab) – Display name of the template
Template Name (General Tab) – Common Name of the template
Validity Period (General Tab) – Certificate Validity Period
Security – Authenticated Users or Groups must have “Enroll” permission to request certificates. 
 
capki9
 
Next step before use it to issue the certificate via CA. Then the members of the domain can request certificates based on that. 
 
To do that, go to Certificate Authority MMC > Certificate Templates > Right click on it > New > Certificate Template to Issue
 
Then from the list select the Template to issue and click Ok

 
capki10
Request Certificate
 
Based on the published certificates templates, users can request certificates from issuing CA. I have log in to an end user PC and going to request a certificate based on template we just created in previous step. 
 
Go to Run > MMC > Add/Remove Snap in > Certificates and Click Add Button
 
From the list select the “Computer Account” to manage certificates for Computer Object. This is depended on the template. Once selected, in next window select Local computer as the target. 
 
Note – If the user is not an administrator, with default permission it will only allow to open the “Current User” snap in. To open Computer Account, MMC need to Run as Administrator 
 
Once MMC is loaded, go to Personal container, right click and then follow All Tasks > Request New Certificate
 
It will open new window and click next till it reach request certificate window. In there we can see the new template. Click on check box to select and then click on link with Yellow warning sign to provide additional details which required for the certificate. 
capki11
 
Provide the required fields and click ok to proceed. Most of the time its Common name which required if its computer certificate. 
 
capki12
 
Once it’s done, click on “Enroll” to request certificate. Then it will automatically process the certificate request and issue the certificate. Once its issued it can be found under the Personal Certificate Container. 
 
capki13
 
As we can see a valid certificate is issued. Same time record of this issued certificate can be found under Issuing CA’s Certificate Authority MMC > Issued Certificate 
 
In this exercise, we learned how to setup two-tier PKI correctly. After setup, as any other system regular maintenance is required to keep up the good health. Also, it is important to have proper documentation about the setup, certificate templates and procedures to issue, renew and revoke different types of certificates.
 
This marks the end of this PKI blog series. If you have any questions feel free to contact me on rebeladm@live.com also follow me on twitter @rebeladm to get updates about new blog posts.