
Last Updated on December 30, 2019 by Dishan M. Francis
Each organization has different standards when it comes to server/desktop provisioning. These standards change based on the nature of the business, compliances, server/desktop role and so on. By keeping the customized OS image simplifies the provisioning process as well as prevent configuration errors. In the local environment, we can do this simply using WDS, System Centre or other 3rd party solutions. But what if need to do the same in Azure environment ?
In this blog post, I am going to demonstrate how to create a managed image in Azure and how to use it to deploy Azure VM.
For the configuration process, I will be using PowerShell. Therefore, please make sure you have Azure PowerShell module installed. More info about it can find under https://docs.microsoft.com/en-us/powershell/azure/install-az-ps?view=azps-2.6.0
Let's go ahead and start the configuration process by creating a new resource group.
1. Launch PowerShell console and connect to Azure using Connect-AzAccount
2. Then create a new resource group using,
New-AzResourceGroup -Name REBELRG -Location "East US"
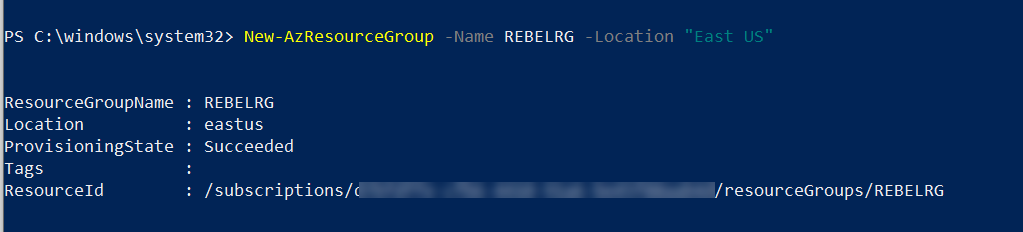
In the above, REBELRG is the resource group name and East US is the resource group location.
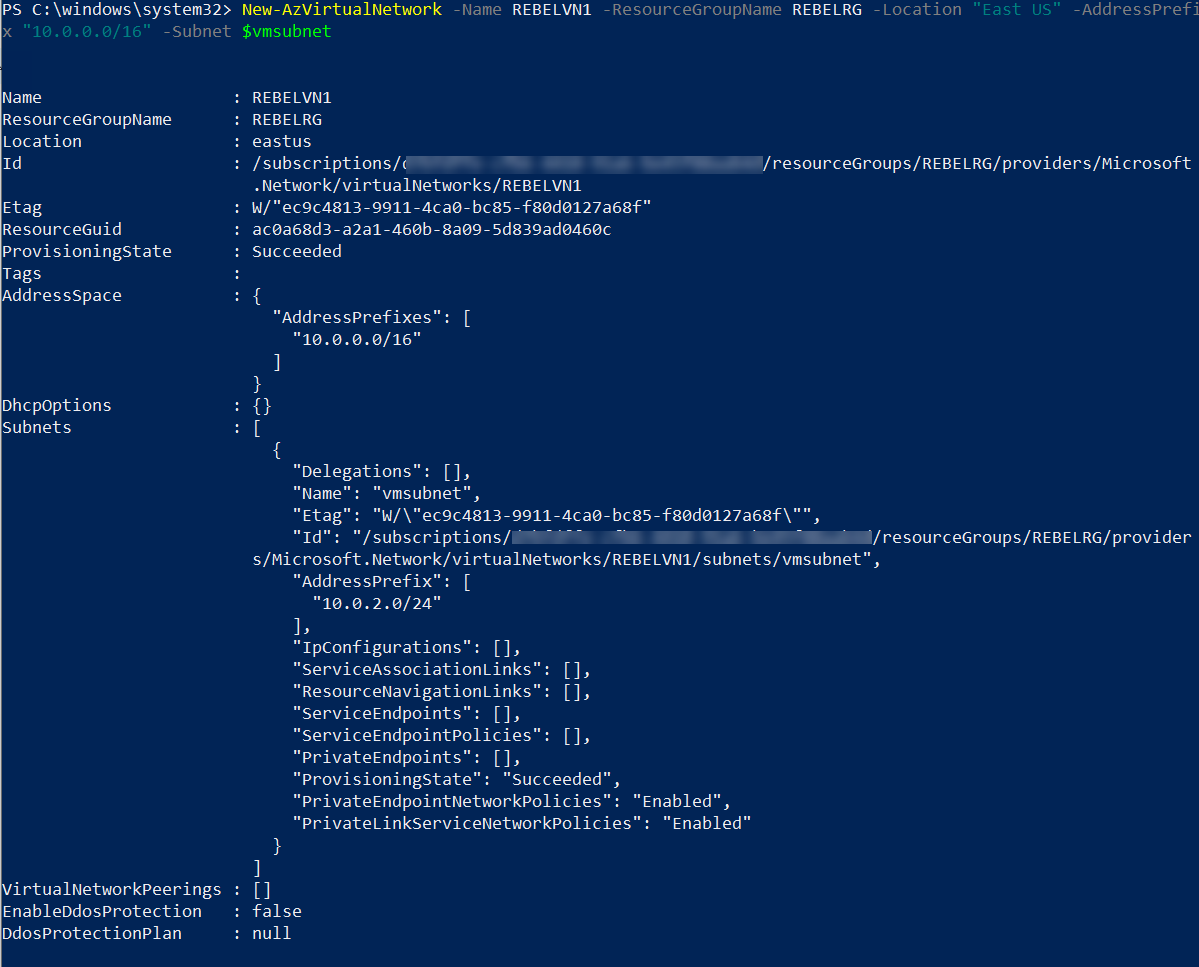
3. The next step is to create a new virtual network.
$vmsubnet = New-AzVirtualNetworkSubnetConfig -Name vmsubnet -AddressPrefix "10.0.2.0/24"
New-AzVirtualNetwork -Name REBELVN1 -ResourceGroupName REBELRG -Location "East US" -AddressPrefix "10.0.0.0/16" -Subnet $vmsubnet
In the above, REBELVN1 is the new virtual network name. It has 10.0.0.0/16 address space. It also has a new subnet 10.0.2.0/24 (vmsubnet) for virtual machines.
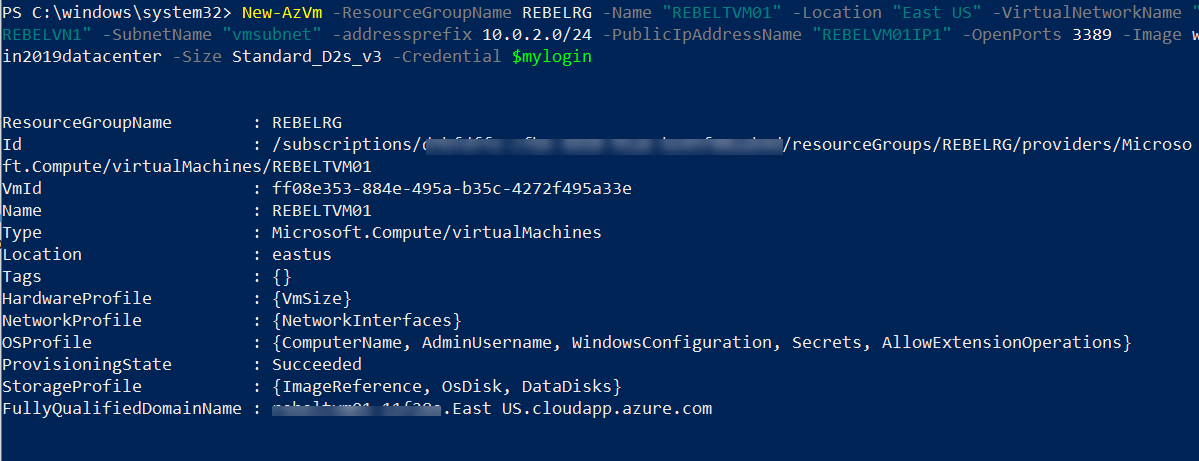
4. Then we need to create a new VM to use image reference.
$mylogin = Get-Credential
New-AzVm -ResourceGroupName REBELRG -Name "REBELTVM01" -Location "East US" -VirtualNetworkName "REBELVN1" -SubnetName "vmsubnet" -addressprefix 10.0.2.0/24 -PublicIpAddressName "REBELVM01IP1" -OpenPorts 3389 -Image win2019datacenter -Size Standard_D2s_v3 -Credential $mylogin
In the above I am creating a new virtual machine called REBELTVM01. It is running windows server 2019 data center edition. I have specified it using -Image parameter. It also using Standard_D2s_v3 vm size.
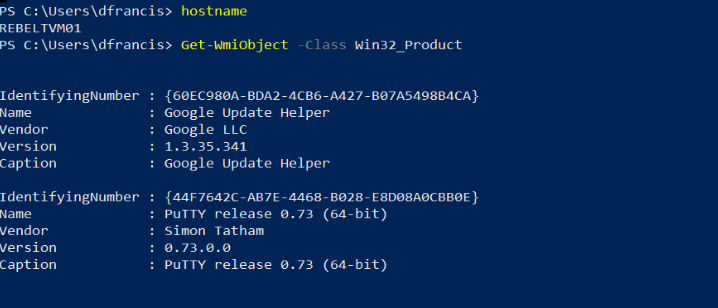
5. Once new VM is up and running, I RDP to it and install some applications such as putty and chrome. This should include in managed image and we can use this to verify the image in a later stage.
6. After relevant applications and settings are in place, we need to generalize it using sysprep. This will remove personal and security information and prepare it to become an image.
To do that, log in to VM and launch PowerShell window as an administrator. Then go to %windir%\system32\sysprep and execute sysprep.exe.
Then In the new window select Enter System Out-of-Box Experience (OOBE) and Generalize option. For shutdown, option go ahead and set it to shutdown. Once VM is generalized you can't access it.
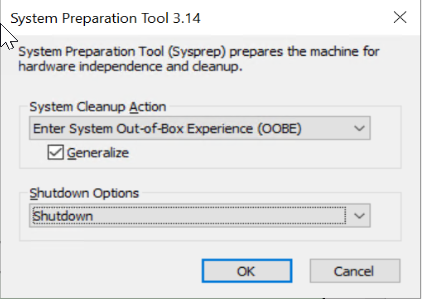
This will take some time to complete.
Once the process is completed, deallocate the VM using,
Stop-AzVM -ResourceGroupName REBELRG -Name REBELTVM01 -Force
Then change the status of VM to Generalized.
Set-AzVm -ResourceGroupName REBELRG -Name REBELTVM01 -Generalized
7. Once VM is in shutdown state, we can go ahead and create VM image configuration using,
New-AzImageConfig -Location "East US" -SourceVirtualMachineId /subscriptions/d7bfdffe-cfb6-4410-91a6-be45f88aab4d/resourceGroups/REBELRG/providers/Microsoft.Compute/virtualMachines/REBELTVM01
In here you can find VM id using Get-AzVM -Name REBELTVM01 -ResourceGroupName REBELRG
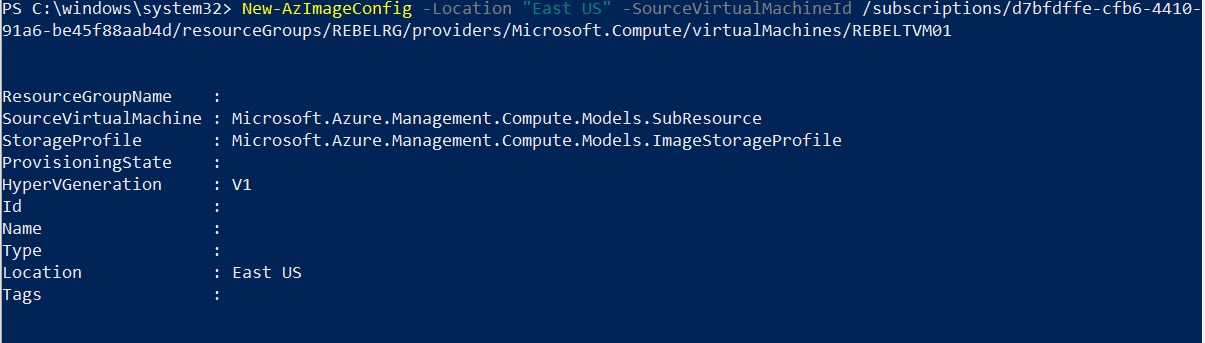
We need to pass it to variable. To do that,
$rebel1 = New-AzImageConfig -Location "East US" -SourceVirtualMachineId /subscriptions/d7bfdffe-cfb6-4410-91a6-be45f88aab4d/resourceGroups/REBELRG/providers/Microsoft.Compute/virtualMachines/REBELTVM01
8. Next step of the configuration is to create a managed image by using,
New-AzImage -Image $rebel1 -ImageName "REBELVMTempl1" -ResourceGroupName REBELRG

In above, we create a new managed image called REBELVMTempl1
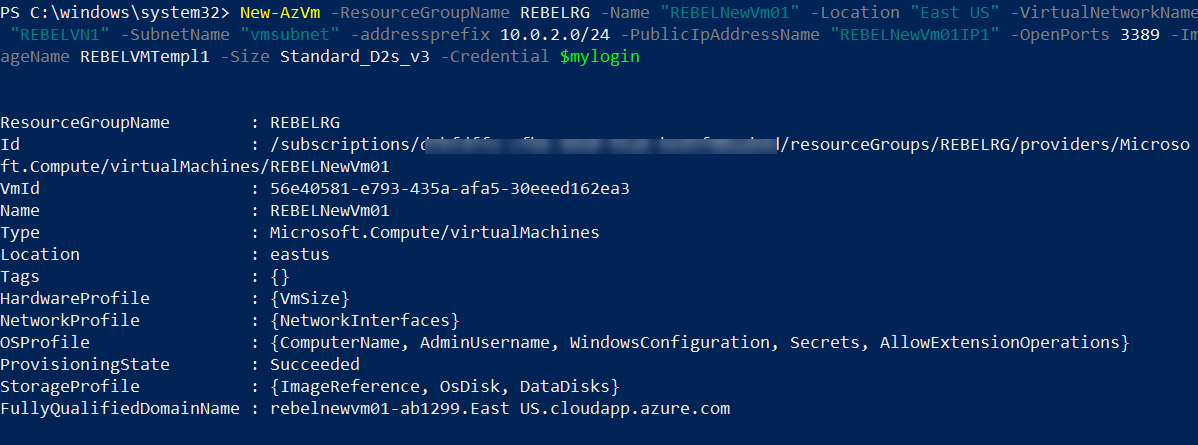
9. This completes the configuration process. The next step is to test it. To do that, let's go ahead and create new VM using the managed image we just created.
$mylogin = Get-Credential
New-AzVm -ResourceGroupName REBELRG -Name "REBELNewVm01" -Location "East US" -VirtualNetworkName "REBELVN1" -SubnetName "vmsubnet" -addressprefix 10.0.2.0/24 -PublicIpAddressName "REBELNewVm01IP1" -OpenPorts 3389 -ImageName REBELVMTempl1 -Size Standard_D2s_v3 -Credential $mylogin
In the above, I am creating a new virtual machine called REBELNewVm01 and it uses REBELVMTempl1 managed image. I have specified it using -ImageName parameter. It also using Standard_D2s_v3 vm size.
Once the server is up and running, I RDP to it. As expected, it got the same apps I installed in the image.

As we can see, the managed image is working as expected.
This marks the end of this blog post. I hope now you know how to create a managed image and how to use it with Azure VMs. If you have any further questions about this feel free to contact me on rebeladm@live.com also follow me on twitter @rebeladm to get updates about new blog posts.