
Last Updated on March 17, 2023 by Dishan M. Francis
In my previous blog post, I explained how we can automate JML (Joiners/Movers/Leavers) process by using Microsoft Entra lifecycle workflows. You can access it using https://www.rebeladmin.com/2022/11/step-by-step-guide-automate-jmljoiners-movers-leavers-process-with-microsoft-entra-lifecycle-workflows/#more-6030 . In this article, I used employeeHireDate Azure AD attribute value to trigger the workflow. At the moment this value cannot be set using UI and can only update using MS Graph. After reading the article, a few readers came back to me and ask how they can sync this attribute from on-premises Active Directory. The employeeHireDate attribute is not available in Microsoft Active Directory so it is not possible to sync value directly. However, it is possible to use a different attribute to record the value and then synchronize it to Azure AD. In this blog post, I am going to demonstrate how we can synchronize value to employeeHireDate attribute from on-premises Active Directory by using Azure AD Connect.
Pre-requisites
Before we start, we need to make sure the following prerequisites are in place.
1. Existing Azure AD Connect Sync – In here I assume you already have a working Azure AD Connect sync. You also can sync values by using Azure AD Connect Cloud sync but in this blog post, I am only focusing on Azure AD Connect sync.
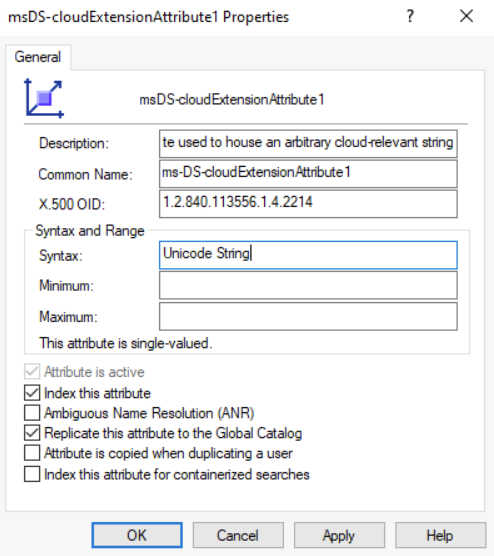
2. Existing Attribute – You can choose any existing Active Directory attribute to record the value for employeeHireDate but it must be a string. In this demo configuration, I am going to use msDS-cloudExtensionAttribute1 Active Directory attribute.
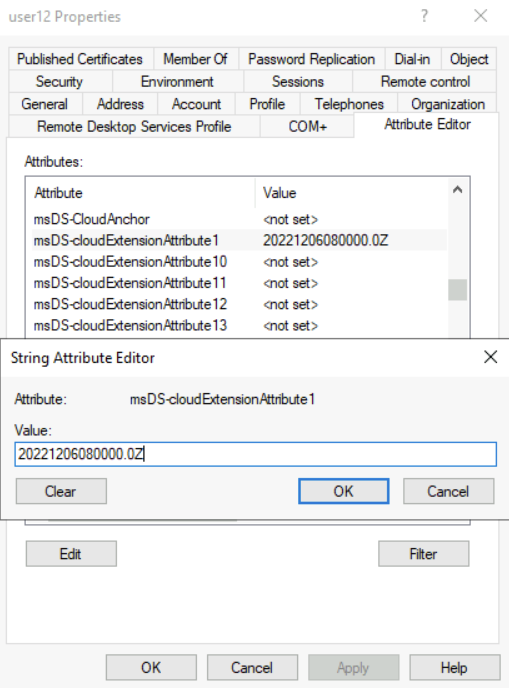
3. Correct Data Format – The value must follow a specific format which is “yyyyMMddHHmmss.fZ“. As a example, if the hire date is 01st Dec 2022 it will be 20221201080000.0Z (In here I used 08 am as the starting time).
Once we have the above prerequisites in place, we can go ahead with the configuration tasks.
In my demo environment, I already configured Microsoft Entra lifecycle workflow to automate certain onboarding tasks. The configuration of the workflow is explained at https://www.rebeladmin.com/2022/11/step-by-step-guide-automate-jmljoiners-movers-leavers-process-with-microsoft-entra-lifecycle-workflows/
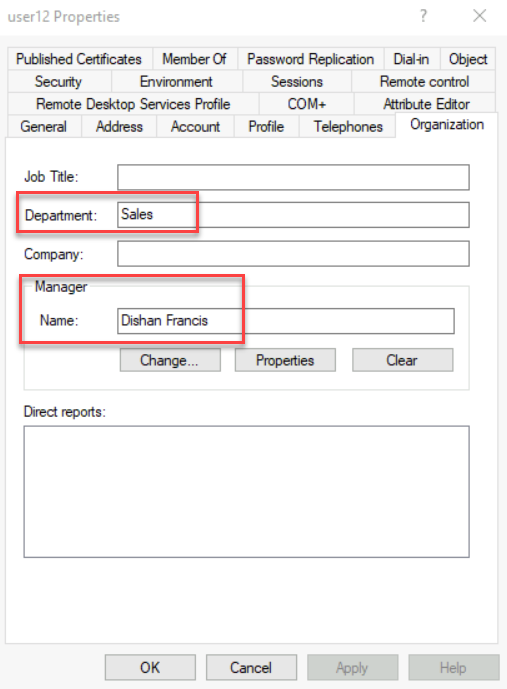
Set Department and Manager attributes
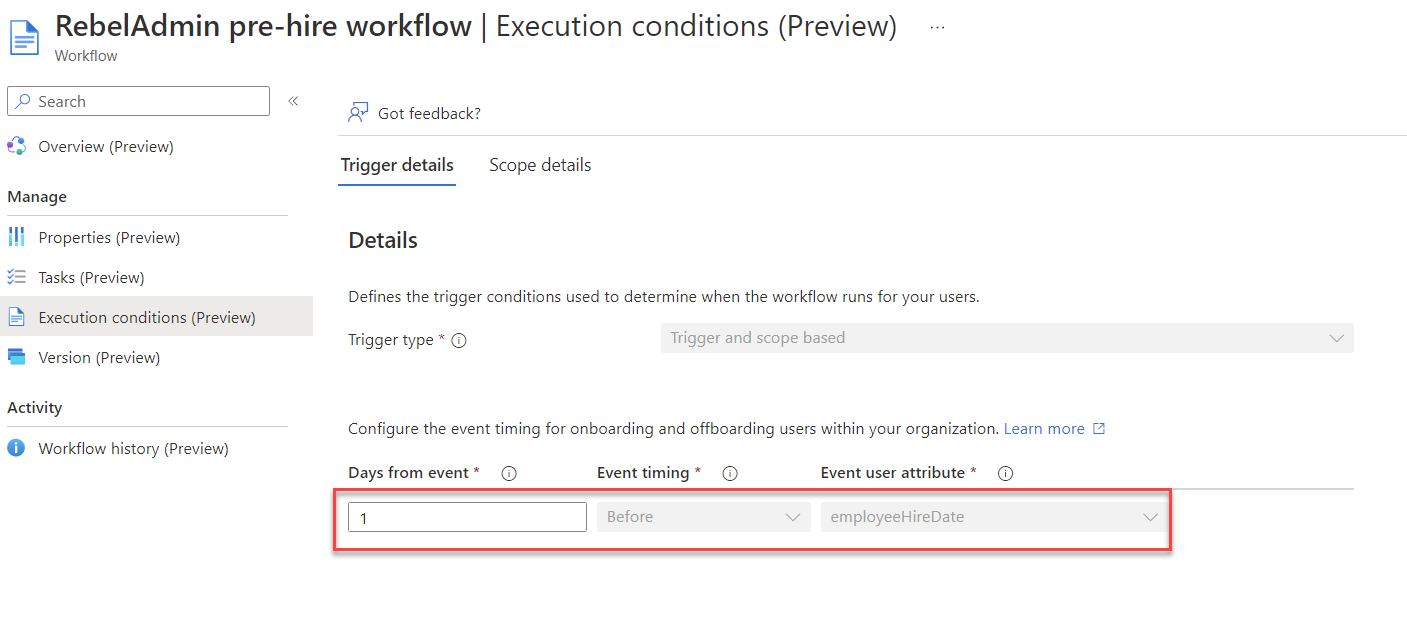
My workflow will only trigger for joiners in Sales department. Also as a step in the workflow, the new employee’s manager should receive a TAP (Temporary Access Pass) via email. For that users also need to have a manager assigned before the workflow triggers. As I am syncing users from on-premises Active Directory, I already set department and manager attributes for the new users.
Set employeeHireDate attribute value in on-premises Active Directory
There is no attribute called employeeHireDate in on-premises Active Directory. So we have to use an already existing attribute to record the value for employeeHireDate and then sync this data to Azure AD. This attribute must be a string. For this demo, I have chosen msDS-cloudExtensionAttribute1 attribute to record the value.
The value for employeeHireDate should be recorded in a specific format. Otherwise, the value will not be populated correctly in Azure AD. The format for value is “yyyyMMddHHmmss.fZ“. In my example, I used 06th Dec 2022 as the hire date. So the format of the value should be 20221206080000.0Z (In here I used 08:00 as the starting time).
I went ahead and populate these values for the selected users in on-premises Active Directory.
Create Custom Sync rule
The next step of the configuration is to set up a custom sync rule to sync on-premises Active Directory msDS-cloudExtensionAttribute1 attribute value to Azure AD employeeHireDate attribute.
To do that,
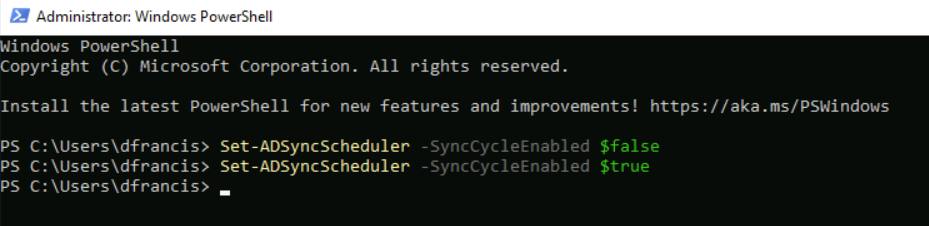
1. Log in to the on-premises server which has Azure AD Connect installed.
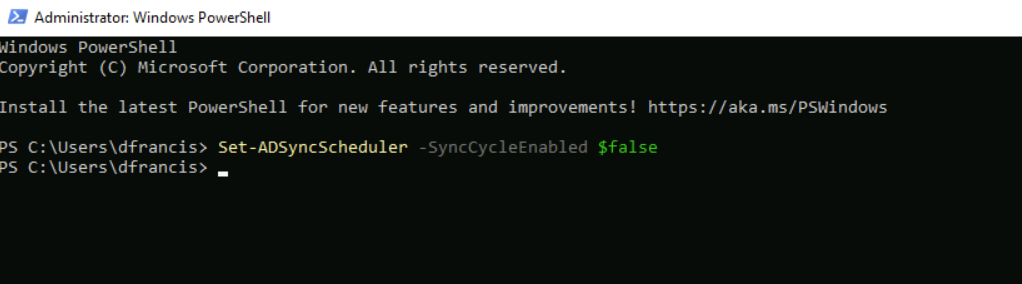
2. Launch PowerShell as Administrator and run Set-ADSyncScheduler -SyncCycleEnabled $false to disable the sync scheduler.
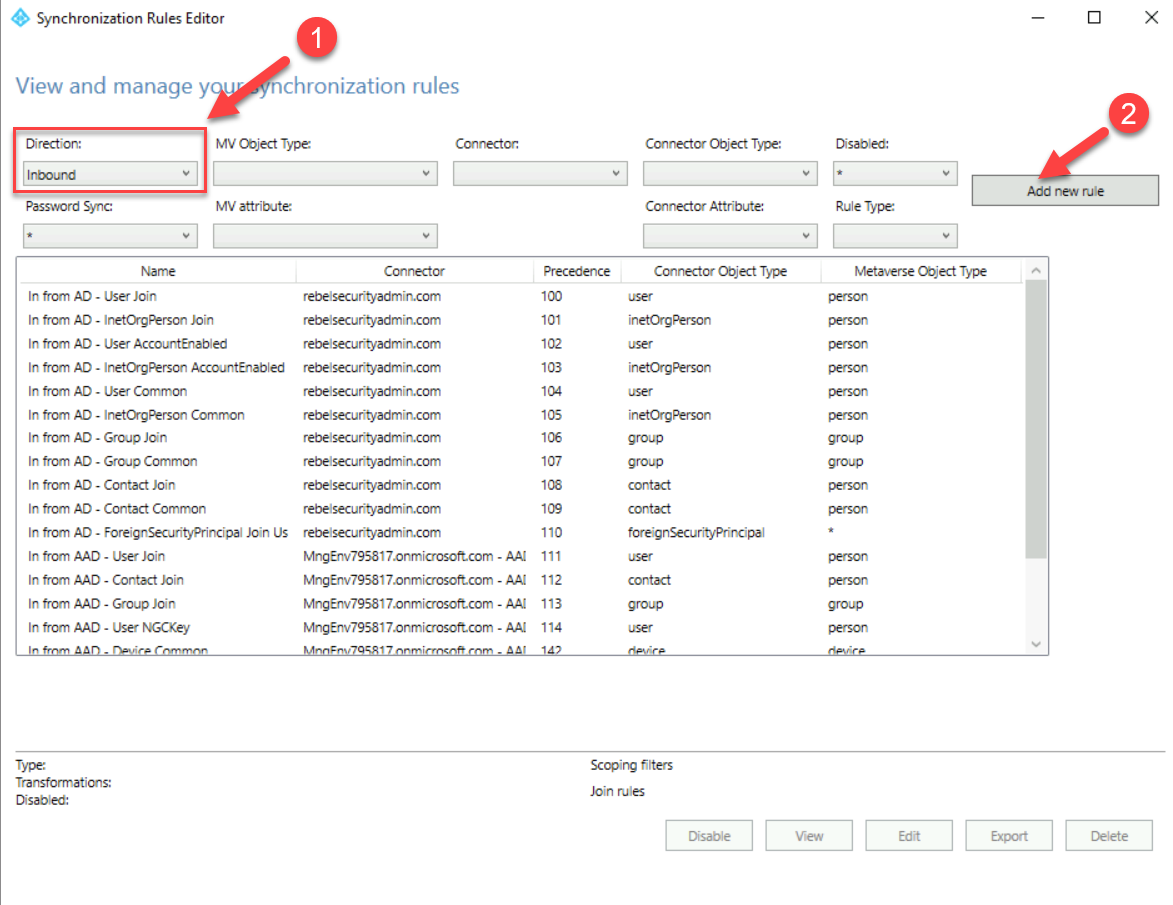
3. Then go to programs and open Synchronization Rules Editor
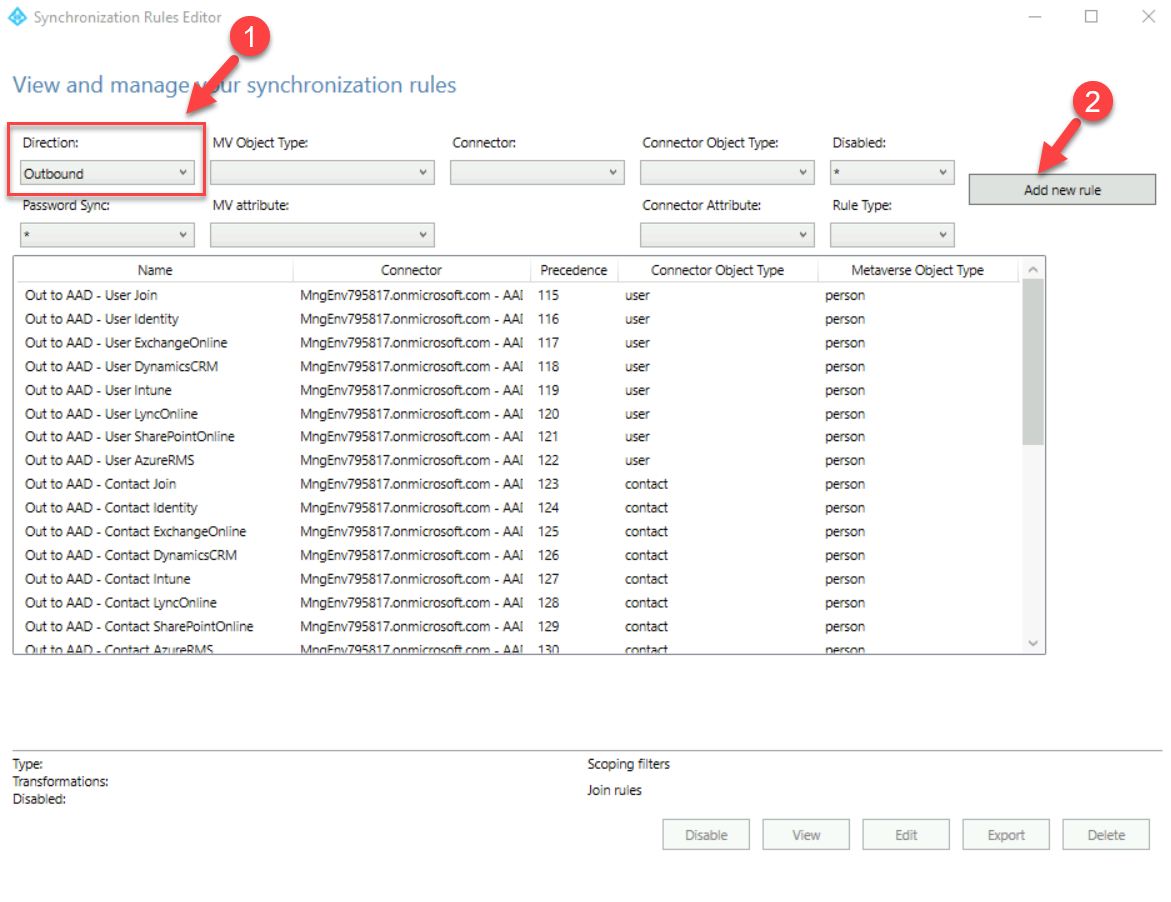
4. First, we need to setup an inbound rule and for that make sure the direction of the rule is selected as inbound and then click on Add rule
5. In the rule setup window, I have used the following info,
Name: In from AD – From on-prem AD
Connected System: rebelsecurityadmin.com
Connected System Object Type: user
Metaverse Object Type: person
Precedence: 200
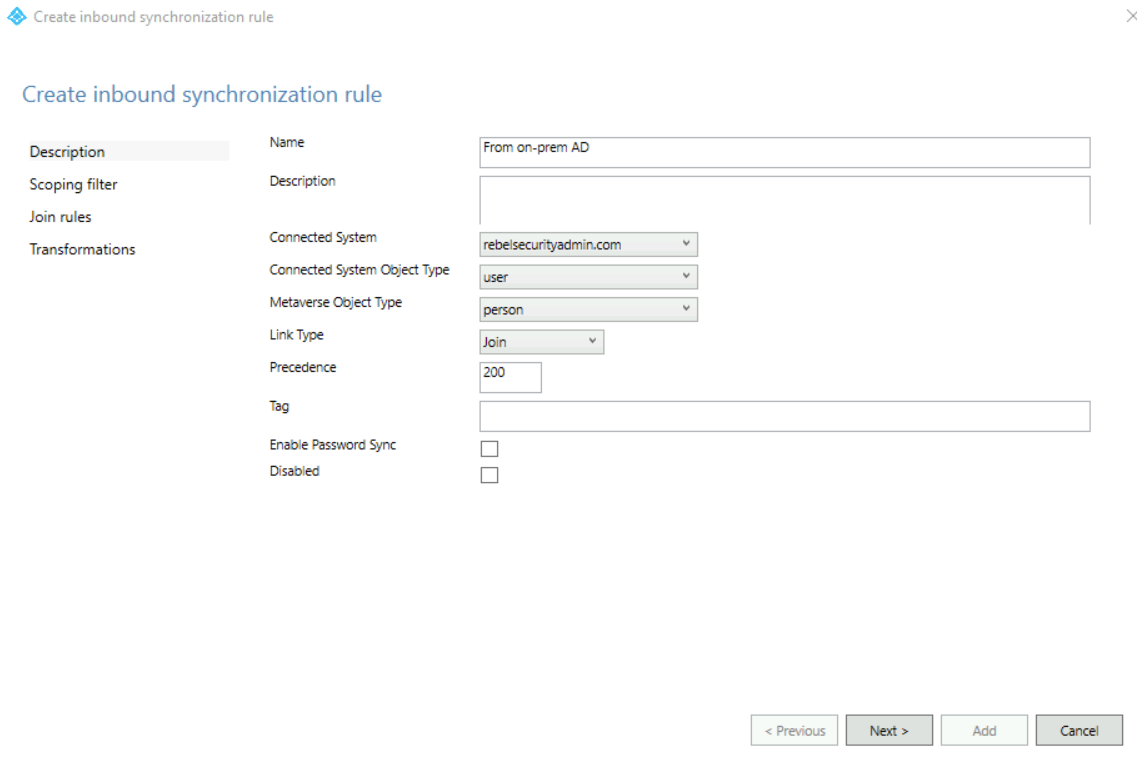
In the above, the connected system should be set to your on-premises active directory domain name.
6. To go to the next step of the configuration, Click Next
7. We are not going to use any scoping filters so click Next.
8. We also not going to add any join rules. Therefore in the next window, click Next to proceed.
9. On the Transformations screen, click Add transformation
Then use the following values,
FlowType: Direct
Target Attribute: employeeHireDate
Source: msDS-cloudExtensionAttribute1
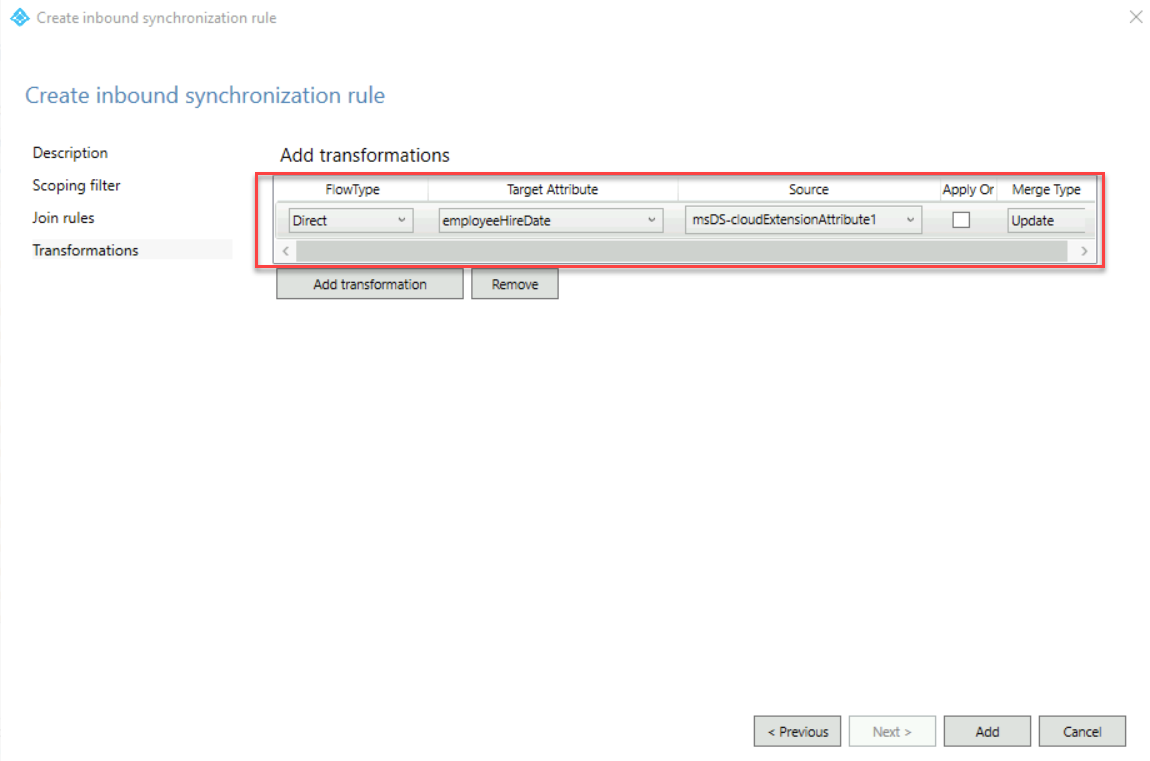
After values are entered, click on Add
This creates the inbound rule and we also need to set up an outbound rule.
10. In the main window, select the direction as outbound and click Add new rule
11. In the new window, we need to use the following info,
Name: Outbound-to-AzureAD
Connected System: <your tenant>
Connected System Object Type: user
Metaverse Object Type: person
Precedence: 300
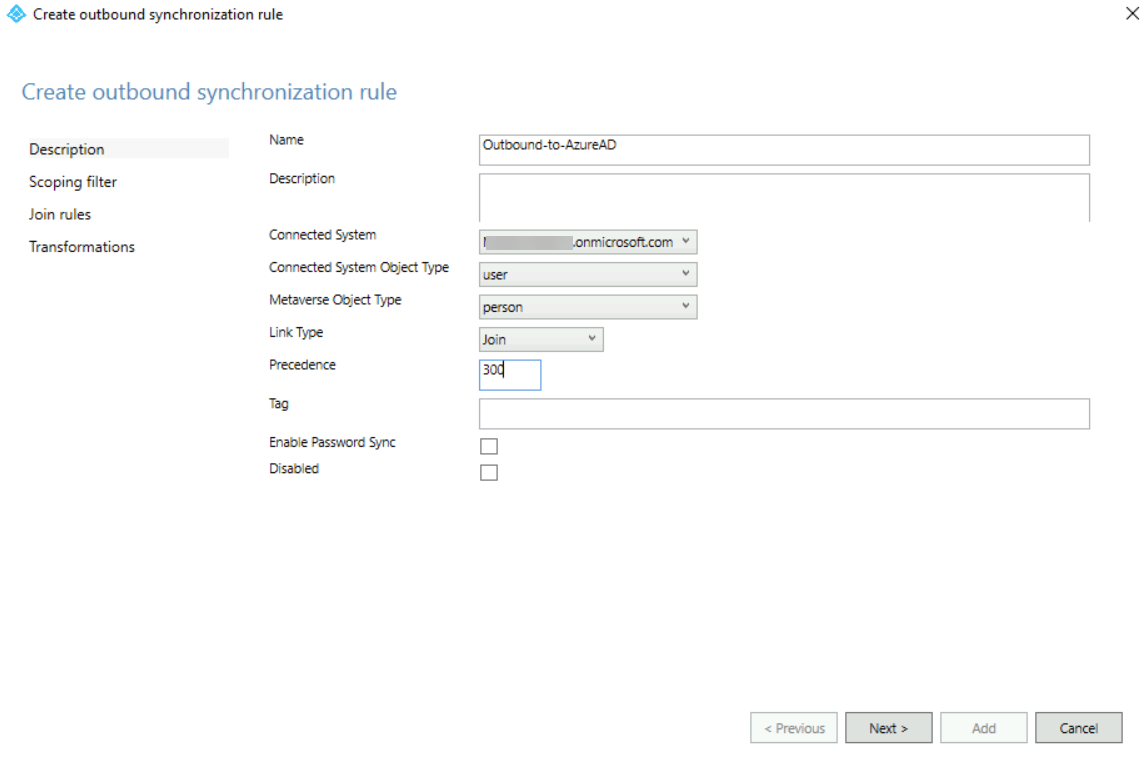
In the above, the connected system should be set to your tenant.
Once values are entered click Next to proceed.
12. We will not add any scoping filters or join rules so in the next two windows click on Next.
13. On the Transformations screen, click Add transformation
Then use the following values,
FlowType: Direct
Target Attribute: employeeHireDate
Source: employeeHireDate

After values are entered, click on Add
This creates the outbound rule.
14. Now we have everything ready and the next step is to resume the sync by running Set-ADSyncScheduler -SyncCycleEnabled $true on PowerShell.
This will start syncing the values and in the next step, we can verify it using Microsoft Graph.
Verify synched attribute values for employeeHireDate
In the above, we have set up the synch rules so the values should start appearing in Azure AD. Let’s go ahead and verify it.
To do that,
1. Go to Graph explore https://developer.microsoft.com/graph/graph-explorer and log in as Global Administrator
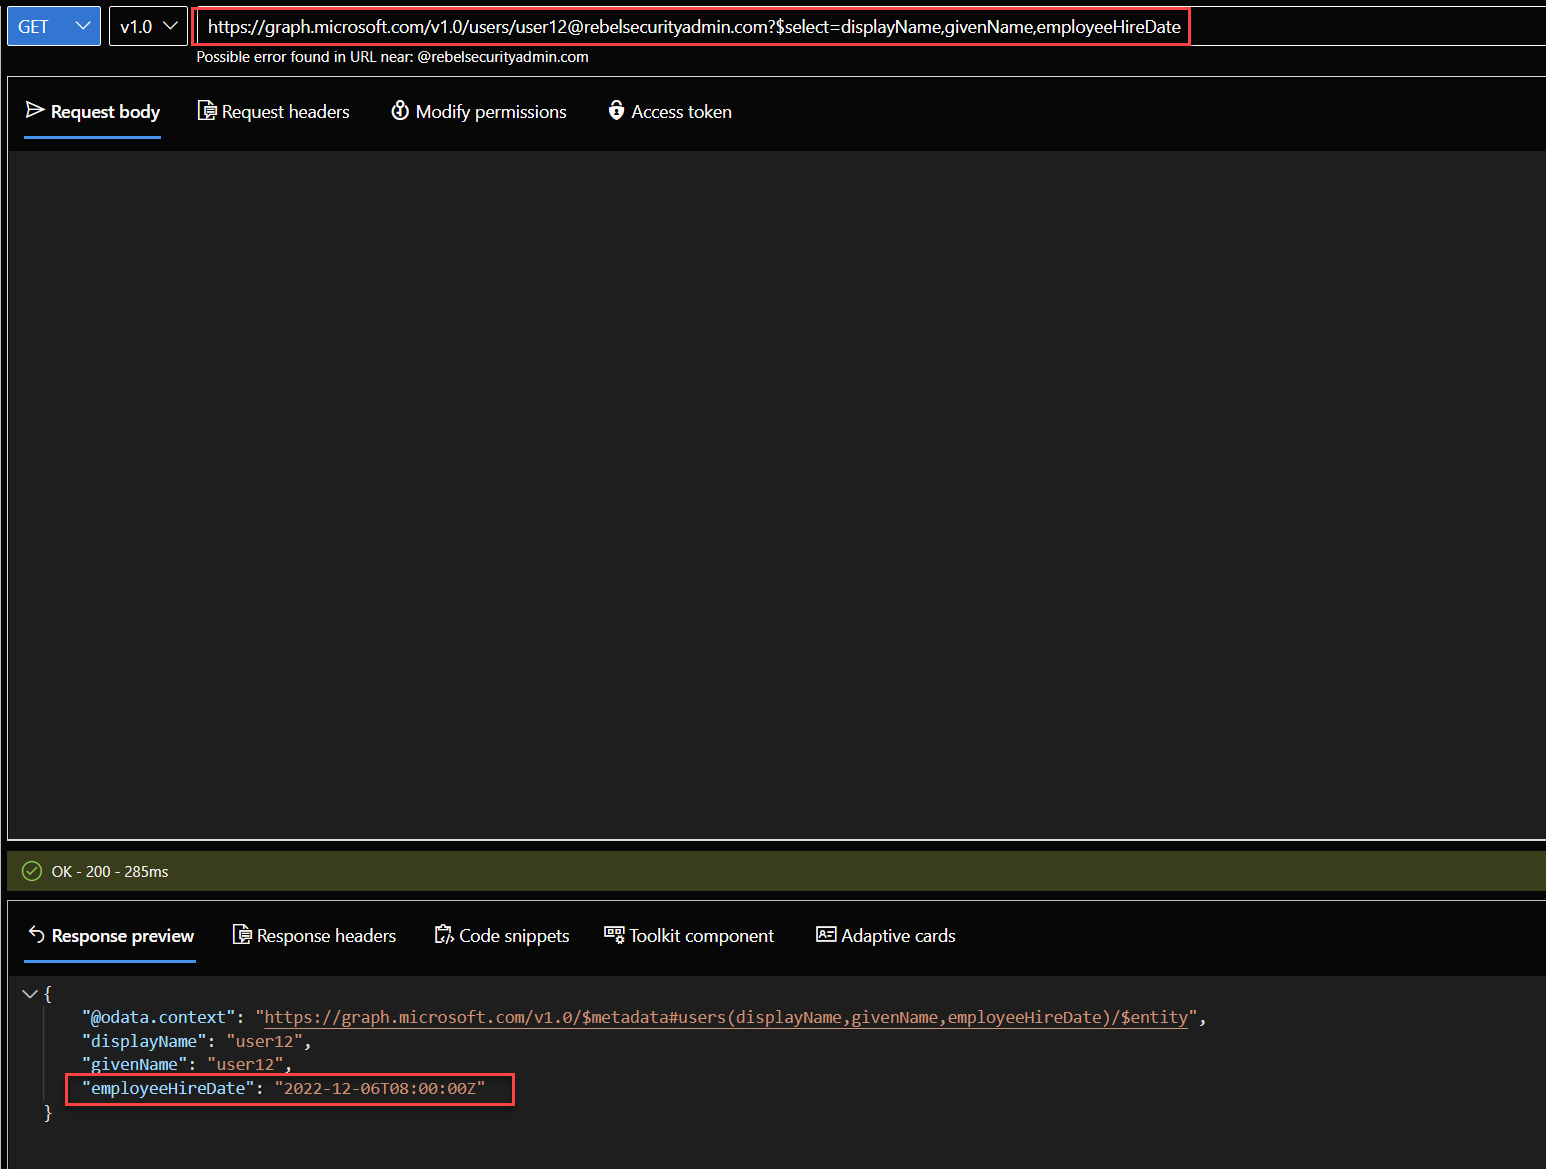
2. Make sure the method on the top of the window is set to GET
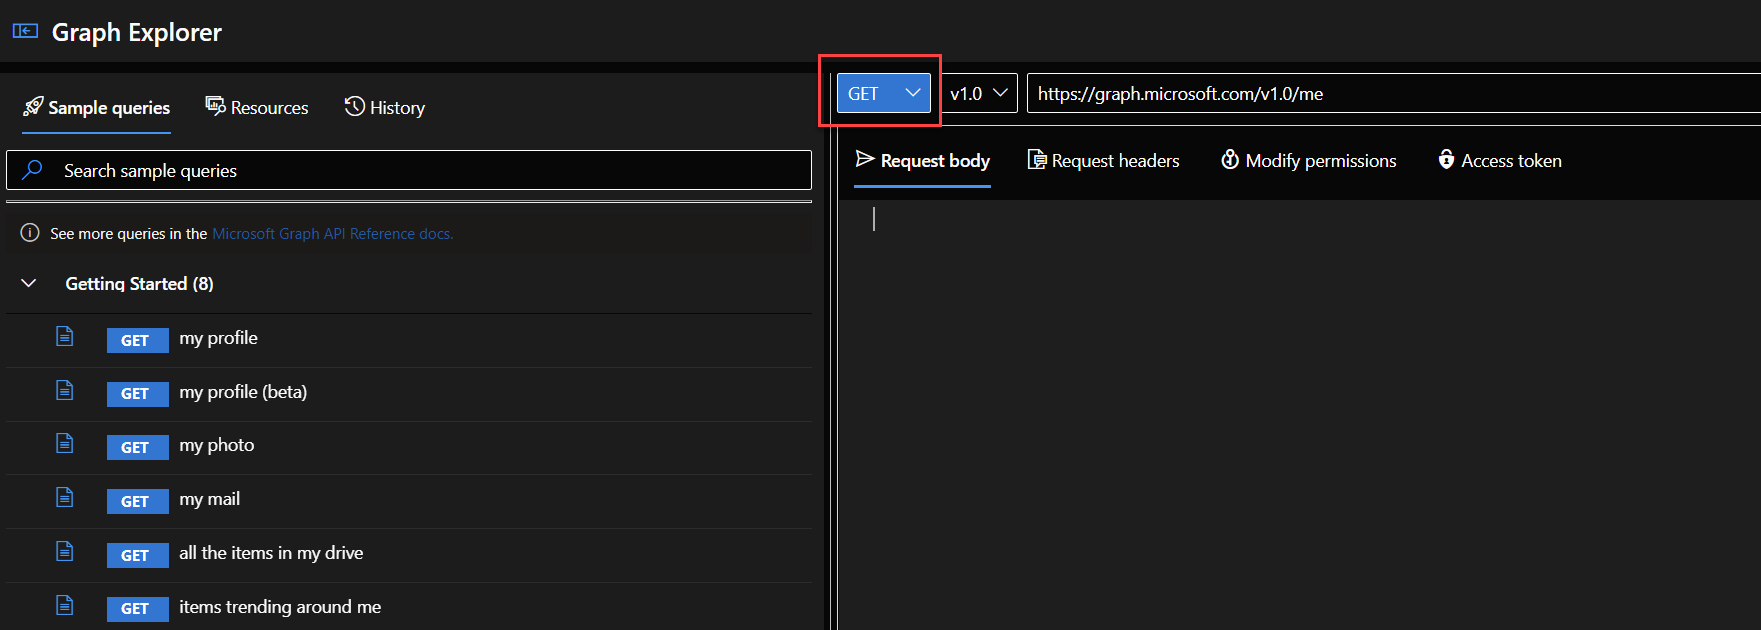
3. Then I used the following https://graph.microsoft.com/v1.0/users/user12@rebelsecurityadmin.com?$select=displayName,givenName,employeeHireDate to view displayName, givenName, employeeHireDate attributes values for user12@rebelsecurityadmin.com
As we can see the user12 has synched value for employeeHireDate
4. Also as expected the existing life cycle workflow was successfully triggered for user12.
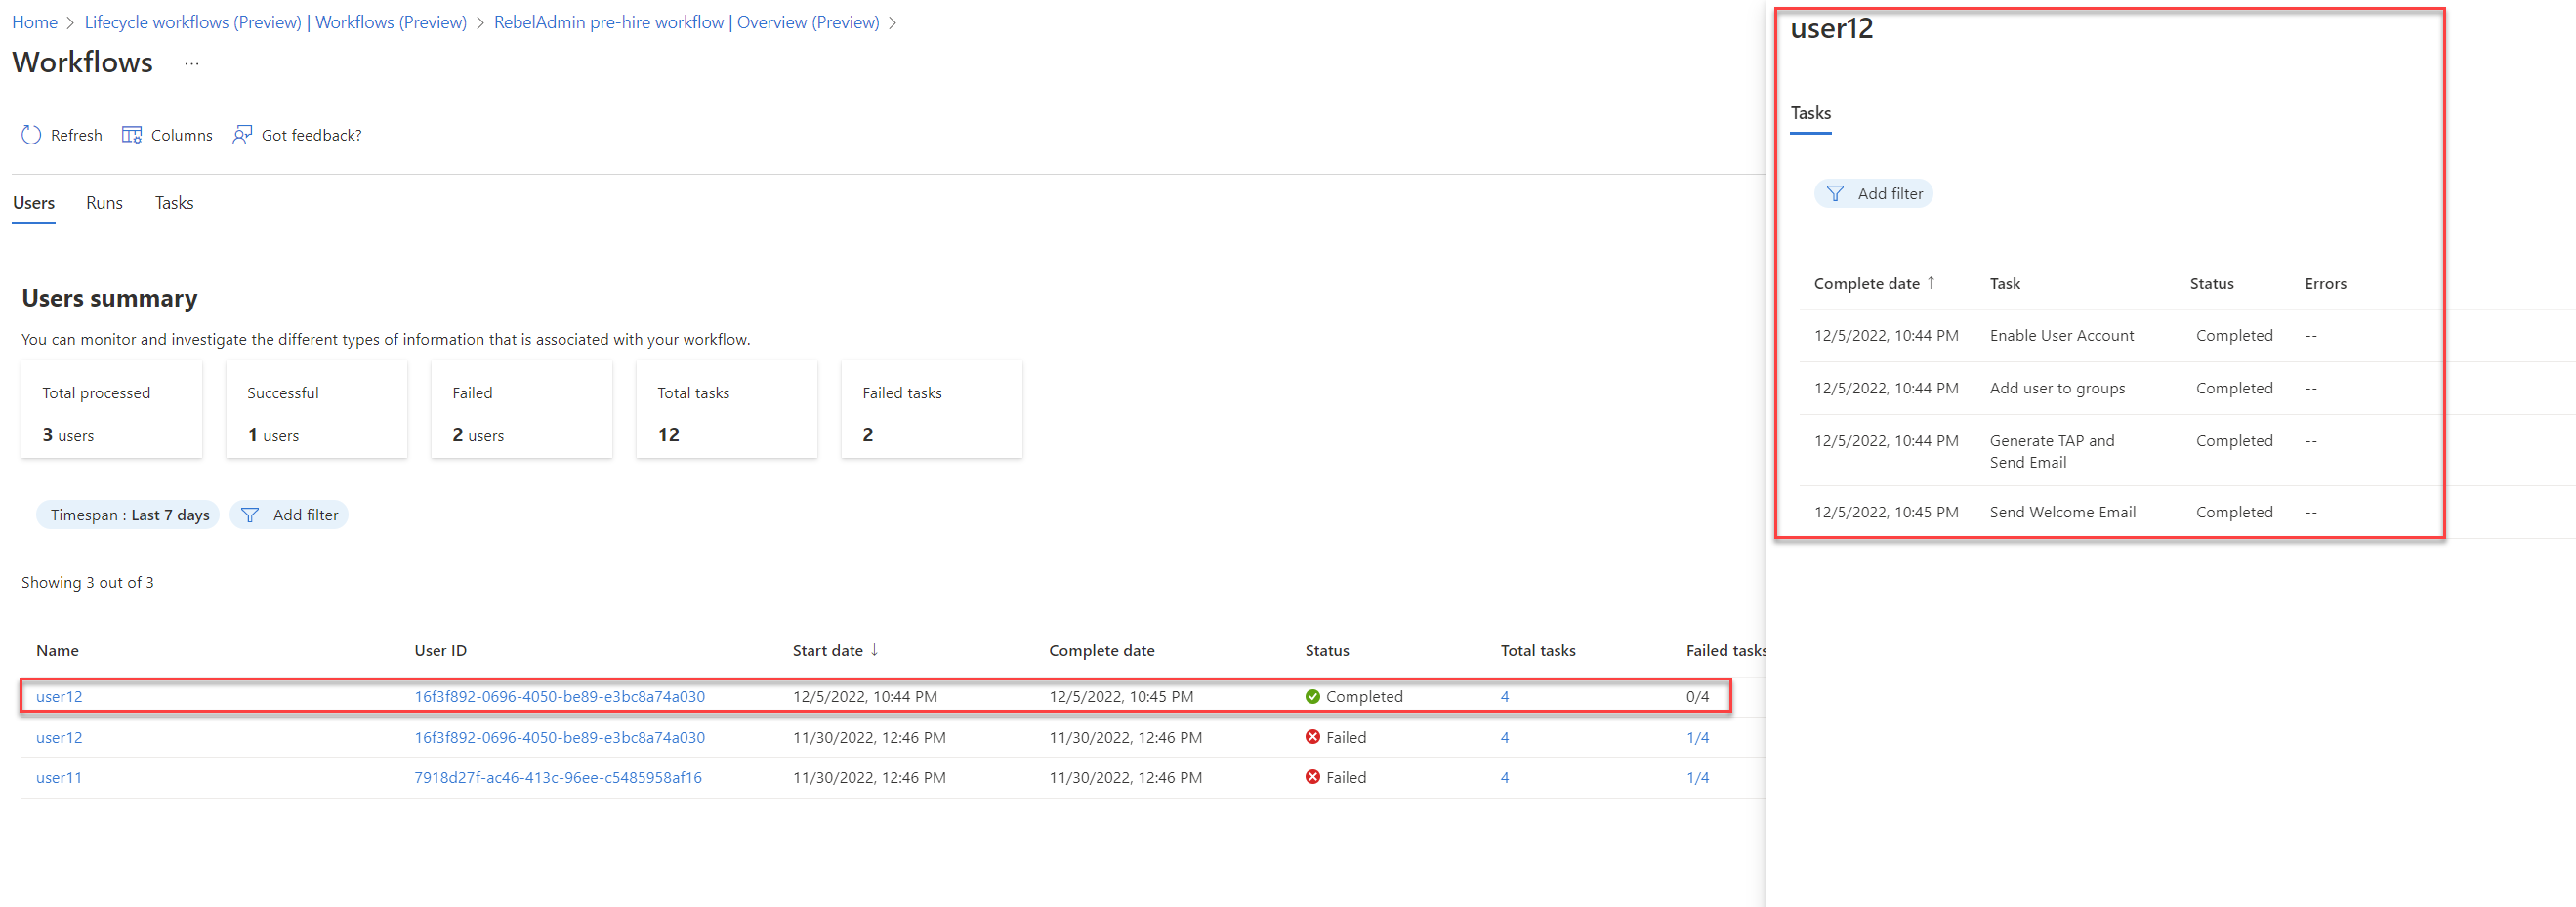
As we can see the values for employeeHireDate is successfully synced from on-premises Active Directory to Azure AD. This marks the end of this blog post, If you have any further questions, feel free to contact me at rebeladm@live.com.


Thank you immensely for this.