
Last Updated on April 22, 2018 by Dishan M. Francis
In my previous post Azure virtual machine scale sets – part 01, we learned what is VM scale set and how we can create a scale set in Azure. if you not read it yet please go through it before we start on this post as reset of the steps in this post depend on it https://www.rebeladmin.com/2018/04/azure-virtual-machine-scale-sets-part-01/
In this post we are going to deploy a sample application to scale set. In my previous post I have created a new scale set using,
New-AzureRmVmss `
-ResourceGroupName "rebelResourceGroup" `
-Location "canadacentral" `
-VMScaleSetName "rebelScaleSet" `
-VirtualNetworkName "rebelVnet" `
-SubnetName "rebelSubnet" `
-PublicIpAddressName "rebelPublicIPAddress" `
-LoadBalancerName "rebelLoadBalancer" `
-BackendPort "80" `
-VmSize "Standard_DS3_v2" `
-ImageName "Win2012Datacenter" `
-InstanceCount "4" `
-UpgradePolicy "Automatic"
In above it created an Azure Load balancer and TCP port 80 been load balanced among 4 instances. Under Azure Load Balancer | Inbound NAT rules it does have default rules for port 3389 and 5985. Those ports are mapped to custom TCP ports in order to give external access.
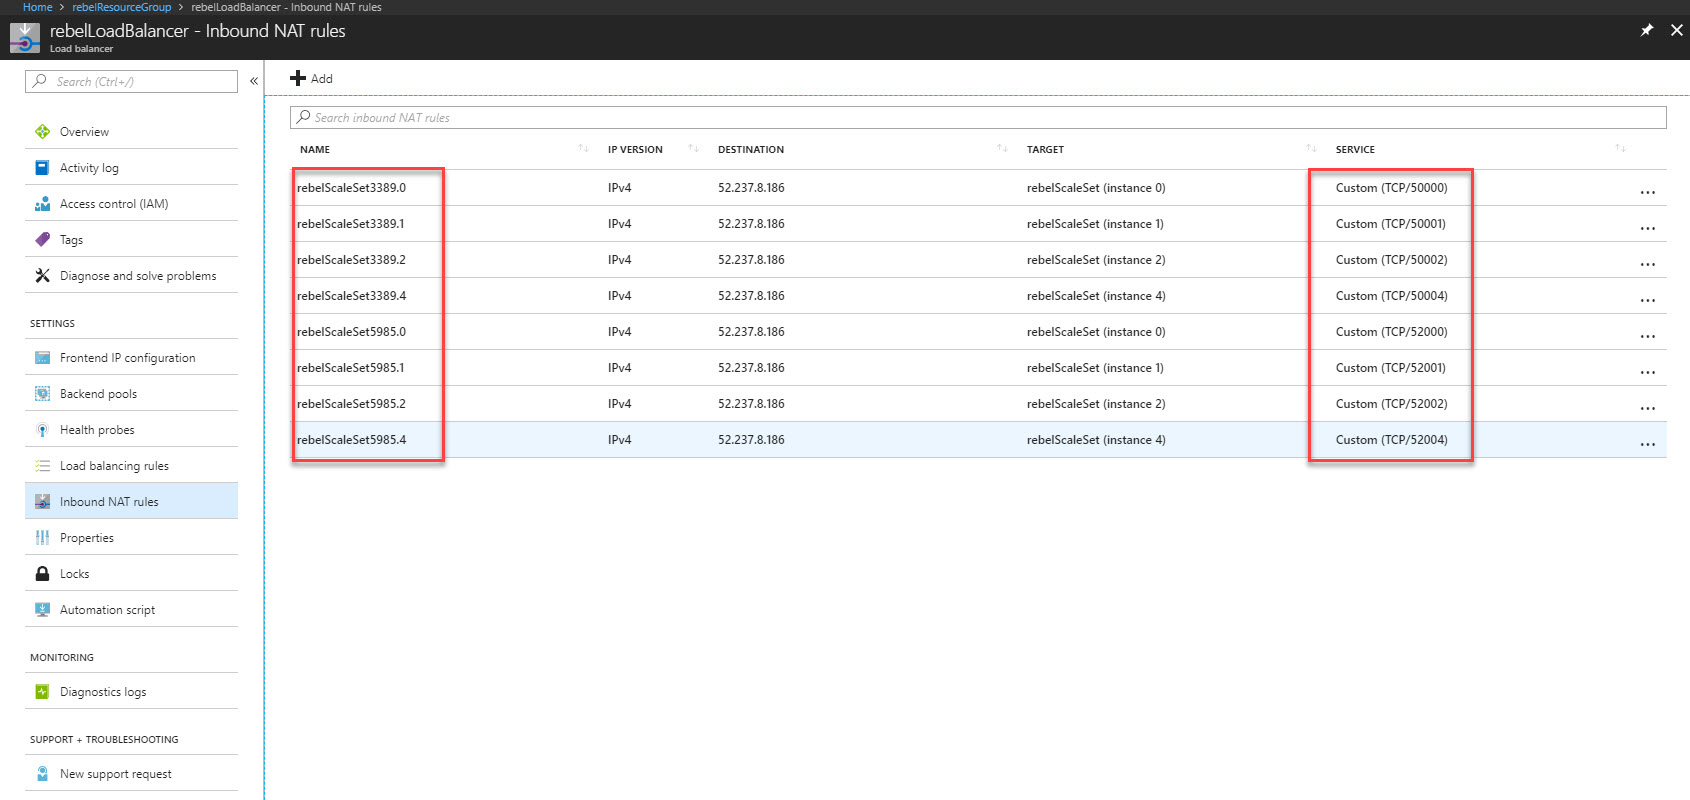
As an example, in above sample, I can RDP to instance0 using 52.237.8.186:50000. Likewise, we can connect to each instance and install apps if need. instead of that we can use centralized remote deployment, so the configuration is same across the instance.
In my config I didn’t use static ip address. You can find public ip address by running following azure PowerShell command,
Get-AzureRmPublicIpAddress -ResourceGroupName rebelResourceGroup | Select IpAddress

In order to push application, first need to prepare app config. in my demo I got a file in GitHub repository.
$customConfig = @{
"fileUris" = (,"https://raw.githubusercontent.com/rebeladm/rebeladm/master/simplewebapp.ps1");
"commandToExecute" = "powershell -ExecutionPolicy Unrestricted -File simplewebapp.ps1"
}
My config is very simple one. In PowerShell script I have following,
Add-WindowsFeature Web-Server
Set-Content -Path "C:\inetpub\wwwroot\Default.htm" -Value "Test webapp running on host $($env:computername) !"
It will install IIS and then create HTML file which will print text with the instance name.

As next step lets go and retrieve info about scale set,
$vmss = Get-AzureRmVmss `
-ResourceGroupName "rebelResourceGroup" `
-VMScaleSetName "rebelScaleSet"

After that, lets create custom script extension
$vmss = Add-AzureRmVmssExtension `
-VirtualMachineScaleSet $scaleconfig `
-Name "customScript" `
-Publisher "Microsoft.Compute" `
-Type "CustomScriptExtension" `
-TypeHandlerVersion 1.8 `
-Setting $customConfig
In above,
–Publisher specifies the name of the extension publisher. This can find using Get-AzureRmVMImagePublisher
–Type specify the extension type. we can use Get-AzureRmVMExtensionImageType find the extension type.
–TypeHandlerVersion specify the extension version. It can view using Get-AzureRmVMExtensionImage.

Next step of the configuration is to update scale set with the custom extension,
Update-AzureRmVmss `
-ResourceGroupName "rebelResourceGroup" `
-Name "rebelScaleSet" `
-VirtualMachineScaleSet $vmss

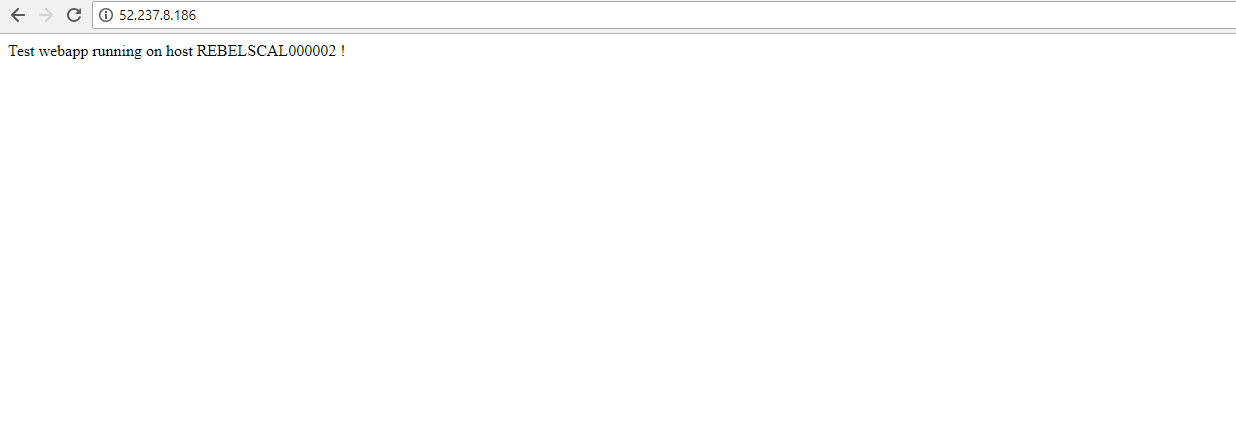
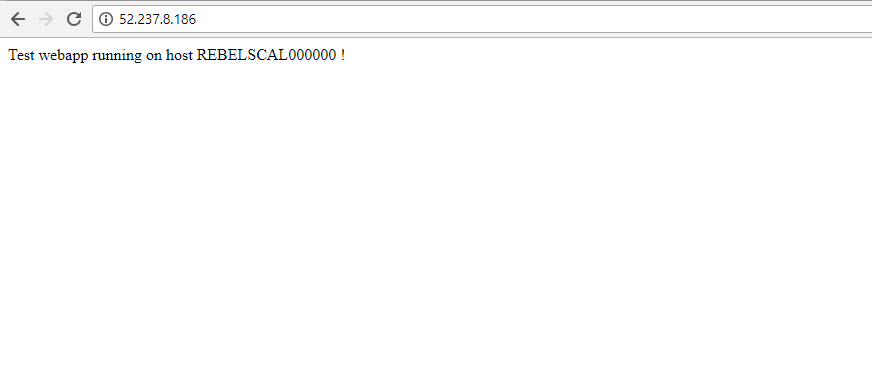
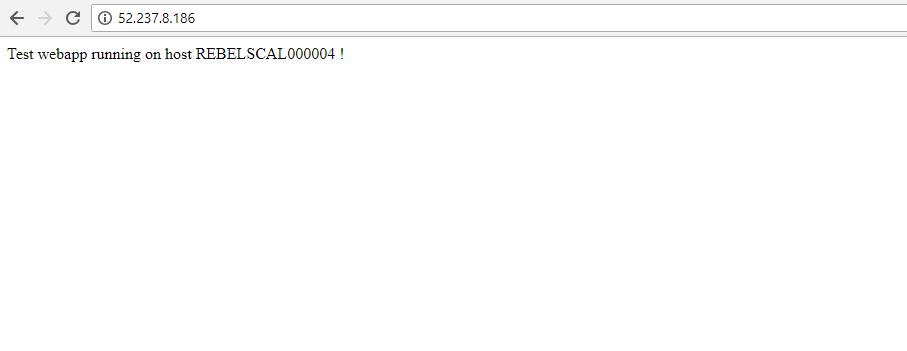
Now it is time to do testing. Let’s go to public IP address and see if it’s got the app we submit.
As I refresh we can see the instance number get updated. That means script is successfully running on scale set as expected.
This marks the end of this blog post. If you have any questions feel free to contact me on rebeladm@live.com also follow me on twitter @rebeladm to get updates about new blog posts.