

In an Active Directory Environment, we keep additional domain controllers to improve resiliency. In this way, if one domain controller fails it will not make a big impact. We can further improve the resiliency of infrastructure by keeping an additional domain controller and mission-critical servers in a different location. So, in the event of a site failure, we will still have a domain controller and mission-critical servers running on a remote location. When we create the Azure Active Directory Domain Services managed domain, we provide a unique domain name. In the back end, Azure will deploy two domain controllers with this unique domain in your selected Azure region. This setup is called a “replica set“. Now, to improve resiliency, we can create additional replica sets in other Azure regions.
Each replica set uses a virtual network. All these virtual networks must be peered to create a mesh network to support the replication between replica sets.
Azure Active Directory Domain Services replica sets have the following characteristics.
• This feature is still in the preview stage.
• Each replica set contains the same data. You can’t use different domains for different replica sets.
• All replica sets will be placed in the same Active Directory site. Because of that the replication between replica sets is faster.
• All replica sets should create under the same subscription. You cannot have replica sets between different subscriptions.
• In the preview, you can have up to four replica sets.
• Replica sets only ensure the availability of the authentication services. But to use the full benefits of it, you need to consider how your Azure VMs, applications will work during a site failure.
In this demo, I am going to demonstrate how to create a replica set of existing Azure Active Directory Domain Services managed domain.
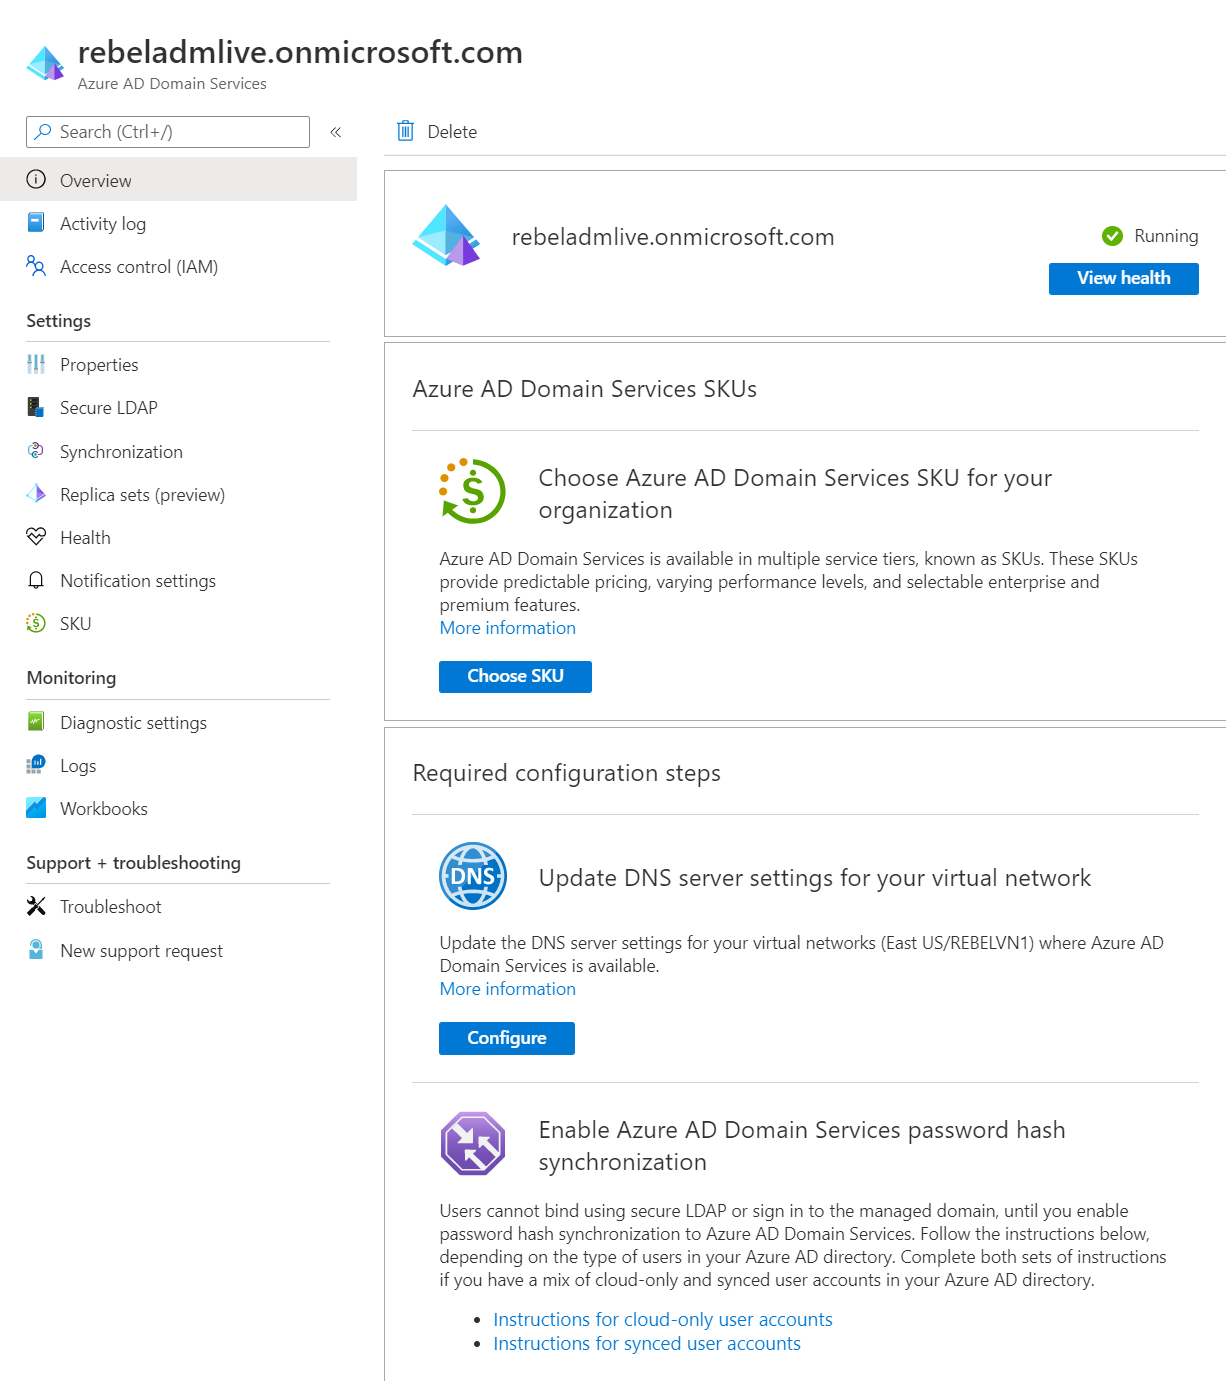
In my current setup, I already have Azure Active Directory Domain Services managed domain configured.
This is using REBELVN1 virtual network and aadds-subnet.
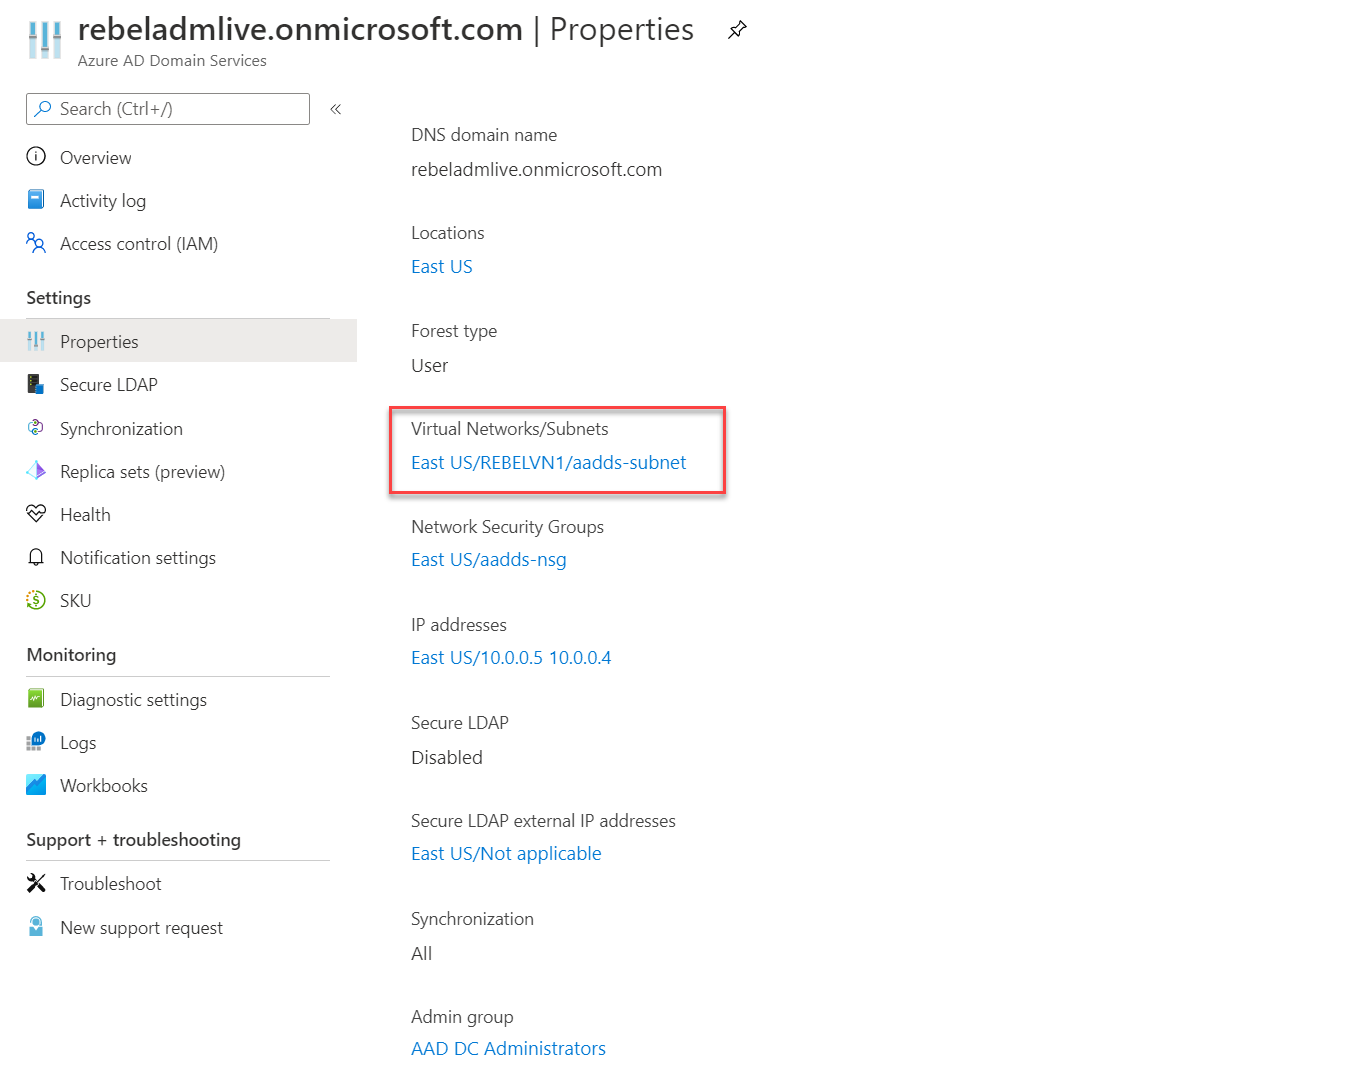
REBELVN1 virtual network is set up under REBELRG1 resource group. This resource group is using “East US” Azure region. The Virtual network is using 10.0.0.0/16 address space. It has two subnets.
vmsubnet – 10.0.2.0/24 for virtual machines
aadds-subnet – 10.0.0.0/24 for Azure Active Directory Domain Services managed domain

In this demo, I am going to create a new virtual network in “West US” Azure region. Later this will be used to host the additional replica test.
Setup New Resource Group for additional replica set
As the first part of the configuration, I am going to create a new resource group in “West US” Azure region.
For the configuration process, I will be using PowerShell. Therefore, please make sure you have an Azure PowerShell module installed. More info about it can find here.
1. Launch PowerShell console and connect to Azure using Connect-AzAccount
2. Create a new resource group using
New-AzResourceGroup -Name REBELDRRG1 -Location “West US”
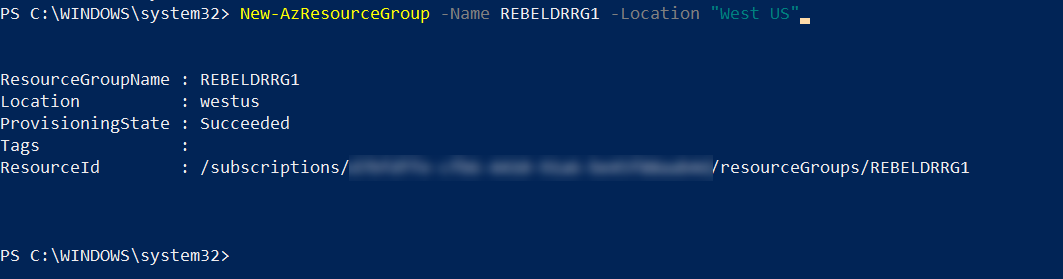
In the above, REBELDRRG1 is the resource group name and it is created in Azure West US region.
Setup New Virtual Network for additional replica set
The next step is to create a new virtual network under REBELDRRG1 resource group.
$drvmsubnet = New-AzVirtualNetworkSubnetConfig -Name drvmsubnet -AddressPrefix “10.1.3.0/24”
New-AzVirtualNetwork -Name REBELDRVN1 -ResourceGroupName REBELDRRG1 -Location “West US” -AddressPrefix “10.1.0.0/16” -Subnet $drvmsubnet
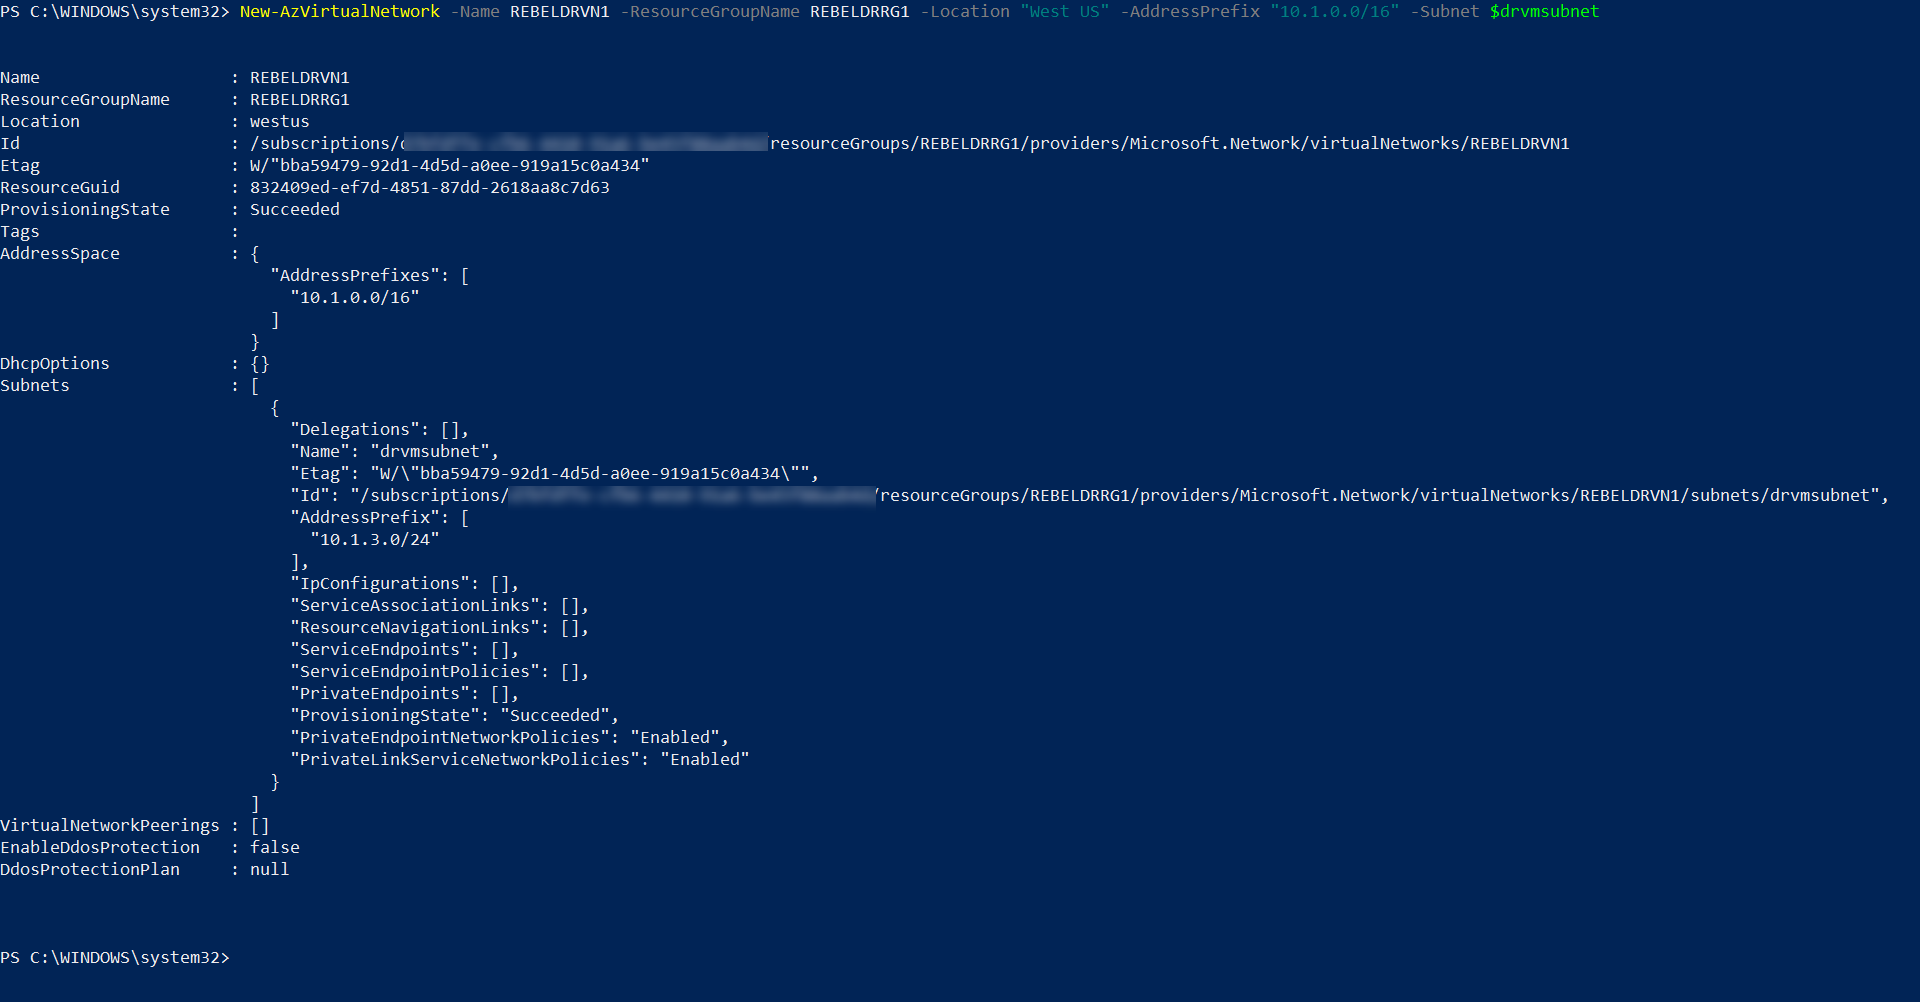
In the above, REBELDRVN1 is the new virtual network name. It has 10.1.0.0/16 address space. It also has a new subnet 10.1.3.0/24 (drvmsubnet) for virtual machines.
Setup Global VNET peering between two virtual networks
replica sets only can be created between peered networks. So, I am going to create Global VNET peering between two virtual networks.
First, I am going to create peering from REBELVN1 to REBELDRVN1
$vnet1 = Get-AzVirtualNetwork -Name REBELVN1 -ResourceGroupName REBELRG1
$vnet2 = Get-AzVirtualNetwork -Name REBELDRVN1 -ResourceGroupName REBELDRRG1
Add-AzVirtualNetworkPeering -Name REBELVN1toEBELDRVN1 -VirtualNetwork $vnet1 -RemoteVirtualNetworkId $vnet2.Id
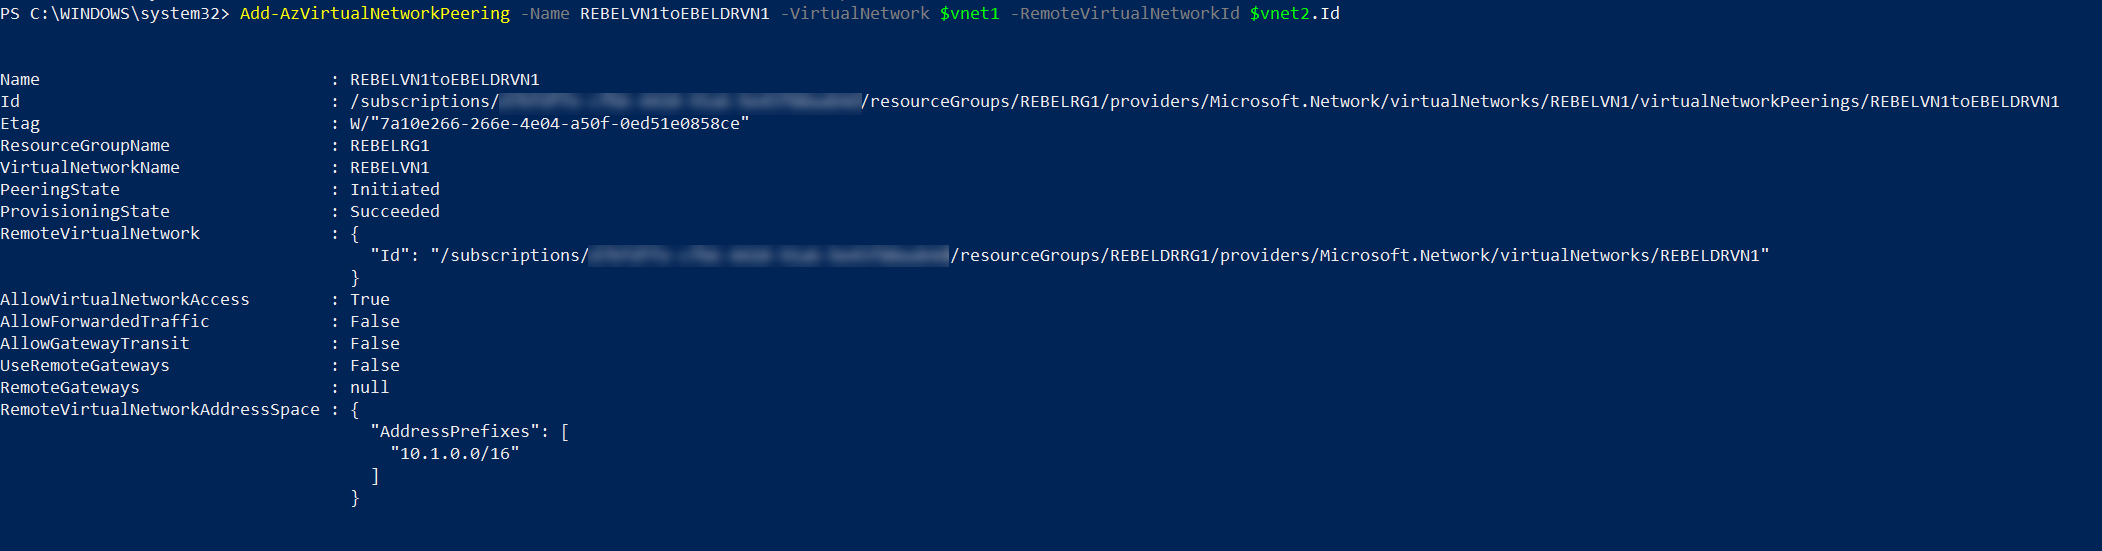
Above creates peering from REBELVN1 to REBELDRVN1. we need to do the same from REBELDRVN1 to REBELVN1
$vnet1 = Get-AzVirtualNetwork -Name REBELVN1 -ResourceGroupName REBELRG1
$vnet2 = Get-AzVirtualNetwork -Name REBELDRVN1 -ResourceGroupName REBELDRRG1
Add-AzVirtualNetworkPeering -Name REBELDRVN1toREBELVN1 -VirtualNetwork $vnet2 -RemoteVirtualNetworkId $vnet1.Id

This completes the peering configuration. You can learn more about Global VNET peering using one of my previous blog posts – Step-by-Step Guide: How to setup Azure Global VNET Peering? (PowerShell Guide)
Create Azure Active Directory Domain Services managed domain replica set
Now we are ready to create the new replica set. To do that,
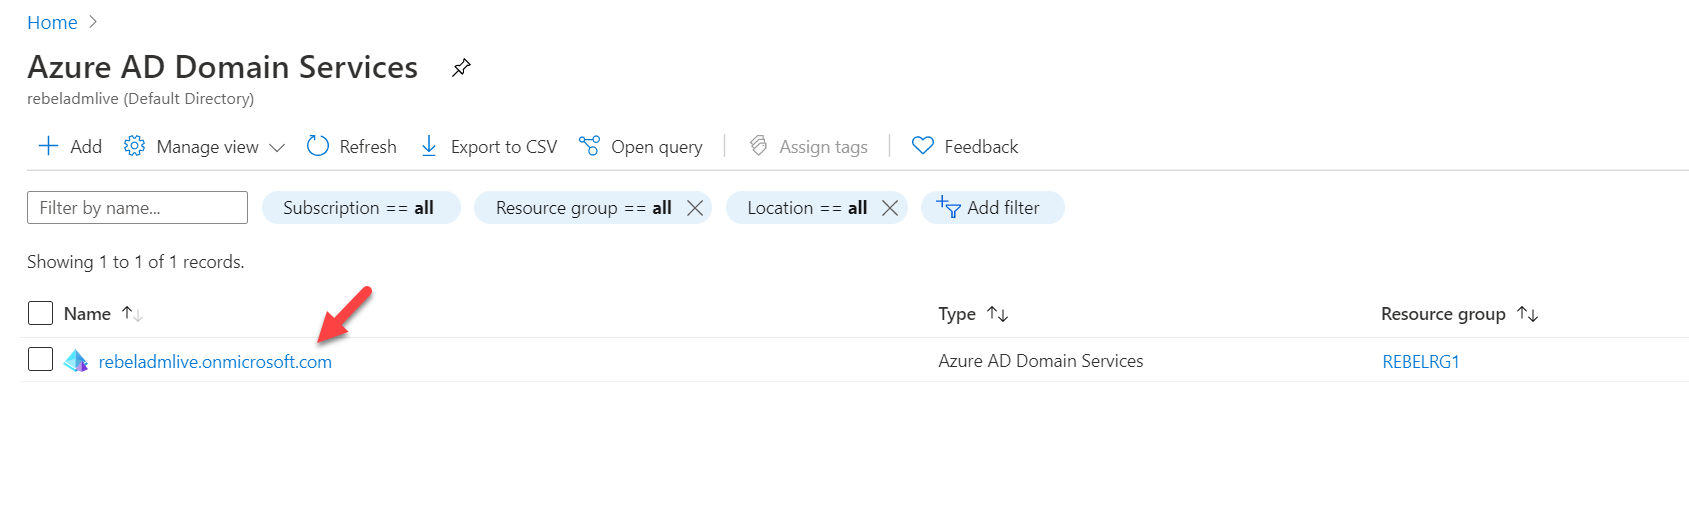
1. Log in to Azure Portal as Global Administrator
2. Then search for Azure Active Directory Domain Services and click on it.
3. In the Azure Active Directory Domain Services page, click on the domain.
4. In properties page click on Replica sets (preview)
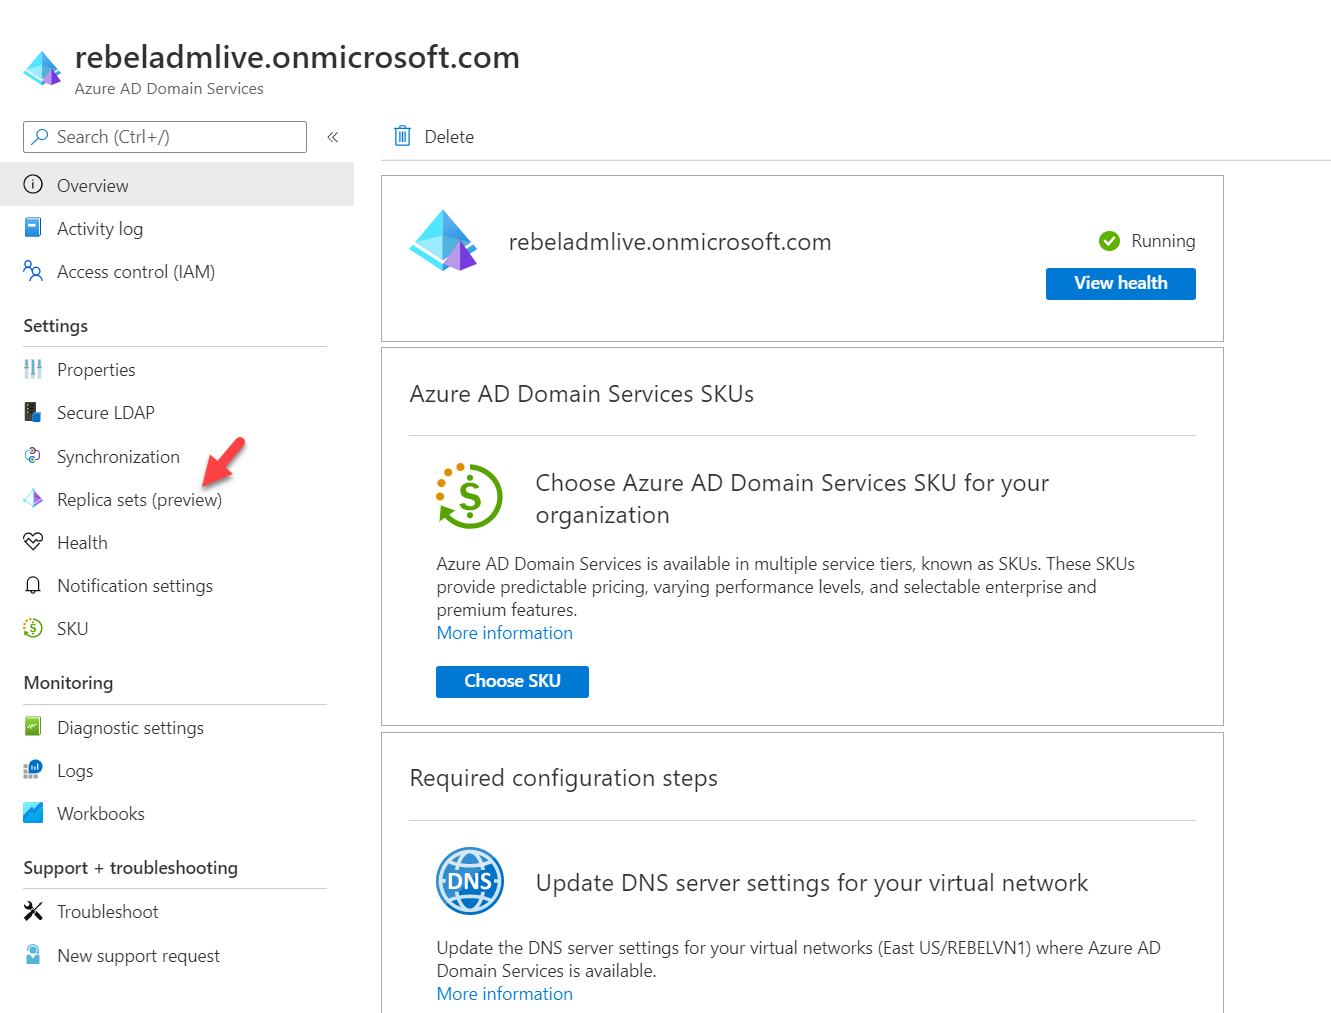
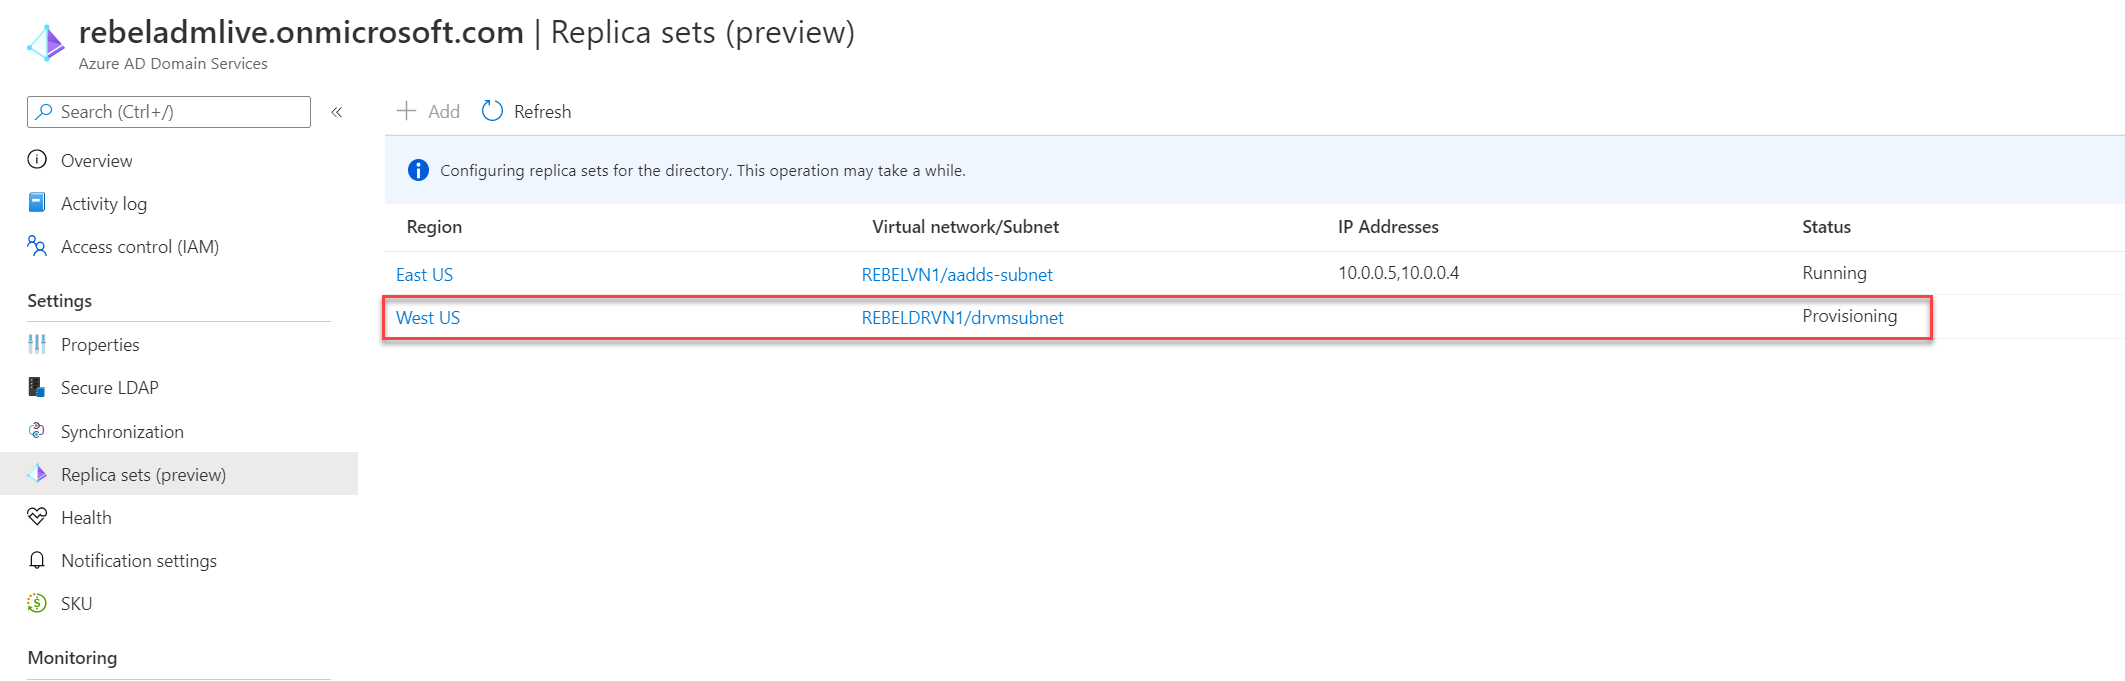
5. There we can see the existing replica set. To add new click on + Add

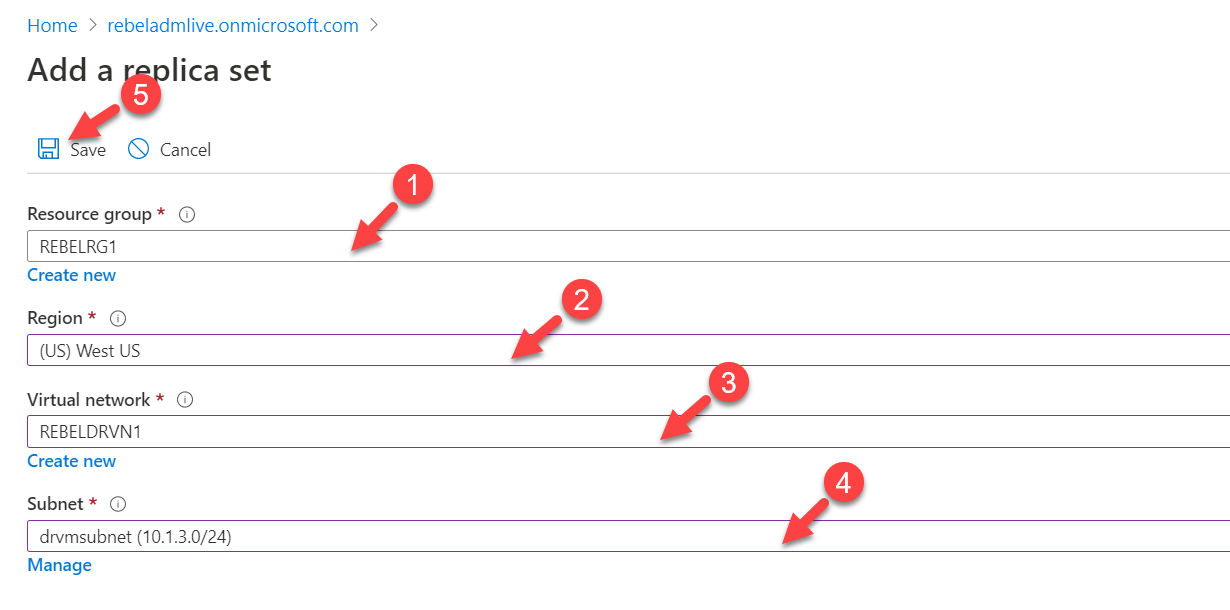
6. In the configuration page, select the REBELDRRG1 as a Resource group. The Region should be set to “West US“. For virtual network select REBELDRVN1. For subnet select the subnet we created in one of the previous steps. You also can add new subnet. At the end click on Save to complete the configuration.
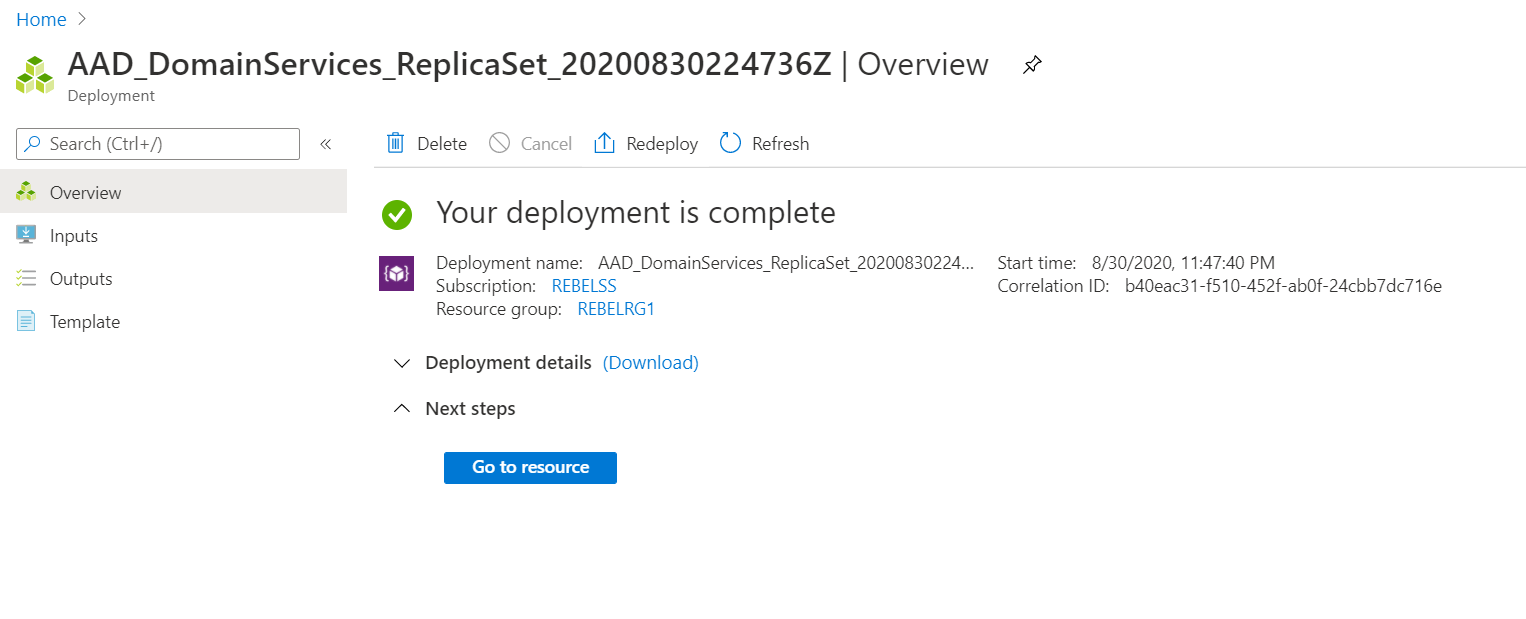
7. Then you can see Azure start provisioning relevant services. This will take some time to complete.
8. Make sure the deployment completes without errors.
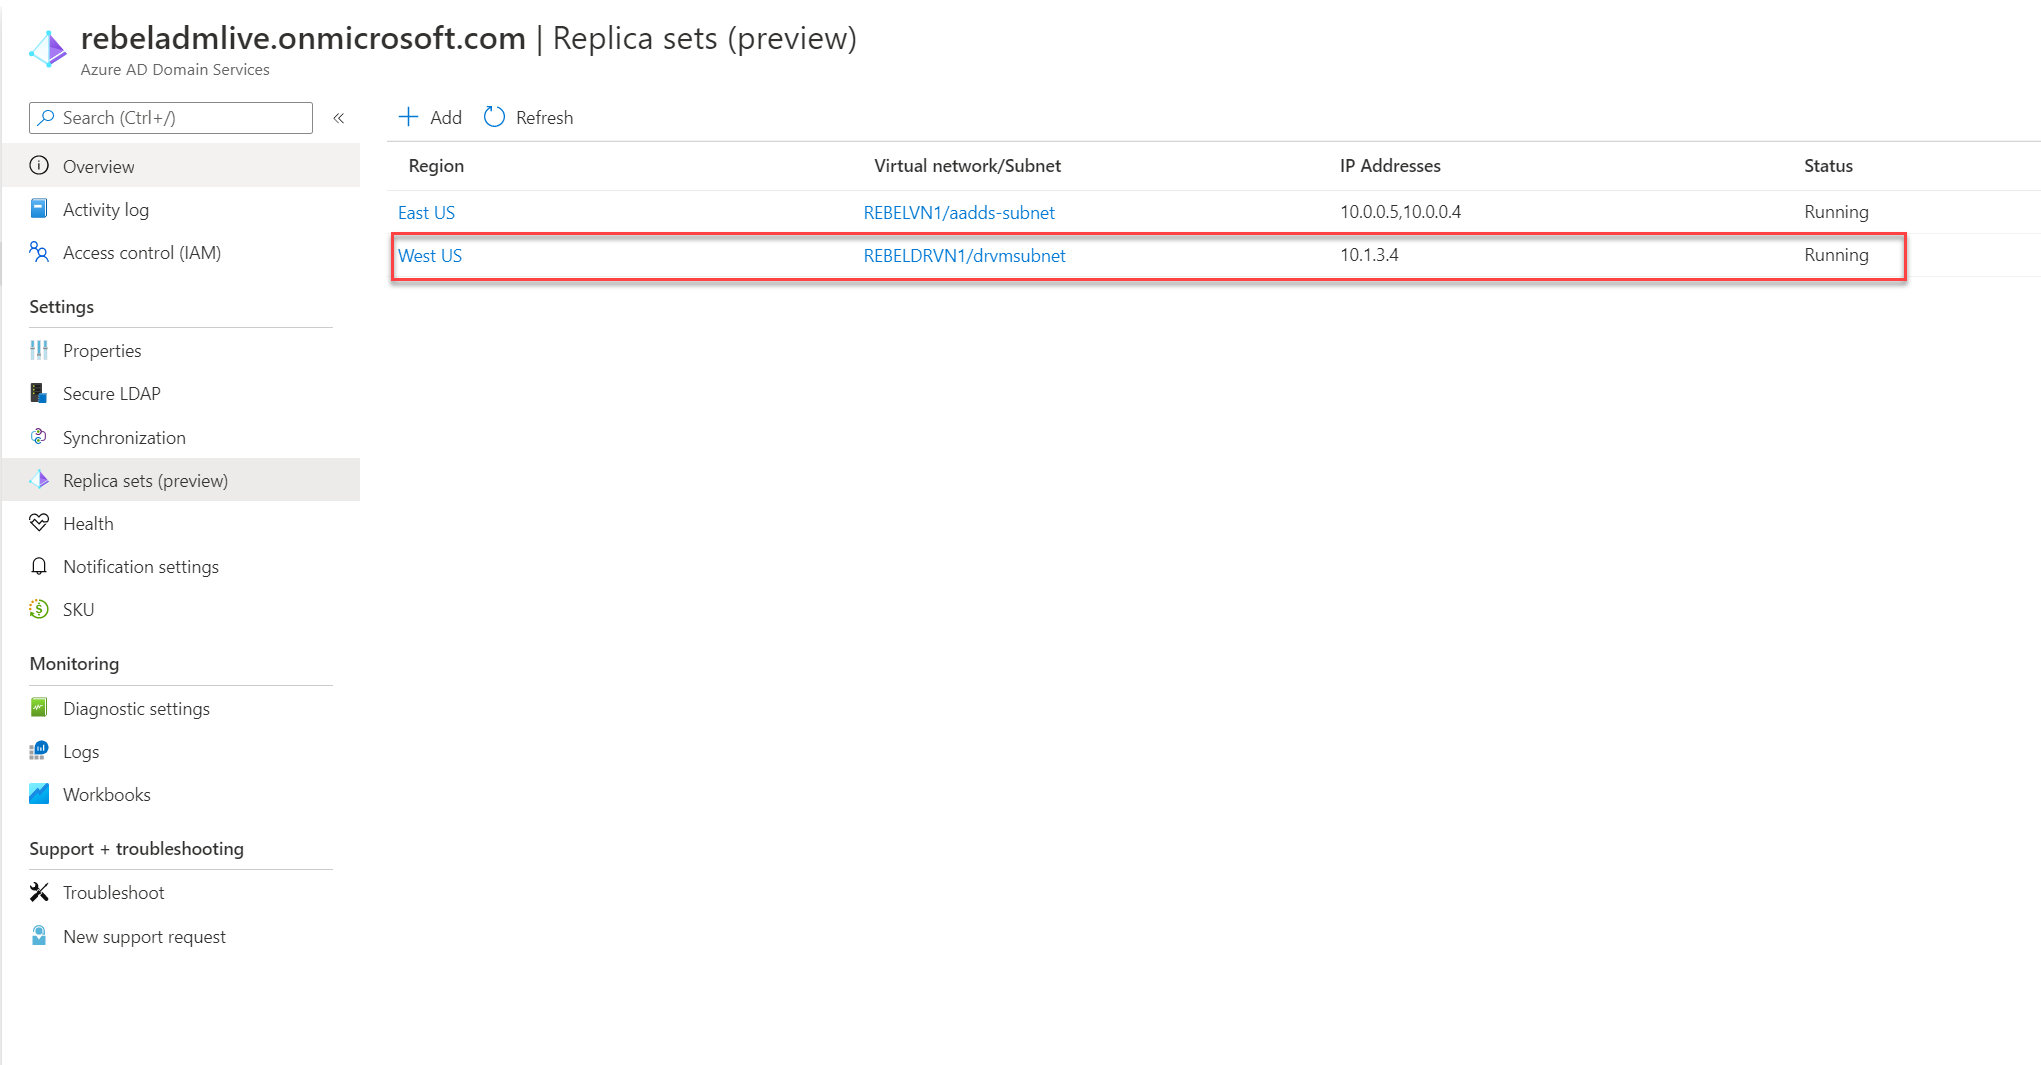
In the end, we have a new replica set running on West Us region.
This marks the end of this blog post. Hope now you have a better understanding of creating a replica set to improve the resiliency of Azure Active Directory Domain Services managed domain. If you have any further questions about this feel free to contact me on rebeladm@live.com also follow me on twitter @rebeladm to get updates about new blog posts.